🧶 Beautiful ✨ Detailed 💝 Adorable

Baby Cow and Bull Amigurumi Pattern

Baby Cow and Bull Amigurumi Pattern
4.8★Rating
5-7 HoursTime Needed
1.3KMade This
✂️

Intermediate Level

Ideal for those with basic crocheting experience, featuring slightly more advanced stitches and techniques to expand your skills.

⏱️

Weekend Treat

Takes 5-7 hours, making it an enjoyable project to finish over a couple of days.

🐰

Whimsical Buddy

Playful characters full of personality, designed to spark imagination and become cherished playtime favorites.

About This Baby Cow and Bull Amigurumi Pattern

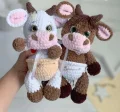
Baby Cow and Bull Amigurumi Pattern crochet pattern - detailed view

These plushies are the perfect size for toddlers to carry around or for adding a touch of handmade charm to a nursery shelf. They make a wonderful baby shower gift that parents will actually want to keep forever.

Why You'll Love This Baby Cow and Bull Amigurumi Pattern

I honestly think the best part of this project is the construction style—joining the legs and arms as you go means way less sewing at the end! Plus, getting to 'play hairdresser' when you trim the bangs and tail fringe is such a satisfying way to finish off your new friends.

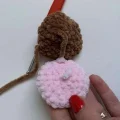
Baby Cow and Bull Amigurumi Pattern step 1 Baby Cow and Bull Amigurumi Pattern step 2 Baby Cow and Bull Amigurumi Pattern step 3 Baby Cow and Bull Amigurumi Pattern step 4

Switch Things Up

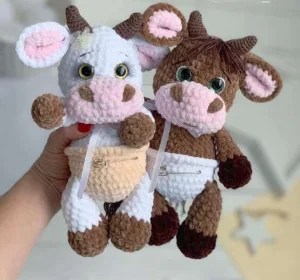
I have to tell you, the moment I finished the first baby bull, I couldn't stop laughing at his little nappy. It is just such a cute, unexpected detail! When I was making these, I found that the 'hairdresser' phase was my absolute favorite part. Trimming the bangs and the tail tuft really lets you customize their 'vibe'—you can give them a neat trim or leave them looking a bit wild and shaggy.

One thing I experimented with was using different colors for the nappies. While the pattern suggests white and peach, imagine a little bull in a soft blue nappy or a cow in a mint green one! It's a great way to use up those random scraps of plush yarn you have sitting in your stash. Also, if you’re making these for very small children, you might want to skip the eyelashes and just embroider some sleepy eyes instead for extra safety. These two are such a joy to work up because they grow so fast with the chunky yarn. I can't wait to see how yours turn out—maybe you'll even make a whole herd of them!

Common Mistakes & How to Fix Them

✗ If you don't pull the yarn firmly enough during the needle sculpting phase, the eyes won't sink in properly, leaving the face looking flat rather than expressive.✗ When working the BLO round for the nappy, keep your tension even; if it is too tight, the body will cinch in unnaturally and the nappy edge won't sit flush.✗ Be careful with the eyelash glue—applying it directly to the eye can cause a mess, so always use a toothpick to place the glue on the lash strip first.✗ If you skip the extra stuffing in the neck area while sewing the head on, your cow might end up with a 'floppy head' that doesn't stay upright during play.

Baby Cow and Bull Amigurumi Pattern

There is something so special about handmade toys that feel like they have a little soul of their own. This pattern lets you create a matched set of bovine buddies—a sweet baby cow and a dapper baby bull—each with their own tiny nappies and plenty of personality. You will love working with plush yarn for that ultra-soft finish, making these the ultimate snuggle companions for the little ones in your life.

Intermediate 5-7 Hours

Materials Needed for Baby Cow and Bull Amigurumi Pattern

— Main Fabric

  • 01
    One skein of medium brown plush yarn for the bull's body and the cow's accents
  • 02
    One skein of white plush yarn for the cow's body and the bull's nappy
  • 03
    Small amount of light pink plush yarn for the inner ears and muzzles
  • 04
    Small amount of peach plush yarn for the cow's nappy
  • 05
    Small amount of dark brown plush yarn for the bull's hooves
  • 06
    Scrap amount of brown cotton yarn for the horns and hair details

— Tools Required

  • 01
    4mm crochet hook for the main body and limbs
  • 02
    2.25mm crochet hook specifically for the horns
  • 03
    16mm safety eyes for a bright, cute expression
  • 04
    Set of false eyelashes (human style) for the baby cow
  • 05
    High-quality polyester fiberfill for stuffing
  • 06
    Long embroidery needle for facial sculpting and a large-eye needle for assembly
  • 07
    Stitch markers and sharp scissors

Progress Tracker

0% Complete

— 1. Baby Bull Arms :

Info :

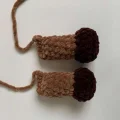
Start with dark brown yarn and your 4mm hook.

Round 1 :

Work 2 ch, then place 6 sc into the 2nd ch from your hook (6)

Round 2 :

Work 6 inc around the circle (12)

Round 3 :

Work 12 sc into the BLO only (12)

Round 4 :

Repeat (4 sc, 1 dec) twice (10)

Colour Change :

Switch to your main brown yarn.

Round 5-9 :

Work 10 sc in each round for 5 rounds (10)

Round 10 :

Repeat (3 sc, 1 dec) twice (8)

Info :

Stuff the arm lightly. Flatten the top and work 4 sc through both layers to close. Fasten off and leave a tail.

— 2. Baby Bull Legs :

Info :

Start with dark brown yarn and your 4mm hook.

Round 1 :

Work 2 ch, then place 6 sc into the 2nd ch from your hook (6)

Round 2 :

Work 6 inc around (12)

Round 3 :

Repeat (1 sc, 1 inc) 6 times (18)

Round 4 :

Work 18 sc into the BLO only (18)

Round 5 :

Work 18 sc around (18)

Round 6 :

Repeat (1 sc, 1 dec) 6 times (12)

Colour Change :

Switch to main brown yarn.

Round 7-11 :

Work 12 sc in each round for 5 rounds (12)

Round 12 :

Repeat (4 sc, 1 dec) twice (10)

Round 13 :

Work 10 sc around (10)

Info :

Stuff the leg. Flatten the top and work 5 sc through both sides to close. Fasten off.

— 3. Baby Bull Tail :

Round 1 :

Using main brown yarn, ch 2 and work 6 sc in the 2nd ch (6)

Round 2-7 :

Work 6 sc in each round for 6 rounds (6)

Info :

Do not stuff. Flatten and work 3 sc across the top. Leave a long tail for sewing later.

— 4. Baby Bull Body :

Info :

Start with white yarn for the nappy.

Round 1 :

ch 2, 6 sc in 2nd ch (6)

Round 2 :

6 inc (12)

Round 3 :

Repeat (1 sc, 1 inc) 6 times (18)

Round 4 :

Repeat (2 sc, 1 inc) 6 times (24)

Round 5 :

Repeat (3 sc, 1 inc) 6 times (30)

Round 6 :

Repeat (4 sc, 1 inc) 6 times (36)

Round 7 :

Attach legs: 5 sc through body and 1st leg, 12 sc, 5 sc through body and 2nd leg, 14 sc (36)

Round 8 :

Attach tail: 27 sc, 3 sc through body and tail, 6 sc (36)

Round 9-10 :

Work 36 sc in each round (36)

Round 11 :

Switch to main brown: 36 sc in BLO (36)

Nappy Edge :

Go back to the FLO of Round 11 with white yarn and work 36 sc to create the nappy border.

Round 12 :

Work 6 sc, 6 dec, 18 sc (30)

Round 13 :

Repeat (3 sc, 1 dec) 6 times (24)

Round 14-15 :

Work 24 sc in each round (24)

Round 16 :

Attach arms: 1 sc, 4 sc through body and 1st arm, 7 sc, 4 sc through body and 2nd arm, 8 sc (24)

Round 17 :

Repeat (2 sc, 1 dec) 6 times (18)

Round 18 :

Repeat (4 sc, 1 dec) 3 times (15)

Info :

Fasten off and stuff the body firmly.

— 5. Baby Bull Head :

Round 1 :

Using main brown, ch 2 and work 6 sc in 2nd ch (6)

Round 2 :

6 inc (12)

Round 3 :

Repeat (1 sc, 1 inc) 6 times (18)

Round 4 :

Repeat (2 sc, 1 inc) 6 times (24)

Round 5 :

Repeat (3 sc, 1 inc) 6 times (30)

Round 6-8 :

Work 30 sc in each round (30)

Round 9 :

Repeat (4 sc, 1 inc) 6 times (36)

Round 10 :

Repeat (5 sc, 1 inc) 6 times (42)

Round 11-12 :

Work 42 sc in each round (42)

Round 13 :

Repeat (5 sc, 1 dec) 6 times (36)

Round 14 :

Repeat (4 sc, 1 dec) 6 times (30)

Round 15 :

Repeat (1 sc, 1 dec) 10 times (20)

Round 16 :

Repeat (3 sc, 1 dec) 6 times (16)

Info :

Install safety eyes at Round 8, spaced 5 st apart. Stuff the head firmly.

— 6. Shared Muzzle :

Round 1 :

Using pink yarn, ch 8. Starting in 2nd ch: 1 sc in next 6 ch, 3 sc in last ch. Turn to other side: 5 sc, 1 inc (16)

Round 2 :

1 inc, 5 sc, 3 inc, 5 sc, 2 inc (22)

Round 3 :

1 sc, 1 inc, 5 sc, repeat (1 sc, 1 inc) 3 times, 5 sc, repeat (1 sc, 1 inc) 2 times (28)

Round 4-5 :

Work 28 sc in each round (28)

Round 6 :

1 sc, 1 dec, 5 sc, repeat (1 sc, 1 dec) 3 times, 5 sc, repeat (1 sc, 1 dec) 2 times (22)

Info :

Fasten off and leave a long tail for sewing.

— 7. Shared Ears :

Pink Layer :

Work R1-4 exactly like the first 4 rounds of the head using pink yarn. Fasten off (24)

Outer Layer :

Work R1-4 exactly like the first 4 rounds of the head using white (cow) or brown (bull) yarn. Do not fasten off (24)

Round 5 :

Place pink and outer pieces wrong sides together. Work 24 sc through both layers to join (24)

Info :

Fold the ear in half and work 4 sc through both sides at the base to create a scooped shape.

— 8. Shared Horns :

Info :

Use brown cotton yarn and 2.25mm hook.

Round 1 :

ch 2, 6 sc in 2nd ch (6)

Round 2 :

Repeat (1 sc, 1 inc) 3 times (9)

Round 3-4 :

Work 9 sc in each round (9)

Round 5 :

Repeat (2 sc, 1 inc) 3 times (12)

Round 6 :

Repeat (3 sc, 1 inc) 3 times (15)

Round 7 :

1 inc, 5 sc, 2 dec, 4 sc, 1 inc (15)

Round 8 :

Work 15 sc around (15)

Round 9 :

1 inc, 5 sc, 2 dec, 4 sc, 1 inc (15)

Round 10 :

Work 15 sc around (15)

Info :

Stuff lightly and leave a tail for sewing.

— 9. Baby Cow - Specific Variations :

Arms :

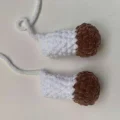
Follow Bull Arm steps, but use brown for R1-4 and white for R5-10.

Legs :

Follow Bull Leg steps, but use brown for R1-6 and white for R7-13.

Tail :

Follow Bull Tail steps using white yarn.

Body :

Follow Bull Body steps, but use peach for the nappy (R1-10) and white for the main body (R11-18).

Head :

Follow Bull Head steps using white yarn.

Assembly Instructions

  • Secure the head to the body, ensuring you add extra stuffing to the neck as you close the seam to prevent wobbling.
  • Perform needle sculpting by threading a needle from the center neck to the inner eye corners, pulling gently to create eye sockets.
  • Sew the muzzle to the lower face, adding a small amount of stuffing inside before closing to give it a rounded look.
  • Attach the ears between Rounds 5 and 6 of the head, positioning them symmetrically on the sides.
  • Stitch the horns to the top of the head, slightly behind the ears, ensuring they curve appropriately.
  • Embroider the nostrils and a small smile onto the muzzle using brown yarn for a friendly expression.
  • Add the finishing touches: attach the tail fringe, create the bangs (hair) on the forehead, and glue eyelashes to the baby cow.

Important Notes

  • 💡When working with plush yarn, it can be hard to see stitches, so always use a stitch marker to track the start of your rounds.
  • 💡The horns use a smaller hook and cotton yarn to ensure they are stiff enough to hold their shape without drooping.
  • 💡For the hair and tail fringe, cut several 10cm lengths of cotton yarn and loop them through the stitches like you would for a rug.
  • 💡If the safety eye backs feel loose on the plush fabric, you can add a small circle of felt behind the fabric before snapping the back on.
  • 💡Always leave longer yarn tails than you think you need for sewing pieces together; it is much easier to trim excess than to join more yarn.

I really hope you enjoy making these little ones as much as I did! There is something so rewarding about seeing their little faces come together, especially after that final haircut. Whether they are destined for a gift box or your own collection, they are sure to bring a smile to anyone who sees them. Don't forget to share your finished photos—I love seeing the different colors you choose for their nappies! Happy crocheting, and enjoy every stitch of your new farmyard friends! 🧶 ✨
You ask,

we answer.

FAQs

Can I use standard acrylic yarn instead of plush yarn?

You can, but the finished toy will be significantly smaller (about half the size) and won't have that signature 'squishy' feel. If you switch, make sure to use a much smaller hook, like a 2.5mm or 3mm.

How do I make the bangs look neat?

After looping the cotton yarn through the forehead stitches, use sharp scissors to trim the fringe at an angle. Think of it like giving a real haircut—take off a little at a time until it looks just right.

Is the needle sculpting step mandatory?

It is not mandatory, but it's highly recommended! Without it, the eyes sit on the surface of the plush. The sculpting 'sinks' them in, which creates a much more professional and soulful look.

What kind of glue is best for the eyelashes?

A clear-drying fabric glue or a 'tacky' glue works best. Avoid super glue, as it can make the plush yarn crunchy and is impossible to fix if you make a mistake.