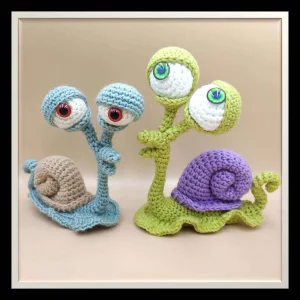
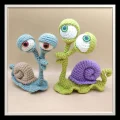
Get ready to create a garden friend with a massive personality! This quirky snail isn't your average slow-mover; with his wide, expressive eyes and poseable stalks, he looks like he just crawled right out of a classic animated film. You will love the process of building the internal wire frame, which gives this little guy so much character and life. It is a fantastic project for anyone looking to move beyond basic shapes and explore sculptural amigurumi techniques.
Progress Tracker
0% Complete
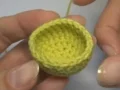
— 1. Shell :
Info :
Work this entire section in a continuous spiral using purple yarn.
Round 1 :
6 sc into a MC (6)
Round 13 :
inc, 11 sc (13)
Round 24 :
inc, 12 sc (14)
Round 30 :
3 sc in next st, 13 sc (16)
Round 31 :
sc, 3 sc in next st, 14 sc (18)
Round 32 :
2 sc, 3 sc in next st, 15 sc (20)
Round 33 :
3 sc, 3 sc in next st, 16 sc (22)
Round 34 :
4 sc, 3 sc in next st, 17 sc (24)
Round 35 :
5 ps, 3 ps in next st, 18 ps (26)
Info :
Fasten off and hide the yarn tail. Stuff the shell very lightly with fiberfill.
— 2. Eye (Make Two) :
Info :
Use white yarn and work in a continuous spiral.
Round 1 :
6 sc into a MC (6)
Round 3 :
(sc, inc) * 6 (18)
Round 4 :
(2 sc, inc) * 6 (24)
Round 8 :
(2 sc, dec) * 6 (18)
Round 9 :
(sc, dec) * 6 (12)
Info :
Stuff the eye firmly with fiberfill.
Info :
Fasten off and use the tail to pull the remaining hole closed through the front loops.
— 3. Upper Eyelid (Make Two) :
Info :
Use light green yarn and work in a spiral.
Round 1 :
6 sc into a MC (6)
Round 3 :
(sc, inc) * 6 (18)
Round 4 :
(2 sc, inc) * 6 (24)
Info :
Fasten off and hide the yarn end.
— 4. Lower Eyelid (Make Two) :
Info :
Use light green yarn. Leave a 20 cm tail at the start for sewing.
Round 1 :
5 sc into a MC, but do not pull the ring tight; leave a hole for the wire (5)
Note :
The stitch count for Round 7 is inconsistent in the source. Follow the count of 12 by increasing 7 times across the round.
Round 8 :
(sc, inc) * 6 (18)
Info :
Finish with a sl st. Cut yarn, leaving a tail for assembly. Place the upper eyelid over the lower and join them by working 8 sc through both layers.
— 5. Upper Jaw :
Info :
Use light green yarn.
Round 1 :
6 sc into a MC (6)
Round 7 :
3 sl st, sc, 4 hdc (8)
Info :
Fasten off and hide the tail. Prepare a wire loop padded with tape and insert it into the jaw, adding a little stuffing for shape.
— 6. Lower Jaw :
Info :
Use light green yarn.
Round 1 :
4 sc into a MC (4)
Round 2 :
(inc, sc) * 2 (6)
Round 3 :
6 sc, then sl st. Do not stuff (6)
Round 4 :
ch, turn, work 3 sc to join with the upper jaw sl st area. On the upper jaw: sc, 3 hdc, sc. On the lower jaw: 3 sl st (8)
— 7. Body :
Info :
Continue from the joined jaws, working in a spiral around the wire frame.
Round 14 :
(inc, 4 sc) * 2 (12)
Round 15 :
(3 sc, inc) * 3 (15)
Round 16 :
(4 sc, inc) * 3 (18)
Round 20 :
dec, 16 sc (17)
Round 24 :
dec, 15 sc (16)
Round 28 :
dec, 14 sc (15)
Round 30 :
dec, 13 sc (14)
Round 31 :
dec, 12 sc (13)
Round 32 :
dec, 11 sc (12)
Info :
Stuff the body lightly as you go.
Round 33 :
dec, 10 sc (11)
Info :
Trim any excess wire. Fasten off and pull the hole closed using the front loops.
— 8. Mantle :
Info :
Pick up 47 stitches along the body. Mark 3 center stitches on the chest and count 22 rows down each side.
Row 1 :
rotate, 10 sc, 7 hdc, 5 dc, 3 inc dc, 5 dc, 7 hdc, 10 sc (50)
Row 2 :
sl st on the body, turn, skip 1, 10 inc, 7 inc hdc, 16 inc dc, 7 inc hdc, 10 inc, sl st (100)
Info :
Fasten off and weave in your ends.
There is something so rewarding about finishing a project that requires a bit of extra engineering like this one. Once you’ve tucked the last bit of wire away and glued those glass eyes in place, you’ll have a handmade friend that’s full of charm. I hope this pattern brings a bit of whimsy to your crochet hook and a smile to your face every time you look at your finished snail. Happy crocheting, and don't forget to give your new buddy a name! 🧶✨