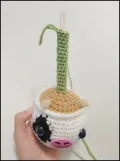
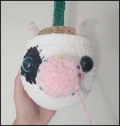
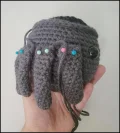
Picture a tiny crocheted pot with big glossy eyes, little ears, and a plant sprouting out the top — that's exactly what you're going to make with this pattern. You get four completely different planters to choose from: a black-and-white cow, a fluffy polar bear, a creepy-cute spider, and a sunflower version that's just pure joy. Each one has its own plant topper, its own face details, and its own little personality. This is the kind of project you start on a Saturday afternoon and can't put down because you keep wanting to see what the finished face looks like.
Progress Tracker
0% Complete
— 1. Pot (all versions — worked bottom to top) :
Info :
Work in a continuous spiral throughout — do not join rounds unless the pattern specifically says to. Keep a stitch marker at the start of every round. All stitches go through both loops unless a round is labeled BLO or FLO. For the spider version, make the legs first if you want to use the no-sew attachment method (see Spider Legs section). Cow color change rounds are listed separately at the end of this section.
Round 1 :
Start with your pot color. Work 8 sc into a mr. (8)
Round 2 :
inc in every st around. (16)
Round 3 :
(sc, inc) x 8. (24)
Round 4 :
(3 sc, inc) x 6. (30)
Round 5 :
(4 sc, inc) x 6. (36)
Round 6 :
BLO: sc in every st around. (36)
Round 7 :
sc in every st around. (36)
Round 8 :
(5 sc, inc) x 6. (42)
Round 9 :
sc in every st around. (42)
Round 10 :
(6 sc, inc) x 6. (48)
Info :
Spider no-sew leg attachment: If you're attaching legs as you work, use this modified version of Round 14 instead of a plain sc round — 2 sc, then (work 3 sc simultaneously through the leg and the pot, sc) x 4, then 11 sc, then (work 3 sc simultaneously through the leg and pot, sc) x 4, then 3 sc. This locks 4 legs on each side without sewing.
Round 11 :
sc in every st around. (48)
Round 12 :
sc in every st around. (48) — For cow color changes, see Cow Pot section below.
Round 13 :
sc in every st around. (48) — For cow color changes, see Cow Pot section below.
Round 14 :
sc in every st around. (48) — For cow color changes, see Cow Pot section below. For spider (no-sew): use the modified leg-attachment round described in the Info step above.
Info :
Eye placement: For the spider, place safety eyes between rounds 14 and 15, leaving 8 stitches between them. For the cow and polar bear, place eyes between rounds 14 and 15, leaving 10 stitches between them.
Round 15 :
sc in every st around. (48) — For cow color changes, see Cow Pot section below.
Round 16 :
sc in every st around. (48) — For cow color changes, see Cow Pot section below.
Round 17 :
(6 sc, dec) x 6. (42)
Round 18 :
(5 sc, dec) x 6. (36)
Round 19 :
sc in every st around. (36)
Round 20 :
FLO: ch 1, hdc in every st around. (36)
Info :
F/O and leave a tail for finishing. The back loops remaining from round 20 will be used to attach the dirt section.
— 2. Cow Pot — Color Change Rounds :
Info :
Work rounds 1–11 of the pot in white. Begin color changes at round 12. Switch colors mid-round as listed. All other rounds follow the standard pot instructions.
Round 12 :
White: 20 sc, Black: 3 sc, White: 25 sc. (48)
Round 13 :
White: 19 sc, Black: 7 sc, White: 22 sc. (48)
Round 14 :
White: 19 sc, Black: 7 sc, White: 22 sc. (48)
Round 15 :
White: 19 sc, Black: 6 sc, White: 23 sc. (48)
Round 16 :
White: 20 sc, Black: 5 sc, White: 23 sc. (48)
Round 17 :
White: (6 sc, dec) x 2, then 5 sc. Black: sc, dec. White: (6 sc, dec) x 3. (42)
— 3. Spider Legs (make 8) :
Round 1 :
Work 7 sc into a mr. (7)
Round 2-12 :
sc in every st around for 11 rounds. (7)
Info :
Do not stuff the legs. If you'd like them to hold a pose, slip a pipe cleaner inside before closing. Fold each leg in half lengthwise and sc across the opening to close it flat. F/O and leave a long tail for sewing — unless you used the no-sew pot method, in which case the legs are already attached.
— 4. Polar Bear Ears (make 2) :
Info :
Work in white yarn throughout.
Round 1 :
Work 6 sc into a mr. (6)
Round 2 :
inc in every st around. (12)
Round 3 :
(sc, inc) x 6. (18)
Round 4 :
sc in every st around. (18)
Round 5 :
(sc, dec) x 6. (12)
Info :
Do not stuff. Fold the ear in half and sc across the open edge to close it. F/O and leave a long tail for sewing onto the pot.
— 5. Dirt on Pot (all versions) :
Info :
Join your dirt-colored yarn to the back loops left over from round 20 of the pot. Work into those back loops only.
Round 1 :
(4 sc, dec) x 6. (30) — For the cow version, see the special cow horn round below instead.
Info :
Cow horn round 1 (replaces standard round 1): Dirt color: 4 sc, dec, 3 sc. Horn color: ch 4, then inc3 in the 2nd ch from hook, hdc in next ch, dc in last ch (first horn made). Dirt color: sc, dec, 4 sc, dec, 2 sc. Work a second horn the same way. Dirt color: 2 sc, dec, (4 sc, dec) x 2. (30)
Round 2 :
(3 sc, dec) x 6. (24)
Round 3 :
(2 sc, dec) x 6. (18)
Round 4 :
(sc, dec) x 6. (12)
Info :
If you're making the cow version, do NOT fasten off here — continue directly with the green stem. For all other versions, F/O and close the remaining hole by sewing it shut.
— 6. Cow/Sunflower Stem (worked after dirt, in green) :
Info :
Change to green yarn, continuing from where the dirt section ended (do not fasten off).
Round 1-18 :
sc in every st around for 18 rounds. (6)
Info :
Insert a wooden dowel or similar support into the stem to keep it upright. F/O and sew the tip of the stem closed.
— 7. Polar Bear Nose :
Info :
Work in white yarn.
Round 1 :
Work 6 sc into a mr. (6)
Round 2 :
inc in every st around. (12)
Round 3 :
(sc, inc) x 6. (18)
Round 4 :
sc in every st around. (18)
Round 5 :
sc in every st around. (18)
Info :
Place the 18 mm safety nose between rounds 1 and 2 before fastening off. F/O and leave a long tail for sewing onto the pot.
— 8. Cow Ears (make 2 — one black, one white) :
Round 1 :
Work 6 sc into a mr. (6)
Round 2 :
inc in every st around. (12)
Round 3 :
(sc, inc) x 6. (18)
Info :
Skip 4 sts, then sl st in the next st. Sl st across the top of the ear to create a pinched, folded shape. F/O and leave a long tail for sewing.
— 9. Cow Nose :
Info :
Work in pink yarn. Begin with a foundation chain.
Round 1 :
inc in the 2nd ch from hook, sc in next ch, inc3 in last ch. Turn and work back along the other side of the chain: 3 sc. (9)
Round 2 :
inc x 2, 2 sc, inc x 3, sc, inc. (15)
Round 3 :
(sc, inc) x 2, 2 sc, (sc, inc) x 3, 2 sc, inc. (21)
Round 4 :
sc in every st around. (21)
Round 5 :
sc in every st around. (21)
Info :
F/O and leave a long tail for sewing. Embroider 2 nostrils after attaching to the pot.
— 10. Sunflower :
Info :
Begin with brown yarn.
Round 1 :
Work 5 sc into a mr. (5)
Round 2 :
inc in every st around. (10)
Round 3 :
(sc, inc) x 5. (15)
Round 4 :
(2 sc, inc) x 5. (20)
Round 5 :
(3 sc, inc) x 5. (25)
Colour Change :
Switch to yellow yarn.
Round 6 :
Work petal repeat all the way around: (ch 5, sc in 2nd ch from hook, hdc in next ch, dc in next ch, tr in last ch of the ch-5, sl st in next 2 sts of the flower center) — repeat this petal sequence around the entire round. F/O and leave a long tail for sewing.
— 11. Sunflower Leaf #1 :
Info :
Work in green yarn.
Row 1 :
Working along the chain: dc + tr in the 3rd ch from hook, 2 tr in next ch, 2 dc in next ch, hdc in next ch, sc in last ch. F/O and leave a long tail for sewing.
— 12. Sunflower Leaf #2 :
Info :
Work in green yarn.
Row 1 :
sc in 3rd ch from hook, hdc in next ch, 2 dc in next ch, 2 tr in next ch, tr + dc in last ch. F/O and leave a long tail for sewing.
— 13. Spider Succulent :
Info :
Join green yarn with a sl st between rounds 2 and 3 of the completed pot.
Round 1 :
Ch 7. Then: sl st in 2nd ch from hook, sc in next ch, hdc in next ch, dc in next 2 chs, tr in next ch, sl st in next 2 sts of the pot. Repeat this leaf sequence all the way around until you reach the center of the pot opening.
— 14. Venus Fly Trap — Stems (make 4) :
Round 1 :
Work 6 sc into a mr. (6)
Round 2-16 :
sc in every st around for 15 rounds. (6)
Info :
Do not stuff the stems. A thin cake dowel can be inserted for structure. F/O and leave a long tail for sewing.
— 15. Venus Fly Trap — Trap Heads (make 4 red and 4 green) :
Info :
Begin each trap by making a red piece and a green piece separately through round 2. Then join them together and continue in green.
Round 1 :
Work 6 sc into a mr. (6) — make this for both the red and green pieces.
Round 2 :
inc in every st around. (12) — make this for both pieces. Do NOT fasten off the green piece.
Info :
Place the red and green pieces back-to-back (wrong sides together). Continue working with the green yarn through both pieces from here.
Round 3 :
Working through both layers: (sc, inc) x 6. (18)
Round 4 :
(2 sc, inc) x 6. (24)
Round 5 :
(ch 3, sl st in same st, sl st in next 2 sts) — repeat around the entire edge. F/O and leave a long tail for sewing.
— 16. Venus Fly Trap — Leaves (make 3) :
Row 1 :
sc in 2nd ch from hook, 2 hdc, 2 dc, 4 tr, 2 dc, 2 hdc, inc in the last ch. Then working back along the other side of the foundation chain: sc, 2 hdc, 2 dc, 4 tr, 2 dc, 2 hdc, sc. F/O and leave a long tail for sewing.
— 17. Polar Bear Cactus :
Info :
Work in green yarn. This piece is crocheted flat (rows) and then seamed into a tube.
Row 1 :
sc in 2nd ch from hook and across. (19)
Row 2-16 :
BLO: ch 1, turn, sc in every st across for 15 rows. (19)
Info :
F/O and leave a very long tail for sewing. Seam the cactus into a tube, stuff it, then sew the top closed. Attach to the top of the pot.
— 18. Polar Bear Cactus — Holly Leaves (make 2) :
Foundation :
ch 10 in green yarn.
Row 1 :
sc in 2nd ch from hook, sc, hdc, dc, dc-inc, dc, hdc, sc, inc3 in the last ch. Working back along the other side: sc, hdc, dc, dc-inc, dc, hdc, sc, sl st in last st.
Row 2 :
sc, (ch 3, sl st in same st) — spike made, 4 sc, spike, 4 sc, spike, 2 sc, spike, 4 sc, spike, 3 sc, sl st to first st. F/O and leave a long tail for sewing.
— 19. Polar Bear Cactus — Berries (make 2) :
Round 1 :
Work 6 sc into a mr. (6)
Round 2 :
sc in every st around. (6)
Info :
Pull the yarn through the remaining stitches to close the berry. F/O and leave a long tail for sewing.
However you're drawn to this pattern — maybe you're a plant lover who thought 'what if my succulent had a face', or maybe you just saw the spider version and immediately needed it in your life — you're going to have so much fun making these little guys. 🧶 They're genuinely charming on a desk, a shelf, a windowsill, or wrapped up as a gift. Each planter has its own personality, and once you make one you'll probably want the whole set. Happy hooking! ✨🌵