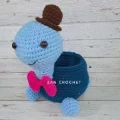
Looking for a way to keep your crochet hooks or small trinkets organized? This sweet little turtle isn't just a toy—he's a functional bowl! I love how his shell doubles as a cozy container. He’s such a fun project to work on, especially with that little dapper hat and bow. You'll enjoy seeing his personality come to life as you stitch him up. It's the kind of project that makes you smile every time you see it sitting on your desk.
Progress Tracker
0% Complete
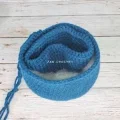
— 1. Body - Inner Layer :
Info :
Start by using the navy blue yarn for the interior of the bowl.
Round 1 :
ch2, then work 6 sc into the 2nd ch from your hook (6)
Round 2 :
inc in every stitch around (12)
Round 3 :
[1 sc, inc] repeat 6 times (18)
Round 4 :
1 sc, inc, then repeat [2 sc, inc] 5 times, finishing with 1 sc (24)
Round 5 :
[3 sc, inc] repeat 6 times (30)
Round 6 :
2 sc, inc, then repeat [4 sc, inc] 5 times, finishing with 2 sc (36)
Round 7 :
Working in FLO, [5 sc, inc] repeat 6 times (42)
Round 8 :
sc in each stitch around (42)
Round 9 :
sc in each stitch around (42)
Round 10 :
sc in each stitch around (42)
Round 11 :
sc in each stitch around (42)
Round 12 :
sc in each stitch around (42)
Round 13 :
sc in each stitch around (42)
Round 14 :
sc in each stitch around (42)
Round 15 :
sc in each stitch around (42)
Round 16 :
sc in each stitch around (42)
Round 17 :
3 sc, inc, then repeat [6 sc, inc] 5 times, finishing with 3 sc (48)
Round 18 :
sc in each stitch around (48)
Round 19 :
sc in each stitch around (48)
Round 20 :
[7 sc, inc] repeat 6 times (54)
Round 21 :
sc in each stitch around (54)
Round 22 :
sc in each stitch around (54)
Info :
Fasten off and turn this inner piece inside out.
— 2. Body - Outer Layer :
Info :
Continue with navy blue. You will begin this layer by working into the remaining loops from Round 6 of the inner layer.
Round 1 :
[3 sc, inc] repeat 9 times (45)
Round 2 :
[2 sc, inc] repeat 15 times (60)
Round 3 :
sc in each stitch around (60)
Round 4 :
sc in each stitch around (60)
Round 5 :
[9 sc, inc] repeat 6 times (66)
Round 6 :
sc in each stitch around (66)
Round 7 :
sc in each stitch around (66)
Round 8 :
sc in each stitch around (66)
Round 9 :
sc in each stitch around (66)
Round 10 :
sc in each stitch around (66)
Round 11 :
sc in each stitch around (66)
Round 12 :
[9 sc, dec] repeat 6 times (60)
Round 13 :
sc in each stitch around (60)
Round 14 :
sc in each stitch around (60)
Round 15 :
[8 sc, dec] repeat 6 times (54)
Round 16 :
sc in each stitch around (54)
Round 17 :
sc in each stitch around (54)
Round 18 :
sc in each stitch around (54)
Info :
Add a small amount of stuffing between the two layers, being careful not to overfill.
Round 19 :
Connect both layers together by working sl st through the stitches of both pieces all the way around.
Info :
Fasten off and weave in your ends.
— 3. Head :
Info :
Switch to your light blue yarn for the head.
Round 1 :
ch2, then work 6 sc into the 2nd ch from your hook (6)
Round 2 :
inc in every stitch around (12)
Round 3 :
[1 sc, inc] repeat 6 times (18)
Round 4 :
1 sc, inc, then repeat [2 sc, inc] 5 times, finishing with 1 sc (24)
Round 5 :
[3 sc, inc] repeat 6 times (30)
Round 6 :
sc in each stitch around (30)
Round 7 :
2 sc, inc, then repeat [4 sc, inc] 5 times, finishing with 2 sc (36)
Round 8 :
[5 sc, inc] repeat 6 times (42)
Round 9 :
19 sc, perform 4 consecutive inc, then 19 sc (46)
Round 10 :
22 sc, perform 2 consecutive inc, then 22 sc (48)
Round 11 :
sc in each stitch around (48)
Round 12 :
22 sc, perform 2 consecutive dec, then 22 sc (46)
Round 13 :
19 sc, perform 4 consecutive dec, then 19 sc (42)
Info :
Place the safety eyes between Rounds 9 and 10. Counting from Round 10, leave a gap of 12 stitches between them.
Round 14 :
[5 sc, dec] repeat 6 times (36)
Round 15 :
2 sc, dec, then repeat [4 sc, dec] 5 times, finishing with 2 sc (30)
Round 16 :
[3 sc, dec] repeat 6 times (24)
Round 17 :
sc in each stitch around (24)
Info :
Begin stuffing the head firmly.
Round 18 :
[2 sc, dec] repeat 6 times (18)
Round 19 :
sc in each stitch around (18)
Round 20 :
sc in each stitch around (18)
Round 21 :
sc in each stitch around (18)
Round 22 :
sc in each stitch around (18)
Round 23 :
[4 sc, dec] repeat 3 times (15)
Round 24 :
sc in each stitch around (15)
Round 25 :
[3 sc, dec] repeat 3 times (12)
Round 26 :
sc in each stitch around (12)
Info :
Finish stuffing the neck area.
Round 27 :
Press the opening flat and close it by working 4 sl st through both thicknesses.
Info :
Fasten off, ensuring you leave a long thread for sewing.
— 4. Legs - Make 4 :
Info :
Use the light blue yarn for all four legs.
Round 1 :
ch2, then work 6 sc into the 2nd ch from your hook (6)
Round 2 :
inc in every stitch around (12)
Round 3 :
[1 sc, inc] repeat 6 times (18)
Round 4 :
sc in each stitch around (18)
Round 5 :
[4 sc, dec] repeat 3 times (15)
Round 6 :
sc in each stitch around (15)
Round 7 :
[3 sc, dec] repeat 3 times (12)
Info :
Stuff the leg, then fasten off and leave a long tail for assembly.
— 5. Hat :
Info :
Use the dark brown yarn to make the little hat.
Round 1 :
ch2, then work 5 sc into the 2nd ch from your hook (5)
Round 2 :
inc in every stitch around (10)
Round 3 :
[1 sc, inc] repeat 5 times (15)
Round 4 :
Working in BLO, sc in each stitch around (15)
Round 5 :
sc in each stitch around (15)
Round 6 :
sc in each stitch around (15)
Round 7 :
Work 15 fpsc around the piece (15)
Round 8 :
[2 sc, inc] repeat 5 times (20)
Round 9 :
[3 sc, inc] repeat 5 times (25)
Info :
Lightly stuff and fasten off.
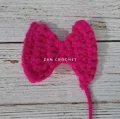
— 6. Bow :
Info :
Grab your pink yarn for the dapper bow tie.
Row 1 :
ch11, then starting in the 2nd ch from hook, sc in each of the next 10 sts, ch1, and turn (10)
Row 2 :
dec, 6 sc, dec, ch1, and turn (8)
Row 3 :
dec, 4 sc, dec, ch1, and turn (6)
Row 4 :
dec, 2 sc, dec, ch1, and turn (4)
Row 5 :
dec, dec, ch1, and turn (2)
Row 6 :
sc in both stitches, ch1, and turn (2)
Row 7 :
inc, inc, ch1, and turn (4)
Row 8 :
inc, 2 sc, inc, ch1, and turn (6)
Row 9 :
inc, 4 sc, inc, ch1, and turn (8)
Row 10 :
inc, 6 sc, inc (10)
Info :
Fasten off. Wrap a length of yarn several times around the center of this piece to create the bow shape.
I hope you have as much fun making this turtle as I did! He’s such a cheerful addition to any workspace, and there’s something so satisfying about a project that’s both cute and functional. Don't forget to share your finished photos—I'd love to see what colors you choose for your turtle's shell! Whether he's holding your hooks or a tiny plant, he's sure to be a conversation starter. Happy stitching and enjoy your new little organization buddy. 🧶 ✨