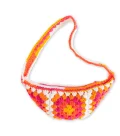
Get ready to add a splash of sunshine to your wardrobe with this vibrant cross-body bag! Using clever color-pooling yarn, you will create beautiful, consistent granny squares without the headache of constant color changes. It is the perfect hands-free accessory for your next market trip or summer festival. You will love how the rhythmic stitches come together to form a sturdy, stylish bag that is as fun to make as it is to wear.
Progress Tracker
0% Complete
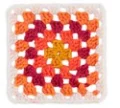
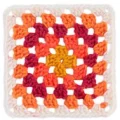
— 1. Granny Square Motif (Make 4) :
Info :
Each motif uses 5 colors. To ensure the colors change at the corners, adjust your tension: if you have leftover color at the end of a round, loosen your gauge; if you run out too early, tighten it.
Round 1 :
(RS). Using the first color from the center of the ball, ch 4 and join with a sl st to the first ch to make a ring. ch 6 (counts as 1 dc and a ch-3 sp). Work (3 dc, ch 3) into the ring 3 times. Finish with 2 dc in the ring and join with a sl st to the 3rd ch of the starting ch-6.
Round 2 :
sl st into the first ch-3 sp. ch 6, 3 dc in the same sp. *ch 1, then work (3 dc, ch 3, 3 dc) in the next ch-3 sp. Repeat from * two more times. ch 1, 2 dc in the first ch-3 sp, and join with a sl st to the 3rd ch of the starting ch-6.
Round 3 :
sl st into the first ch-3 sp. ch 6, 3 dc in the same sp. *ch 1, 3 dc in the next ch-1 sp, ch 1, then work (3 dc, ch 3, 3 dc) in the corner ch-3 sp. Repeat from * two more times. ch 1, 3 dc in the final ch-1 sp, ch 1, 2 dc in the first ch-3 sp, and join with a sl st to the 3rd ch of the starting ch-6.
Round 4 :
sl st into the corner ch-3 sp. ch 6, 3 dc in that same space. *Work (ch 1, 3 dc) into each of the next two ch-1 spaces. ch 1, then work (3 dc, ch 3, 3 dc) in the corner ch-3 space. Repeat from * twice more. Work (ch 1, 3 dc) into the last two ch-1 spaces, ch 1, then work 2 dc in the first corner space and sl st to the 3rd ch of the ch-6.
Round 5 :
sl st into the corner ch-3 sp. ch 6, 3 dc in that same space. *Work (ch 1, 3 dc) into each of the next three ch-1 spaces. ch 1, then work (3 dc, ch 3, 3 dc) in the corner ch-3 space. Repeat from * twice more. Work (ch 1, 3 dc) into the final three ch-1 spaces, ch 1, then work 2 dc in the first corner space and sl st to the 3rd ch of the ch-6. Fasten off.
— 2. Bag Assembly :
Info :
Use the white sections of your yarn for joining the motifs to keep the seams clean and cohesive.
Joining :
Hold two motifs with WS together and stitches aligned. Join your yarn with a sl st in the corner spaces. ch 1. Working through the BLO of both layers, work 1 sc in every dc across the edge to join. Fasten off.
Layout :
Connect the four squares to create a flat trapezoid shape as shown in the assembly diagram, then fold and seam the sides to form the bag body.
— 3. Upper Edging :
Round 1 :
(RS). Join your yarn with a sl st at the right corner of the top opening. ch 1. Work 1 sc into every stitch around the entire top edge. Join with a sl st to the first sc.
Round 2 :
ch 1. Work 1 sc in each sc from the previous round. Join with a sl st to the first sc.
Round 3 :
ch 1. Work 1 sc in each sc around. Join with a sl st and fasten off.
— 4. Cross-body Strap :
Round 1 :
Using any color section, ch 109. Work 2 dc in the 4th ch from your hook. *Skip 2 ch, 3 dc in the next ch. Repeat from * until 3 ch remain. Skip 2 ch, then work (3 dc, ch 2, 3 dc) in the very last ch. Now rotate to work along the bottom of the foundation chain: work 3 dc in each space created by the skipped chains. Finish with 3 dc in the first ch of the round, ch 2, and sl st to the top of the starting ch-3.
Round 2 :
ch 1. Work 1 sc in the same space as your join, then work 1 sc in every dc around the entire strap. Join with a sl st to the first sc and fasten off.
— 5. Final Touches :
Info :
Secure the strap ends to the inside of the bag at the side seams using a yarn needle and sturdy stitches.
Zipper :
Using your sewing needle and thread, carefully sew the 12-inch zipper into the top opening of the bag, ensuring it opens and closes smoothly without catching on the crochet stitches.
I really hope you enjoy making this bag as much as I did! There is something so rewarding about watching those citrusy shades bloom into perfect squares. Once you have finished, you will have a sturdy, stylish accessory that is just the right size for your essentials. Don't forget to take your time with the zipper—it really gives the bag that professional, high-quality finish. I can't wait to see which colors you choose for your own version! Happy stitching, and enjoy your beautiful new handmade bag! 🧶✨