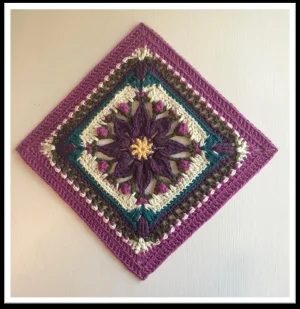
This gorgeous textured square is all about layers and floral details. Inspired by a love for things pretty and sparkly, it features a blooming center that really pops off the fabric. Whether you're building a heirloom blanket or just want a stunning standalone piece, this square brings a touch of elegance to your hook. You'll love seeing the petals take shape as you work through the unique post stitches and clusters that give this design its signature 3D look.
Progress Tracker
0% Complete
— 1. Central Floral Motif :
Round 1 :
Start with a double magic circle and ch 5 (this counts as your first dc and a ch-2 sp), then dc into the ring; work [ch 2, dc] 6 more times, then ch 2; finish with an invisible join into the 4th ch (8 dc, 8 ch-2 sp).
Round 2 :
Join your new color in any ch-2 sp and work (sc, ch 4, sc) in every ch-2 sp around; finish with an invisible join (16 sc, 8 ch-4 sp).
Round 3 :
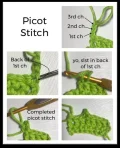
Starting in any ch-4 sp, work *(sc, 3 hdc, dc, tr, picot, tr, dc, 3 hdc, sc) all in the ch-4 sp, then sk the next sc and slst into the following sc; repeat from * around; finish with an invisible join (16 sc, 48 hdc, 16 dc, 16 tr, 8 picot, 8 slst).
Round 4 :
Starting in a slst between petals and working in the BL only, work *trtr into the slst from Round 2, ch 4, (sc, ch 1, sc) in the top of the picot, then ch 4; repeat from * around; finish with an invisible join (16 sc, 8 trtr, 16 ch-4 sp, 8 ch-1 sp).
Round 5 :
In any ch-1 sp, work *(sc, ch 2, sc) to create a new corner; ch 4, sk the next sc and ch-4 sp, work a PC in the trtr, ch 4, sk the next ch-4 sp and sc; sc in the next ch-1 sp, ch 4, sk the next sc and ch-4 sp, work a PC in the trtr, ch 4, sk the next ch-4 sp and sc; repeat from * around; finish with an invisible join (12 sc, 8 PC, 16 ch-4 sp, 4 ch-2 corner sp).
Round 6 :
In any corner ch-2 sp, work *(dc, ch 1, dc, ch 2, dc, ch 1, dc), then sk the next sc; in the next ch-4 sp of Round 5, work a 2dc-cluster, then work a long dc around both the Round 4 and Round 5 ch-4 spaces together, then work another 2dc-cluster in that same Round 5 ch-4 sp; work a FPhdc around the next PC; hdc in the next ch-4 sp; work a long hdc around the ch-4 spaces of Rounds 4 and 5 together; sc in the ch-4 sp from Round 5; work a FPsc around the next sc; sc in the Round 5 ch-4 sp; work a long hdc around the Round 4 and 5 ch-4 spaces; hdc in the ch-4 sp; FPhdc around the next PC; in the next ch-4 sp of Round 5, work a 2dc-cluster, a long dc around the Round 4 and 5 ch-4 spaces, and another 2dc-cluster in the Round 5 ch-4 sp, then sk the next sc; repeat from * around (16 dc, 16 2dc-cluster, 8 FPhdc, 8 long dc, 8 long hdc, 8 hdc, 8 sc, 4 FPsc, 8 ch-1 sp, 4 ch-2 corner sp).
Round 7 :
Starting in any corner ch-2 sp, work *(sc, ch 2, sc), then sc in every st and ch-1 sp across to the next corner; repeat from * around; finish with an invisible join (92 sc, 4 ch-2 corner sp).
— 2. Mini Square Finishing :
Round 8 :
In any corner ch-2 sp, work *(sc, ch 2, sc), then sc in the next st; work [sc back-stitch in the Round 6 st directly below, sc in the next Round 7 st] 11 times; repeat from * around; finish with an invisible join (56 sc, 44 sc back-stitch, 4 ch-2 corner sp).
— 3. Large Square Extension :
Info :
These steps continue from Round 7 of the central motif for those making the larger 11-inch version.
Round 8a :
In any corner ch-2 sp, work *(2 dc, ch 2, 2 dc), then long tr in the Round 5 corner sp, FPdc around the next Round 6 dc, sk 2 sc from Round 7, long dc over the next sc and into the Round 6 ch-1 sp, sc in the next st; working in BL, BLsc in the next 15 sts; sc in the next st, long dc over the next sc and into the Round 6 ch-1 sp, sk 2 sc from Round 7, FPdc around the next Round 6 dc, and long tr in the Round 5 corner sp; repeat from * around (8 sc, 60 BLsc, 16 dc, 8 FPdc, 8 long dc, 8 long tr, 4 ch-2 corner sp).
Round 9 :
Working over the Round 8a corner and into the Round 6 corner, work *3 dtr in the Round 6 corner; ch 1, sk the next dc, BLhdc in the next 4 sts, BLsc in the next 17 sts, BLhdc in the next 4 sts, sk the next dc, and ch 1; repeat from * around; finish with an invisible join (12 dtr, 32 BLhdc, 68 BLsc, 8 ch-1 sp).
Round 10 :
Starting in the ch-1 sp after any dtr group, work *sc in the ch-1 sp, [ch 3, sk the next st, sc in the following st] 12 times; ch 3, sk the next st, sc in the ch-1 sp, then ch 4; repeat from * around; finish with an invisible join (56 sc, 52 ch-3 sp, 4 ch-4 corner sp).
Round 11 :
Working behind the ch-4 corner, start in the 2nd dtr of any 3-dtr group from Round 9 and work *(tr, ch 2, tr) in that dtr; working behind the ch-4 sp, 2 dc in the next dtr, sk the sc; [sc in the next ch-3 sp, sk the next st, ch 1] 12 times; sc in the next ch-3 sp, sk the next sc; working behind the ch-4 corner, 2 dc in the next dtr; repeat from * around (8 tr, 16 dc, 52 sc, 48 ch-1 sp, 4 ch-2 corner sp).
Round 12 :
In any corner ch-2 sp, work *(2 dc, ch 2, 2 dc), dc in the next 3 sts; [dc back-stitch in the Round 10 ch-3 sp directly below, dc in the next ch-1 sp] 12 times; dc back-stitch in the final Round 10 ch-3 sp directly below, then dc in the next 3 sts; repeat from * around (88 dc, 52 dc back-stitch, 4 ch-2 corner sp).
Round 13 :
In any corner ch-2 sp, work *(2 dc, ch 2, 2 dc), then BLdc in every st across to the next corner; repeat from * around; finish with an invisible join and weave in all ends (16 dc, 140 BLdc, 4 ch-2 corner sp).
I hope you enjoy every stitch of this Macey Ann square as much as I did! There’s something so special about creating a piece with this much heart and history behind it. Whether you’re making a single square to test your skills or a whole garden of them for a blanket, the texture is sure to impress. Don't forget to take a moment to admire those petals once you finish Round 3—they’re my favorite part! The way they layer over the background really gives the piece its personality. Happy hooking, and I can't wait to see your color choices. 🧶✨