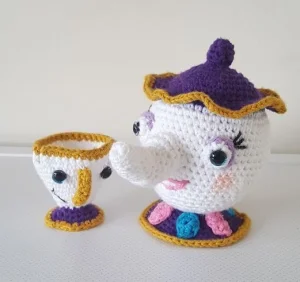
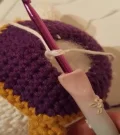
Bring a bit of fairytale charm into your home with this darling duo! There's something so nostalgic about crafting characters that feel like old friends, and these two are just brimming with personality. You'll love watching the teapot's curvy shape come together and seeing that famous little teacup take form. It's a project that's as much about the storytelling as it is about the stitches.
Progress Tracker
0% Complete
— 1. Mrs. Potts Teapot Body :
Round 1 :
Using purple yarn, start with 6 sc into a MR (6)
Round 2 :
Work a pattern of 1 sc then an inc, repeating this 3 times around (9)
Round 3 :
Place 1 sc into every stitch around (9)
Round 4 :
Work a pattern of 1 sc followed by a sc2tog, repeating 3 times (6)
Round 5 :
Place 1 sc into every stitch around (6)
Round 6 :
Work an inc into every stitch around (12)
Round 7 :
Work an inc into every stitch around again (24)
Round 8 :
Place 1 sc into every stitch around (24)
Round 9 :
Work 3 sc then an inc, repeating this 6 times around (30)
Round 10 :
Work 4 sc then an inc, repeating this 6 times around (36)
Round 11-12 :
Place 1 sc into every stitch around (36)
Round 13 :
Work 1 sc into the BLO of every stitch around (36)
Info :
Switch to white yarn here. Start stuffing the teapot as you continue to work.
Round 14 :
Work 2 sc then an inc, repeating this 12 times around (48)
Round 15 :
Place 1 sc into every stitch around (48)
Round 16 :
Work 7 sc then an inc, repeating this 6 times around (54)
Round 17-23 :
Place 1 sc into every stitch around (54)
Round 24 :
Work 7 sc then a sc2tog, repeating this 6 times around (48)
Round 25 :
Work 6 sc then a sc2tog, repeating this 6 times around (42)
Round 26 :
Place 1 sc into every stitch around (42)
Round 27 :
Work 5 sc then a sc2tog, repeating this 6 times around (36)
Round 28-29 :
Place 1 sc into every stitch around (36)
Round 30 :
Work 1 sc followed by a sc2tog, repeating this 12 times around (24)
Round 31-32 :
Place 1 sc into every stitch around (24)
Round 33 :
Work sc2tog all the way around (12)
Info :
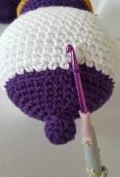
Switch back to purple yarn for the base.
Round 34 :
Work in the FLO, placing 2 sc into every stitch around (24)
Round 35 :
Work 3 sc then an inc, repeating this 6 times around (30)
Round 36 :
Place 1 sc into every stitch around (30)
Round 37 :
Work 4 sc then an inc, repeating this 6 times around (36)
Round 38 :
Place 1 sc into every stitch around (36)
Round 39 :
Work 5 sc then an inc, repeating this 6 times around (42)
Round 40 :
Work 6 sc then an inc, repeating this 6 times around (48)
Info :
Switch to mustard or gold yarn.
Round 41 :
Place 1 sc into every stitch around (48)
Info :
Fasten off, finish stuffing firmly, and weave your yarn tail through the final stitches to pull the bottom closed.
— 2. Mrs. Potts Bottom Seal :
Info :
You will now work into the unworked BLO loops from Round 33 of the teapot body using white yarn.
Round 1 :
Place 1 sc into every loop around (12)
Round 2 :
Work sc2tog all the way around (6)
Info :
Fasten off and use a needle to thread through the remaining stitches to close.
— 3. Mrs. Potts Lid Frill :
Info :
Attach purple yarn to any of the FLO loops left over from Round 13 of the teapot.
Round 1 :
Place 1 sc into every loop around (36)
Round 2 :
Work 1 sc then an inc, repeating this 18 times around (54)
Round 3 :
Work 2 sc then an inc, repeating this 18 times around (72)
Info :
Switch to mustard or gold yarn.
Round 4 :
Work 3 sc then an inc, repeating this 18 times around (90)
Info :
Fasten off and tidy up your ends.
— 4. Mrs. Potts Spout :
Round 1 :
Using white yarn, place 8 sc into a MR (8)
Round 2 :
Work 1 sc into the BLO of every stitch around (8)
Round 3-4 :
Place 1 sc into every stitch around (8)
Round 5 :
Work an inc in the first stitch, then 1 sc in the remaining 7 stitches (9)
Round 6 :
Place 1 sc into every stitch around (9)
Round 7 :
Work an inc in the first stitch, then 1 sc in the remaining 8 stitches (10)
Round 8 :
Place 1 sc into every stitch around (10)
Round 9 :
Work a sc2tog, 3 sc, then place 2 dc into each of the next 2 stitches, followed by 3 sc (11)
Round 10-12 :
Place 1 sc into every stitch around (11)
Round 13 :
Work 1 sc, then 2 inc, then 1 sc in the remaining 8 stitches (13)
Round 14 :
Work 2 sc, then 2 inc, then 1 sc in the remaining 9 stitches (15)
Round 15 :
Place 1 sc into every stitch around (15)
Info :
Fasten off and leave a long tail for sewing. This piece should be attached to the face before the eyes.
— 5. Mrs. Potts Eyes :
Round 1 :
Using white yarn, place 6 sc into a MR (6)
Round 2 :
Work 1 sc, then place 2 sc into each of the next 4 stitches, and finish with 1 sc (10)
Round 3 :
Work a pattern of 1 sc followed by an inc all the way around (15)
Round 4 :
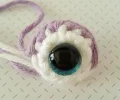
Work 2 sl st, switch to light purple, work 5 sc, then 1 sl st. Leave the final 2 stitches unworked (9)
Info :
Fasten off with a long tail. Secure the safety eye through the center of the magic ring before sewing to the teapot.
— 6. Mrs. Potts Handle :
Round 1 :
Using mustard yarn, place 6 sc into a MR (6)
Round 2-24 :
Place 1 sc into every stitch around (6)
Info :
Fasten off and leave a long tail. This will be sewn to the back of the teapot, directly opposite the spout.
— 7. Decorative Petals :
Info :
Make 6 total: 3 in pink and 3 in blue.
Row 1 :
ch 4, sc in the 2nd ch from hook, 2 hdc in the next ch, sc in the last ch. Rotate to work along the bottom of the chain: sc, 2 hdc in the next, sc in the last, then sl st to the first stitch to join.
Info :
Fasten off with a tail. These will be spaced evenly around the purple base of Mrs. Potts.
— 8. Chip Teacup Body :
Round 1 :
Using white yarn, place 6 sc into a MR (6)
Round 2 :
Work 2 sc into every stitch around (12)
Round 3 :
Work in the BLO, repeating a pattern of 1 sc then an inc around (18)
Round 4-5 :
Place 1 sc into every stitch around (18)
Round 6 :
Work 2 sc then an inc, repeating this 6 times around (24)
Round 7-8 :
Place 1 sc into every stitch around (24)
Round 9 :
Work 3 sc then an inc, repeating this 6 times around (30)
Round 10-11 :
Place 1 sc into every stitch around (30)
Round 12 :
Work 4 sc then an inc, repeating this 6 times around (36)
Row 13 :
ch 1 and turn. Work 1 sc in every stitch until 2 stitches remain. Leave those unworked and turn (34)
Info :
Switch to mustard or gold yarn.
Row 14 :
Place 1 sc into every stitch across (34)
Info :
Fasten off and weave in your ends.
— 9. Chip Teacup Base :
Note :
The source mentions Round 3, but to achieve a 12-stitch count, attach purple yarn to any FLO loop from Round 2 of the teacup.
Round 1 :
Place 1 sc into every loop around (12)
Round 2 :
Work 1 sc then an inc, repeating this 6 times around (18)
Round 3 :
Work 2 sc then an inc, repeating this 6 times around (24)
Info :
Switch to mustard or gold yarn.
Round 4 :
Place 1 sc into every stitch around (24)
Info :
Fasten off and weave in ends.
— 10. Chip's Handle & Details :
Row 1 :
Using mustard yarn, ch 9. Starting in the 2nd ch from the hook, sc in each chain across (8)
Info :
Fasten off and leave a tail for sewing. Position the handle on the front face so the 'chip' is on the left.
Round 1 :
For the internal eye covers (make 2): Using white yarn, place 6 sc in a MR (6)
Round 2 :
Work 2 sc into every stitch around (12)
Info :
Fasten off. These will be sewn inside the cup to hide the back of the safety eyes.
I honestly can't wait to see your finished sets! There's so much room to play with the facial expressions to give your Mrs. Potts and Chip their own unique souls. Whether they're sitting on a shelf or being played with in a magical tea party, they're bound to bring a smile to anyone's face. Don't forget to take your time with the embroidery—it's the 'icing on the cake' for this project! Happy crocheting, and may your stitches be as sweet as a cup of tea. 🧶✨💖