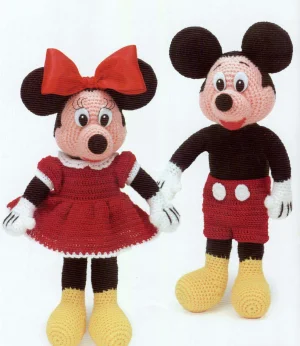
There is something so timeless about Mickey and Minnie, isn't there? This pattern helps you bring that classic Disney magic right into your living room. You will be crafting two substantial dolls that stand 18 inches tall, complete with their iconic outfits and those perfectly expressive faces. It is a project that feels like a labor of love, but seeing them sitting together on a shelf makes every single stitch worth it.
Progress Tracker
0% Complete
— 1. Head Front :
Round 1 :
Using Peach yarn, ch 2 then work 10 sc into the 2nd ch from your hook. Mark this round as the right side and do not join. (10)
Round 2 :
Work 2 sc into every st around. (20)
Round 3 :
Repeat (1 sc, then 2 sc in the next st) around. (30)
Round 4 :
Repeat (1 sc in each of the next 2 sts, then 2 sc in the next st) around. (40)
Round 5 :
Repeat (1 sc in each of the next 3 sts, then 2 sc in the next st) around. (50)
Round 6 :
Work 1 sc into every st around. (50)
Round 7 :
1 sc in next 8 sts, 2 hdc in each of next 5 sts, 1 sc in next 24 sts, 2 hdc in each of next 5 sts, 1 sc in last 8 sts. (60)
Round 8 :
1 sc in next 8 sts, 1 hdc in next 10 sts, 1 sc in next 24 sts, 1 hdc in next 10 sts, 1 sc in last 8 sts. (60)
Round 9 :
1 sc in next 26 sts, hdc in next st, 2 hdc in next st, hdc in next st, sc in next 2 sts, repeat hdc sequence once, sc in last 26 sts. (62)
Round 10 :
sc in next 28 sts, 2 hdc in next hdc, hdc in next hdc, sl st in next 2 sc, hdc in next hdc, 2 hdc in next hdc, sc in next 28 sts. (64)
Round 11 :
sc dec twice, sc in next 27 sts, sl st in next 2 sl sts, sc in next 31 sts, sl st in next sc, then fasten off. (62)
— 2. Head Back :
Round 1 :
Using Black yarn, ch 2 and work 10 sc into the 2nd ch from the hook. Mark as right side. (10)
Round 2 :
Work 2 sc into every st around. (20)
Round 3 :
Repeat (1 sc, 2 sc in next st) around. (30)
Round 4 :
Repeat (sc in next 2 sts, 2 sc in next st) around. (40)
Round 5 :
Work 1 sc into every st around. (40)
Round 6 :
Repeat (sc in next 3 sts, 2 sc in next st) around. (50)
Round 7 :
Work 1 sc into every st around. (50)
Round 8 :
Repeat (sc in next 4 sts, 2 sc in next st) around. (60)
Round 9-13 :
Work 1 sc into every st around. (60)
Round 14 :
sc in next 29 sts, (hdc, dc) in next st, (dc, hdc) in next st, sl st in next st, sc in next 28 sts. (62)
Round 15 :
sc in next 30 sts, (hdc, dc) in next st, (dc, hdc) in next st, sc in next 30 sts. (64)
Round 16 :
hdc in next 32 sts, 2 hdc in next st, hdc in next 31 sts, sl st in next st, fasten off. (65)
— 3. Sideburns (Make 2) :
Row 1 :
With Black yarn, ch 7. sc in 2nd ch, hdc in next ch, dc in next ch. Leave remaining 3 chs unworked and fasten off with a long tail. (3 sts)
— 4. Nose and Mouth :
Round 1 :
With Black, ch 2 and work 8 sc in the 2nd ch from hook. (8)
Round 2 :
Work 2 sc in every st around. (16)
Round 3-4 :
Work 1 sc into every st around. (16)
Round 5 :
Repeat (skip next st, sc in next st) around. (8)
Round 6 :
Work 1 sc into every st around, then fasten off. (8)
Round 7 :
Join Peach yarn to the last sc of the previous round. Work 2 sc in every st around. (16)
Round 8 :
Repeat (sc in next 2 sts, 2 sc in next st) around. (16)
Round 9 :
Repeat (sc in next st, 2 sc in next st) around. (24)
Round 10-11 :
Work 1 sc into every st around. (24)
Round 12 :
hdc in next 12 sts, sc in next 12 sts. (24)
Round 13 :
Using Peach, sc in next hdc, hdc in next 10 hdc, sc in next hdc. Place a safety pin in the current loop. Join Red to the 3rd hdc of this round and work 2 sc, 2 dc in next 2 sts, 2 sc in next st, sl st in next hdc, then fasten off Red. (Mixed)
Round 14 :
Pick up Peach loop. sl st in next 12 sc, then sc in next sc, hdc in next 2 hdc, hdc in BLO of next 8 sts, hdc in next 2 hdc, sc in next st, sl st in next st. Fasten off with a long tail. (Mixed)
— 5. Ears (Make 2 Outer & 2 Inner) :
Round 1 :
With Black, ch 2 and work 10 sc in 2nd ch from hook. (10)
Round 2 :
Work 2 sc in every st around. (20)
Round 3 :
Repeat (sc in next st, 2 sc in next st) around. (30)
Round 4-5 :
Work 1 sc into every st around. (30)
Round 6 :
Repeat (sc in next 2 sts, 2 sc in next st) around. (40)
Round 7 :
Repeat (sc in next 3 sts, 2 sc in next st) around. Fasten off for Outer Ear; keep working for Inner Ear. (50)
Info :
To join, hold an Inner and Outer ear with wrong sides together. Sc through both thicknesses around the entire edge, then fasten off leaving a sewing tail.
— 6. Body :
Round 1 :
With Black, ch 2 and work 10 sc in 2nd ch from hook. (10)
Round 2 :
Work 2 sc in every st around. (20)
Round 3 :
Repeat (sc in next st, 2 sc in next st) around. (30)
Round 4 :
Repeat (sc in next 2 sts, 2 sc in next st) around. (40)
Round 5 :
Repeat (sc in next 3 sts, 2 sc in next st) around. (50)
Round 6 :
Work 1 sc into every st around. (50)
Round 7-30 :
Work 1 sc into every st around. (50)
Round 31 :
Repeat (sc in next 3 sts, sc dec) around. (40)
Round 32 :
Repeat (sc in next 2 sts, sc dec) around. (30)
Round 33 :
sc in every st around, sl st in next sc, fasten off with a long tail. (30)
— 7. Arms (Make 2) :
Round 1 :
With White, ch 7. 2 sc in 2nd ch, sc in next 4 chs, 4 sc in last ch. Working on the other side of the chain, sc in next 4 chs, 2 sc in last ch. (16)
Round 2 :
2 sc in first st, sc in next 6 sts, 2 sc in next 2 sts, sc in next 6 sts, 2 sc in last st. (20)
Round 3-5 :
Work 1 sc into every st around. (20)
Round 6 :
ch 2, skip first 2 sts for thumb opening, sc in remaining 18 sts. (18)
Round 7 :
sc in each ch and each sc around. (20)
Round 8 :
Repeat (sc in next 3 sts, sc dec) around. (16)
Round 9 :
Repeat (sc in next 2 sts, sc dec) around. (12)
Round 10-12 :
Work 1 sc into every st around, then fasten off. (12)
Thumb Round 1 :
Join White to the free loops of the thumb opening. hdc in same st, hdc in next ch, hdc in side of sc, hdc in next ch, hdc in side of sc. (6)
Thumb Round 2-3 :
Work 1 hdc in every st around, then fasten off. (6)
Arm Body Round 1 :
Join Black to the BLO of the last sc of the hand. sc in every st around. (12)
Arm Body Round 2 :
Repeat (sc in next 2 sts, 2 sc in next st) around. (16)
Arm Body Round 3-12 :
Work 1 sc into every st around. (16)
Left Arm R13 :
sc in next 8 sts, hdc in next 8 sts. (16)
Left Arm R16 :
Repeat (sc in next st, 2 sc in next st) 4 times, then (hdc in next st, 2 hdc in next st) 4 times, sl st in next sc, then fasten off. (Mixed)
Right Arm R13 :
hdc in next 8 sts, sc in last 8 sts. (16)
Right Arm R16 :
Repeat (2 hdc in next st, hdc in next st) 4 times, then (2 sc in next st, sc in next st) 4 times, sl st in next hdc, then fasten off. (Mixed)
— 8. Legs (Make 2) :
Round 1 :
With Yellow, ch 2 and work 10 sc in 2nd ch. (10)
Round 2 :
Work 2 sc in every st around. (20)
Round 3 :
Repeat (sc in next st, 2 sc in next st) around. (30)
Round 4-11 :
Work 1 sc into every st around. (30)
Row 1 :
sc in next 10 sts, sl st in next sc. (10)
Row 2 :
ch 1, turn, skip sl st, sc in next 10 sts, sl st in next sc. (10)
Row 3-6 :
Continue working in rows, increasing the reach into Round 11 by one st each time as described in the PDF, finishing with 14 sc on Row 6. (14)
Round 1 :
ch 1, turn, skip sl st, sc in 14 sc, sc in next 10 sc on Round 11. (24)
Round 2 :
Skip first ch, sc in every st around. (24)
Round 3 :
sc dec, sc in next 12 sts, (sc dec) 5 times. (18)
Round 5 :
sc in next 5 sts, (sc dec) twice, sc in next 9 sts. (16)
Round 6-8 :
Work 1 sc into every st around, then fasten off. (16)
Leg Body Round 1 :
Join Black to the last sc of the foot. sc in every st around. (16)
Leg Body Round 2 :
Repeat (sc in next 3 sts, 2 sc in next st) around. (20)
Leg Body Round 3-15 :
Work 1 sc into every st around. (20)
Leg Body Round 16 :
sc in next 18 sts, leave last 2 sts unworked, then fasten off. (18)
I truly hope you enjoy every moment of bringing these icons to life! Mickey and Minnie have a way of making everyone smile, and having a handmade version in your home is just so special. Take your time with the little details like the eyelashes and those classic yellow shoes—it’s the care you put into those finishing touches that really makes the magic happen. I can't wait to see your finished pairs sitting together! Happy crafting, and may your home be filled with a little extra Disney cheer today. 🧶✨