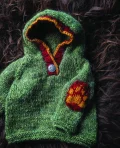
🧢 Beautiful ✨ Detailed πŸ’ Adorable

Waya Baby Hooded Sweater Crochet Pattern

Waya Baby Hooded Sweater Crochet Pattern
4.1β˜…Rating
8-10 HoursTime Needed
4.1KMade This
βœ‚οΈ

Intermediate Level

Ideal for those with basic crocheting experience, featuring slightly more advanced stitches and techniques to expand your skills.

⏱️

All-Day Adventure

Requires 8-10 hours, ideal for a full day of immersive crocheting.

🧸

Cute Companion

An adorable friend to cherish, handcrafted with love to bring comfort and joy for years to come.

About This Waya Baby Hooded Sweater Crochet Pattern

Waya Baby Hooded Sweater Crochet Pattern crochet pattern - detailed view

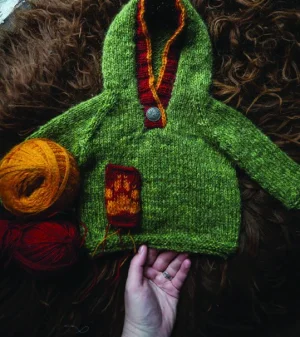
Whether you're making this for a newborn's first photo shoot or a sturdy layer for a ten-year-old explorer, the result is a timeless heirloom. It looks stunning in earthy, natural tones that celebrate the spirit of the great outdoors.

Why You'll Love This Waya Baby Hooded Sweater Crochet Pattern

I honestly couldn't get enough of the paw print chart! It’s such a satisfying little bit of colorwork that adds so much personality to a simple sweater. Plus, the way the hood is shaped feels so professional, yet the steps are very logical once you get going.

Waya Baby Hooded Sweater Crochet Pattern step 1 Waya Baby Hooded Sweater Crochet Pattern step 2 Waya Baby Hooded Sweater Crochet Pattern step 3 Waya Baby Hooded Sweater Crochet Pattern step 4

Switch Things Up

There is something truly grounding about working on a project named 'Waya'β€”the Cherokee word for wolf. When I first saw this design, I was struck by how it balances a rugged, outdoorsy feel with the delicate needs of a baby garment. I chose a wool blend for my version because I wanted that authentic, rustic look, but if you're making this for a little one with sensitive skin, a high-quality cotton or bamboo blend would work beautifully too.

The paw print patch is definitely the star of the show here. I recommend using a slightly smaller hook for the patch than you do for the body to keep the colorwork nice and crisp. It’s a small detail, but it really makes the 'toes' of the paw pop! Also, don't be afraid to play with the button choice. A wooden toggle or a vintage-style metal button can completely change the personality of the sweater. I often find myself making these as baby shower gifts because they feel so much more substantial than a standard blanket. It’s the kind of piece that gets passed down through siblings, gathering stories as it goes. I hope you enjoy the rhythm of the raglan shaping as much as I didβ€”it’s pure crochet therapy!

Common Mistakes & How to Fix Them

βœ— When joining the sleeves to the body, it is very easy to accidentally twist the arm pieceβ€”lay everything flat on a table before you begin the joining round to ensure your stitches are all facing the right way.βœ— The raglan decreases require 8 total decreases per round; if you find your stitch count is off, check that you are placing a decrease on both the left and right side of every marker.βœ— During the hoodie shaping, the decreases happen every second roundβ€”it's helpful to use a row counter or a scrap piece of yarn to track which rounds are 'decrease rounds' and which are 'plain rounds' to keep the hood symmetrical.βœ— For the paw patch colorwork, pulling your floats too tight across the back will cause the patch to pucker and shrinkβ€”keep your tension loose and carry the yarn behind your work with a bit of slack.

Waya Baby Hooded Sweater Crochet Pattern

Bringing a touch of the wilderness to your little one's wardrobe! This hoodie is all about warmth, heritage, and those adorable paw print details. You'll love how the rustic texture comes together, making it the perfect piece for outdoor adventures or cozying up at home. It's a project that feels as good to make as it does to gift.

Intermediate 8-10 Hours

Materials Needed for Waya Baby Hooded Sweater Crochet Pattern

β€” Main Fabric

  • 01
    Approximately 100-300g of worsted weight yarn in a Main Color (MC) like forest green or deep brown
  • 02
    Small amount (approx. 50g) of worsted weight yarn in Contrast Color 1 (CC1) for the paw patch and hoodie trim
  • 03
    Small amount (approx. 50g) of worsted weight yarn in Contrast Color 2 (CC2) for the paw print details

β€” Tools Required

  • 01
    3.5 mm crochet hook
  • 02
    4.5 mm crochet hook
  • 03
    Stitch markers
  • 04
    Stitch holders or scrap yarn for holding armhole stitches
  • 05
    Yarn needle
  • 06
    Measuring tape
  • 07
    Scissors
  • 08
    One button (20-22 mm size)

Progress Tracker

0% Complete

β€” 1. Body β€” Size 0-3 Months :

Info :

Using the 3.5mm hook and MC, we'll start at the bottom of the sweater.

Round 1 :

ch 88, sl st to join while being careful not to twist the chain. (88)

Round 2-6 :

sc in each st around to create the rolled edge. (88)

Round 7-9 :

sc in flo of every st to create the textured ridge. (88)

Round 10 :

Switch to the 4.5mm hook. sc in each st around. (88)

Info :

Place markers after the 44th st to separate the front and back.

Info :

Continue working sc rounds until the piece measures 18 cm (7.1 in) from the start.

Info :

Place the first 3 and last 3 sts (6 total) on a stitch holder for the first armhole. Set the body aside.

β€” 2. Arms β€” Size 0-3 Months :

Info :

Using 3.5mm hook and MC, we'll work the sleeves from the cuff up.

Round 1 :

ch 24, sl st to join. (24)

Round 2-6 :

sc in each st around. (24)

Round 7-9 :

sc in flo of each st. (24)

Round 10 :

Switch to 4.5mm hook. sc in each st. (24)

Round 11 :

sc in the first st, inc in the next, sc until 1 st remains, inc in the last st. (26)

Round 12-14 :

sc in each st around. (26)

Info :

Repeat the increase round every 4th round until you have 36 sts.

Info :

Continue sc until the sleeve measures 18 cm (7.1 in).

Info :

Place the first 3 and last 3 sts on a holder. Make a second sleeve identical to the first.

β€” 3. Yoke Joining & Raglan β€” Size 0-3 Months :

Info :

Switch to 4.5mm circular hook or larger cable. We will now join the body and sleeves.

Round 1 :

sc across the first sleeve, then sc across 42 sts of the front, sc across the second sleeve, and finally sc across the back piece. (136)

Info :

Mark the 4 points where the sleeves and body meet.

Round 2 :

At each of the 4 markers, work a dec on both the left and right side of the marked stitch (8 dec total). (128)

Round 3 :

sc in each st around. (128)

Info :

Repeat Rounds 2 and 3 until you have 68 sts left on your hook.

β€” 4. Hoodie Option :

Info :

If you want the hoodie, we'll start working back and forth instead of in the round.

Row 1 :

Bind off or skip the middle 6 sts at the front. This is your new opening.

Row 2 :

Continue the raglan decreases every other row until you have 68 sts remaining.

Info :

Work sc rows back and forth until the hood measures 18 cm (7 in) from the neckline.

Info :

Mark the middle of the back. dec 1 st on each side of this marker every 2nd row, 3 times total.

Info :

sl st the top edges together to close the hood.

β€” 5. Hoodie Button Band :

Row 1 :

Using CC1 and 3.5mm hook, pick up 3 sts along the hood edge, skip the 4th, and repeat.

Row 2 :

sc in each st across. (Ensure an even number of sts).

Row 3 :

Work in blo sc ribbing (sc 1, sl st 1) for 4 cm (1.5 in).

Info :

If adding a buttonhole, dec 1 st and ch 1 at the 2 cm mark, then continue ribbing.

Info :

Bind off using a contrasting color for a decorative edge.

β€” 6. Arm Patches (Small Sizes) :

Info :

Use 3.5mm hook and CC1. We work these flat.

Row 1 :

ch 11, sc in second ch from hook and across. (10)

Info :

Follow the paw print color chart, using CC2 for the paw pads.

Info :

Bind off loosely and leave a long tail for sewing.

Assembly Instructions

  • Place the sweater flat and use a yarn needle to sew the underarm gaps together using the stitches held on the scrap yarn.
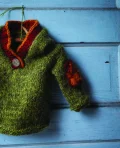
  • Position the paw patches on the elbows of the sleeves, ensuring they are centered and symmetrical on both arms.
  • Whipstitch the bottom of the button band where it meets the chest, overlapping the edges slightly for a clean look.
  • If you made the hoodie, use a slip stitch join or Kitchener stitch to close the top seam of the hood from the inside.
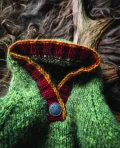
  • Secure the button to the right side of the neck opening, aligning it perfectly with your buttonhole on the left side.
  • Weave in all remaining yarn tails on the inside of the garment to ensure a professional and comfortable finish.

Important Notes

  • πŸ’‘Always check your gauge before starting; if your stitches are too loose, the sweater will lose its structure and warmth.
  • πŸ’‘When working the colorwork on the patches, try to catch your floats every 3 stitches to prevent long loops on the back.
  • πŸ’‘Blocking your finished sweater in lukewarm water with a bit of wool soak will help even out the stitches and soften the fibers.
  • πŸ’‘If you prefer a cleaner look for the patches, you can add a simple slip stitch border around the edge before sewing them on.
  • πŸ’‘For the raglan decreases, using a different colored marker for the start of the round helps you keep track of your progress.

I can’t wait to see your version of this little mountain sweater! There is something so special about seeing a child wear something handmade with such care. Whether you stick to the traditional earthy greens or go for a bold, bright palette, the Waya Baby Hoodie is sure to become a cherished piece in any family. Don't forget to share your progress and tag me so I can cheer you on! Happy crafting, and may your stitches be as steady as a wolf's stride. 🧢 ✨

You ask,

we answer.

FAQs

Can I use acrylic yarn instead of wool for this sweater?

Absolutely! While wool provides that traditional rustic look, a soft acrylic or cotton blend is a great choice for babies with sensitive skin. Just make sure it's a worsted weight to match the gauge.

How do I make the buttonhole larger for a chunky button?

In the button band section, simply chain 2 instead of 1 when creating the buttonhole gap, and skip an extra stitch in the row below to accommodate the larger size.

The raglan lines look crooked, what did I do wrong?

Check that you are decreasing exactly on either side of your markers. If you shift the decrease by even one stitch, the line will begin to slant diagonally across the body.

Is the paw patch worked separately or directly onto the sleeve?

The patch is worked separately as a flat piece and then sewn onto the elbow. This makes the colorwork much easier to manage than trying to work it into the round sleeve.