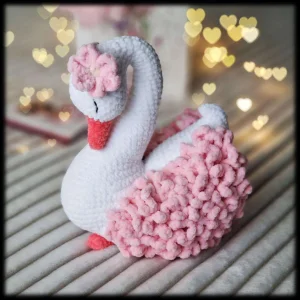
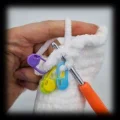
There is something so incredibly peaceful about a swan, and I wanted to capture that elegance in a huggable form. Using super soft velvet yarn, this project turns into a cloud-like companion that is just as beautiful on a nursery shelf as it is in a child's arms. You will love the way the long, curved neck flows into the textured body, creating a piece that feels truly special and high-end.
Progress Tracker
0% Complete
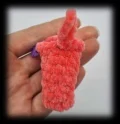
— 1. Beak :
Round 1 :
Start with 4 ch. Beginning in the second chain from your hook, work 3 sc, then work 3 sc along the opposite side of the foundation chain (6)
Round 2 :
Work 6 sc around (6)
Round 3 :
1 inc, 1 sc, 1 inc, 3 sc (8)
Round 4 :
Work 8 sc around (8)
Round 5 :
2 sc, 3-sc-inc, 5 sc (10)
Round 6 :
Work 10 sc around (10)
Round 7 :
2 sc, 3-sc-inc, 7 sc (12)
Round 8 :
3 sc, 3-sc-inc, 4 sc, 3 slst. Stop here, leaving the last stitch of the round unworked (14)
Info :
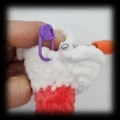
Switch to white yarn on the final slst of Round 8. Stuff the beak with fiberfill before continuing to the head.
— 2. Head, Neck & Body :
Round 1 :
Work 2 slst, 1 inc, 2 sc, 1 hdc, 5-hdc-inc, 1 hdc, 2 sc, 1 inc, 3 slst (20)
Round 2 :
Work 2 slst, 1 inc, 5 sc, 1 hdc, 5-hdc-inc, 1 hdc, 5 sc, 1 inc, 3 slst (26)
Round 3 :
Work 2 slst, 1 inc, 6 sc, 7 hdc, 6 sc, 1 inc, 1 sc (shifting stitch), 3 slst (26)
Round 4 :
Work 2 slst, 1 inc, 9 sc, 1 hdc, 3-hdc-inc, 1 hdc, 9 sc, 1 inc, 3 slst (32)
Round 5 :
Work 2 slst, 11 sc, 5 hdc, 11 sc, 3 slst (32)
Round 6 :
Work 2 slst, 11 sc, 5 hdc, 11 sc, 1 slst, move your marker forward one stitch, then 3-slst-dec (30)
Round 7 :
Work 1 slst, 11 sc, 5 hdc, 11 sc, move marker forward one stitch, 3-slst-dec (28)
Round 8 :
Work 1 slst, 5 sc, 1 dec, 3 sc, 5 hdc, 3 sc, 1 dec, 5 sc, move marker forward one stitch, 3-slst-dec (24)
Round 9 :
Work 1 slst, 8 sc, 5 hdc, 8 sc, move marker forward one stitch, 3-slst-dec (22)
Round 10 :
Work 1 slst, 4 sc, 1 dec, 1 sc, 5 hdc, 1 sc, 1 dec, 4 sc, move marker forward one stitch, 3-slst-dec (18)
Round 11 :
Work 1 slst, 2 sc, 1 dec, 1 sc, 5 hdc, 1 sc, 1 dec, 2 sc, move marker forward one stitch, 3-slst-dec (14)
Round 12 :
Work 1 slst, 3 sc, 5 hdc, 3 sc, move marker forward one stitch, 3-slst-dec (12)
Round 13 :
Work 1 slst, 2 sc, 5 hdc, 2 sc, 2 slst (12)
Round 14 :
Work 1 slst, 2 sc, 5 hdc, 2 sc, 1 slst, then work the next 1 slst in the back loop only (12)
Round 15 :
Work 1 slst, 2 sc, 5 hdc, 2 sc, 2 slst (12)
Round 16 :
Work 1 slst, 3 sc, 3 hdc, 3 sc, 2 slst (12)
Round 17 :
Work 1 slst, 4 sc, 1 hdc, 4 sc, 1 slst, then 1 slst using the back loop left over from Round 14. Move marker and work 5-6 extra sc to reach the center back of the neck (12)
Round 18 :
Work 5 sc, 1 inc, 6 sc (13)
Round 19 :
Work 5 sc, 3 slst, 5 sc (13)
Round 20 :
Work 6 sc, 1 inc, 6 sc (14)
Round 21 :
Work 1 sc, 1 dec, 2 sc, 1 inc, 2 sc, 1 inc, 2 sc, 1 dec, 1 sc (14)
Round 22 :
Work 6 sc, 2 inc, 6 sc (16)
Round 23 :
Work 6 sc, 4 slst, 6 sc (16)
Round 24 :
Work 6 sc, 1 inc, 2 sc, 1 inc, 6 sc (18)
Round 25 :
Work 1 sc, 1 dec, 5 sc, 2 inc, 5 sc, 1 dec, 1 sc (18)
Round 26 :
Work 18 sc around (18)
Round 27 :
Work 1 sc, 1 dec, 4 sc, 1 inc, 2 sc, 1 inc, 4 sc, 1 dec, 1 sc (18)
Round 28 :
Work 8 sc, 2 inc, 8 sc (20)
Round 29 :
Work 1 sc, 1 dec, 5 sc, 1 inc, 2 sc, 1 inc, 5 sc, 1 dec, 1 sc (20)
Round 30 :
Work 9 sc, 2 inc, 9 sc (22)
Round 31 :
Work 9 sc, 1 inc, 2 sc, 1 inc, 9 sc (24)
Round 32 :
Work 11 sc, 2 inc, 11 sc (26)
Round 33 :
Work 1 sc, 1 dec, 9 sc, 2 inc, 9 sc, 1 dec, 1 sc (26)
Round 34 :
Work 11 sc, 1 inc, 2 sc, 1 inc, 11 sc (28)
Round 35 :
Work 1 sc, 1 dec, 10 sc, 2 inc, 10 sc, 1 dec, 1 sc (28)
Round 36 :
Work 12 sc, 1 inc, 2 sc, 1 inc, 12 sc (30)
Round 37 :
Work 1 sc, 1 dec, 6 sc, 1 inc, 4 sc, 2 inc, 4 sc, 1 inc, 6 sc, 1 dec, 1 sc (32)
Round 38 :
Work 1 sc, 1 dec, 9 sc, 1 inc, 2 sc, 2 inc, 2 sc, 1 inc, 8 sc, 1 slst, 2-slst-dec, 1 slst (34)
Round 39 :
Work 6 slst, 22 sc, 3 slst, then 3 slst in back loop only (34)
Round 40 :
Work 3 slst in back loop only. Then for both loops: 6 sc, 1 inc, 6 sc, 2 inc, 6 sc, 1 inc, 6 sc, 3 slst, then grab the back loop left from Round 39 for the final stitches (38)
Round 41 :
Work 3 slst in the back loop from Round 40, 5 slst, 5 sc, 1 inc, 10 sc, 1 inc, 5 sc, 5 slst, then 3 slst in back loop only (40)
Round 42 :
Work 3 slst in back loop only. For both loops: 5 sc, 1 inc, 6 sc, 1 inc, 3 sc, 2 inc, 3 sc, 1 inc, 6 sc, 1 inc, 5 sc, 3 slst, then work into the back loop from Round 41 (46)
Round 43 :
Work 3 slst in back loop from Round 42, 7 slst, 9 sc, 1 inc, 6 sc, 1 inc, 9 sc, 7 slst, then 3 slst in back loop only (48)
Round 44 :
Work 3 slst in back loop only. For both loops: 12 sc, 1 inc, 16 sc, 1 inc, 12 sc, 3 slst, then work into the back loop from Round 43 (50)
Round 45 :
Work 3 slst in back loop from Round 44, 9 slst, 2 sc, 1 inc, 9 sc, 2 inc, 9 sc, 1 inc, 2 sc, 9 slst, then 3 slst in back loop only (54)
Round 46 :
Work 3 slst in back loop only. For both loops: 48 sc, 3 slst (54)
Round 47 :
Work 14 slst, 3 sc, 1 inc, 18 sc, 1 inc, 3 sc, 14 slst (56)
Round 48 :
Work 3 slst, 7 sc, 1 inc, 34 sc, 1 inc, 7 sc, 3 slst (58)
Round 49 :
Work 16 slst, 26 sc, 16 slst (58)
Round 50 :
Work 3 inc, grab back loops from Round 46, 10 inc, 1 dec, 4 sc, (1 dec, 3 sc) repeat twice, (3 sc, 1 dec) repeat twice, 4 sc, 1 dec, 10 inc, 3 inc, grab back loops from Round 45 (78)
Round 51 :
(1 sc, 1 inc) repeat 5 times, 10 sc, (1 sc, 1 inc) repeat 3 times, 1 dec, 22 sc, 1 dec, (1 inc, 1 sc) repeat 3 times, 10 sc, (1 inc, 1 sc) repeat 5 times (92)
Round 52 :
13 sc, work 10 sc in back loop only (mark the front loops with green), 11 sc, 1 dec, 3 sc, 1 dec, (2 sc, 1 dec) repeat 3 times, 3 sc, 1 dec, 11 sc, 10 sc in back loop only (mark front loops with green), 13 sc (86)
Round 53 :
(6 sc, 1 inc) repeat 4 times, 5 sc, (1 dec, 4 sc) repeat 3 times, 1 dec, 5 sc, (1 inc, 6 sc) repeat 4 times (90)
Round 54 :
5 sc, 1 inc, 5 sc, work (1 inc, 5 sc) repeat twice in back loop only (mark front loops with orange). For both loops: 1 inc, 5 sc, 1 inc, (1 dec, 3 sc) repeat 3 times, (3 sc, 1 dec) repeat 3 times, 1 inc, 5 sc, 1 inc. Back loop only: (1 inc, 5 sc) repeat twice (mark front loops with orange). Both loops: 5 sc, 1 inc, 5 sc (94)
Round 55 :
(7 sc, 1 inc) repeat 4 times, (3 sc, 1 dec) repeat 3 times, (1 dec, 3 sc) repeat 3 times, (1 inc, 7 sc) repeat 4 times (96)
Round 56 :
11 sc, work 14 sc in back loop only (mark front loops with purple). Both loops: 8 sc, (1 dec, 3 sc) repeat 3 times, (3 sc, 1 dec) repeat 3 times, 8 sc. Back loop only: 14 sc (mark front loops with purple). Both loops: 11 sc (90)
Round 57 :
(6 sc, 1 inc) repeat 4 times, 2 sc, (3 sc, 1 dec) repeat 3 times, (1 dec, 3 sc) repeat 3 times, 2 sc, (1 inc, 6 sc) repeat 4 times (92)
Round 58 :
9 sc, work 15 sc in back loop only (mark front loops with blue). Both loops: 7 sc, (1 dec, 3 sc) repeat 3 times, (3 sc, 1 dec) repeat 3 times, 7 sc. Back loop only: 15 sc (mark front loops with blue). Both loops: 9 sc (86)
Round 59 :
(6 sc, 1 inc) repeat 4 times, (3 sc, 1 dec) repeat 3 times, (1 dec, 3 sc) repeat 3 times, (1 inc, 6 sc) repeat 4 times (88)
Round 60 :
7 sc, work 17 sc in back loop only (mark front loops with pink). Both loops: 5 sc, (1 dec, 3 sc) repeat 3 times, (3 sc, 1 dec) repeat 3 times, 5 sc. Back loop only: 17 sc (mark front loops with pink). Both loops: 7 sc (82)
Round 61 :
(5 sc, 1 inc) repeat 4 times, 2 sc, (3 sc, 1 dec) repeat 3 times, (1 dec, 3 sc) repeat 3 times, 2 sc, (1 inc, 5 sc) repeat 4 times (84)
Round 62 :
5 sc, work 19 sc in back loop only (mark front loops with yellow). Both loops: 3 sc, (1 dec, 3 sc) repeat 3 times, (3 sc, 1 dec) repeat 3 times, 3 sc. Back loop only: 19 sc (mark front loops with yellow). Both loops: 5 sc (78)
Round 63 :
(5 sc, 1 inc) repeat 4 times, (3 sc, 1 dec) repeat 3 times, (1 dec, 3 sc) repeat 3 times, (1 inc, 5 sc) repeat 4 times (80)
Round 64 :
25 sc, (1 dec, 3 sc) repeat 3 times, (3 sc, 1 dec) repeat 3 times, 25 sc (74)
Round 65 :
(6 sc, 1 inc) repeat 4 times, (1 sc, 1 dec) repeat 3 times, (1 dec, 1 sc) repeat 3 times, (1 inc, 6 sc) repeat 3 times, 1 inc, 3 sc, (3-sc-inc) repeat 3 times (82)
Round 66 :
(3-sc-inc) repeat 3 times, 29 sc, 6 dec, 38 sc (76)
Round 67 :
Work 40 sc, then 1 slst to finish (40)
Info :
Fasten off leaving a long tail (approx. 60cm). Stuff the body firmly and sew the remaining 38-stitch opening closed.
— 3. Wings :
Info :
The wings are worked directly onto the marked front loops. Use pink yarn and a 4mm hook.
Row 1 :
Attach pink yarn to the last front loop of Round 52. ch 5. In each front loop between the markers, work the following combo: (1 dtr, ch 1, 1 dtr, ch 3, 1 sc in the third chain from the hook).
Row 2 :
Repeat the combination for each marked row: 10 times for green, 12 for orange, 14 for purple, 15 for blue, 17 for pink, and 19 for yellow.
Row 3 :
On the final yellow row (Round 62), after finishing the ruffles, ch 4 and attach to the last slst of Round 60 with a slst. Fasten off and hide tails.
— 4. Legs :
Round 1 :
Start with 5 ch. From the second chain, work 4 sc, then work 4 sc on the other side of the chain (8)
Round 2 :
Work 8 sc around (8)
Round 3 :
3 sc, 1 dec, 2 sc, move marker, 1 dec, 3 sc (6)
Info :
Stuff lightly. Fold the opening flat and crochet 3 sc through both layers to close. Leave a tail for sewing.
— 5. Flower :
Round 1 :
Using powdery pink, work 6 sc into an AR. Change to pink yarn on the last stitch (6)
Round 2 :
In each stitch around, work: (ch 2, 2 trc, ch 2, 1 slst). Fasten off and use tails for sewing.
Your graceful swan is now complete! I hope you enjoyed the process of watching those ruffles grow and seeing her personality emerge with every stitch. There is something so rewarding about finishing a project that looks this sophisticated yet feels so soft. Whether she's destined for a special gift or a cozy corner of your own home, she's sure to bring a little bit of magic wherever she goes. Thank you for crafting along with me, and I can't wait to see your beautiful finished swans! Happy crocheting! 🧶 🧵 ✨