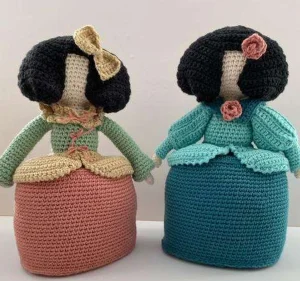
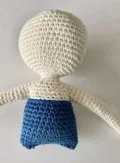
You're going to love bringing a piece of classical art to life with these elegant Menina dolls! Inspired by the famous "Ladies in Waiting," these little figures have such a unique, voluminous shape that's a joy to crochet. Whether you're making a single doll or a whole royal court, they make the most sophisticated handmade gifts.
Progress Tracker
0% Complete
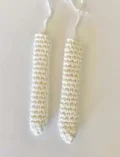
— 1. Arms (Make 2) :
Round 1 :
Start with flesh yarn and work 4 sc into a magic ring (4)
Round 2 :
Work 1 inc in every stitch around (8)
Round 3-21 :
Work 1 sc in each of the 8 stitches (8)
Info :
Fasten off and set aside for assembly later.
— 2. Main Body :
Round 1 :
Using your chosen dress color, ch 28 and join with a sl st to form a loop (28)
Round 1-12 :
Work 1 sc in each of the 28 stitches (28)
Info :
Cut the yarn and weave in your ends.
Round 13 :
Attach flesh yarn to the top of the last row and work 28 sl st around (28)
Round 14 :
Working in the sc blo of the previous row: 2 sc, 1 dec, 3 sc, then work 6 sc around the top of the first arm. Continue on the body with 3 sc, 1 dec, 4 sc, 1 dec, 3 sc. Work 6 sc around the second arm. Finish the body row with 3 sc, 1 dec, 2 sc (36)
Note :
Use the yarn tails from the arms to sew any small gaps closed where the arms meet the body.
Round 15 :
(4 sc, 1 dec) repeat 6 times (30)
Round 16 :
(3 sc, 1 dec) repeat 6 times (24)
Round 17 :
1 sc, 1 dec, 1 sc, 2 dec, 1 sc, 1 dec, 2 sc, 1 dec, 1 sc, 2 dec, 1 sc, 1 dec, 1 sc (16)
Round 18 :
1 sc, 1 dec, 2 sc, 1 dec, 2 sc, 1 dec, 2 sc, 1 dec, 1 sc (12)
Round 19-21 :
Work 1 sc in each of the 12 stitches (12)
— 3. Head :
Round 1 :
Work 1 inc in every stitch around (24)
Round 2 :
(3 sc, 1 inc) repeat 6 times (30)
Round 3 :
(1 inc, 4 sc) repeat 6 times (36)
Round 4 :
2 sc, 1 inc, (5 sc, 1 inc) repeat 5 times, 3 sc (42)
Round 5 :
(6 sc, 1 inc) repeat 6 times (48)
Round 6-14 :
Work 1 sc in each of the 48 stitches (48)
Round 15 :
(6 sc, 1 dec) repeat 6 times (42)
Round 16 :
2 sc, 1 dec, (5 sc, 1 dec) repeat 5 times, 3 sc (36)
Round 17 :
(4 sc, 1 dec) repeat 6 times (30)
Round 18 :
(3 sc, 1 dec) repeat 6 times (24)
Round 19 :
(2 sc, 1 dec) repeat 6 times (18)
Info :
Stuff the head firmly before continuing.
Round 20 :
(1 sc, 1 dec) repeat 6 times (12)
Info :
Finish stuffing the head completely.
Info :
Fasten off and sew the bottom of the body closed.
— 4. Skirt :
Round 1 :
Using a new color, ch 30 and join with a sl st. Work 30 sc (30)
Round 2 :
Work 1 sc in each of the 30 stitches (30)
Round 3 :
5 sc, 6 inc, 9 sc, 6 inc, 4 sc (42)
Round 4 :
5 sc, 1 inc, 2 sc, 1 inc, 4 sc, 1 inc, 2 sc, 1 inc, 9 sc, 1 inc, 2 sc, 1 inc, 4 sc, 1 inc, 2 sc, 1 inc, 4 sc (50)
Round 5 :
5 sc, 1 inc, 4 sc, 1 inc, 4 sc, 1 inc, 4 sc, 1 inc, 9 sc, 1 inc, 4 sc, 1 inc, 4 sc, 1 inc, 4 sc, 1 inc, 4 sc (58)
Round 6 :
7 sc, 1 inc, 4 sc, 1 inc, 4 sc, 1 inc, 4 sc, 1 inc, 13 sc, 1 inc, 4 sc, 1 inc, 4 sc, 1 inc, 4 sc, 1 inc, 6 sc (66)
Round 7 :
11 sc, 1 inc, 3 sc, 1 inc, 2 sc, 1 inc, 3 sc, 1 inc, 21 sc, 1 inc, 3 sc, 1 inc, 2 sc, 1 inc, 3 sc, 1 inc, 10 sc (74)
Round 8 :
14 sc, 1 inc, 3 sc, 1 inc, 7 sc, 1 inc, 3 sc, 1 inc, 13 sc, 1 inc, 3 sc, 1 inc, 7 sc, 1 inc, 3 sc, 1 inc, 13 sc (82)
Round 9 :
Work 82 sc blo around (82)
Round 10-35 :
Work 1 sc in each of the 82 stitches (82)
Info :
Fasten off and weave in ends. Trace the skirt base onto cardboard for your structural support.
— 5. Overskirt :
Row 1 :
Ch 32. Starting in 2nd ch from hook, work 31 sc. Ch 1 and turn (31)
Row 2 :
Work 31 sc. Ch 1 and turn (31)
Row 3 :
5 sc, 6 inc, 9 sc, 6 inc, 5 sc. Ch 1 and turn (43)
Row 4 :
5 sc, 1 inc, 2 sc, 1 inc, 4 sc, 1 inc, 2 sc, 1 inc, 9 sc, 1 inc, 2 sc, 1 inc, 4 sc, 1 inc, 2 sc, 1 inc, 5 sc. Ch 1 and turn (51)
Row 5 :
5 sc, 1 inc, 4 sc, 1 inc, 4 sc, 1 inc, 4 sc, 1 inc, 9 sc, 1 inc, 4 sc, 1 inc, 4 sc, 1 inc, 4 sc, 1 inc, 5 sc. Ch 1 and turn (59)
Row 6 :
7 sc, 1 inc, 4 sc, 1 inc, 4 sc, 1 inc, 4 sc, 1 inc, 13 sc, 1 inc, 4 sc, 1 inc, 4 sc, 1 inc, 4 sc, 1 inc, 7 sc. Ch 1 and turn (67)
Row 7 :
11 sc, 1 inc, 12 sc, 1 inc, 18 sc, 1 inc, 12 sc, 1 inc, 11 sc, 11 sc. Ch 1 and turn (71)
Row 8 :
14 sc, 1 inc, 10 sc, 1 inc, 20 sc, 1 inc, 10 sc, 1 inc, 14 sc. Ch 1 and turn (75)
Row 9-11 :
Skip the first stitch, then work 1 sc in every stitch until the end. Finish with a sl st (72)
Info :
Work a row of crab stitch along the edge for a decorative finish.
— 6. Dress Base :
Round 1 :
In a magic circle, work 6 inc (12)
Round 2 :
(1 sc, 1 inc) repeat 6 times (18)
Round 3 :
(2 sc, 1 inc) repeat 6 times (24)
Round 4 :
(3 sc, 1 inc) repeat 6 times (30)
Round 5 :
5 sc, 6 inc, 9 sc, 6 inc, 4 sc (42)
Round 6 :
5 sc, 1 inc, 2 sc, 1 inc, 4 sc, 1 inc, 2 sc, 1 inc, 9 sc, 1 inc, 2 sc, 1 inc, 4 sc, 1 inc, 2 sc, 1 inc, 4 sc (50)
Round 7 :
5 sc, 1 inc, 4 sc, 1 inc, 4 sc, 1 inc, 4 sc, 1 inc, 9 sc, 1 inc, 4 sc, 1 inc, 4 sc, 1 inc, 4 sc, 1 inc, 4 sc (58)
Round 8 :
7 sc, 1 inc, 4 sc, 1 inc, 4 sc, 1 inc, 4 sc, 1 inc, 13 sc, 1 inc, 4 sc, 1 inc, 4 sc, 1 inc, 4 sc, 1 inc, 6 sc (66)
Round 9 :
11 sc, 1 inc, 3 sc, 1 inc, 2 sc, 1 inc, 3 sc, 1 inc, 21 sc, 1 inc, 3 sc, 1 inc, 2 sc, 1 inc, 3 sc, 1 inc, 10 sc (74)
Round 10 :
14 sc, 1 inc, 3 sc, 1 inc, 7 sc, 1 inc, 3 sc, 1 inc, 13 sc, 1 inc, 3 sc, 1 inc, 7 sc, 1 inc, 3 sc, 1 inc, 13 sc (82)
Round 11 :
10 sc, 4 hdc, 1 inc (hdc), 3 hdc, 1 inc (hdc), 7 hdc, 1 inc (hdc), 3 hdc, 1 inc (sc), 20 sc, 1 inc (sc), 3 hdc, 1 inc (hdc), 7 hdc, 1 inc (hdc), 3 hdc, 1 inc (hdc), 4 hdc, 10 sc (90)
Round 12 :
Work 1 sc in each of the 90 stitches (90)
— 7. Hair :
Round 1 :
In a magic circle, work 6 inc. Sl st, ch 1 and turn (12)
Round 2 :
(1 sc, 1 inc) repeat 6 times (18)
Round 3 :
(2 sc, 1 inc) repeat 6 times (24)
Round 4 :
(3 sc, 1 inc) repeat 6 times (30)
Round 5 :
(4 sc, 1 inc) repeat 6 times (36)
Round 6 :
(5 sc, 1 inc) repeat 6 times (42)
Round 7 :
(6 sc, 1 inc) repeat 6 times (48)
Round 8 :
10 sc, (1 inc, 1 sc) repeat 6 times, 11 sc, (1 inc, 1 sc) repeat 6 times, 3 sc (60)
Row 9 :
Work 54 sc. Leave the remaining 6 stitches unworked to form the fringe area (54)
Row 10 :
1 sc, 1 inc, 50 sc, 1 inc, 1 sc (56)
Row 12 :
1 sc, 1 inc, 52 sc, 1 inc, 1 sc (58)
Row 14 :
1 sc, 1 inc, 48 sc, 1 sl st. Turn (leaving 7 stitches unworked)
Row 15 :
Skip the first sl st, work 42 sc, 1 sl st. Turn (leaving 8 stitches unworked)
Row 16 :
Skip the first sl st, work 48 sc. Now work into the sl st from Row 14: 1 inc, 1 sc
Row 17 :
Work 60 sc, including the sl st skipped in the previous row
Row 18 :
1 sc, 1 inc, 48 sc, 1 sl st. Turn (leaving 9 stitches unworked)
Row 19 :
Skip the first sl st, work 40 sc, 1 sl st. Turn (leaving 10 stitches unworked)
Row 20 :
Skip the first sl st, work 48 sc. Now work into the sl st from Row 18: 1 inc, 1 sc
Row 21 :
Work 62 sc, including the sl st skipped in the previous row
Row 22 :
1 sc, 1 inc, 58 sc, 1 inc, 1 sc (64)
Note :
In the following rows, the term 'double decrease' refers to sc3tog.
Row 24 :
3 sc3tog, (2 sc, 1 dec) repeat 11 times, 2 sc, 3 sc3tog (41)
Row 25 :
1 sc3tog, (1 sc, 1 dec) repeat 11 times, 2 sc, 1 sc3tog
— 8. Sleeve Type A :
Round 1 :
Ch 10 and join with a sl st. Work 10 sc (10)
Round 2 :
Work 10 inc (20)
Round 3-4 :
Work 1 sc in each of the 20 stitches (20)
Round 5 :
(3 sc, 1 dec) repeat 4 times (16)
Round 7 :
(2 sc, 1 dec) repeat 4 times (12)
Round 8-20 :
Work 1 sc in each of the 12 stitches (12)
— 9. Collar & Bows Type A :
Neckline Lace :
Ch 35. Row 1: 35 sl st. Row 2: 35 sc. Row 3: (1 sc, 1 dc, 1 sc in same stitch, 1 sl st in next) repeat to end.
Neckline Edge :
Using sl st to position at the starting chain: *ch 3, skip 1 ch, sl st in next* repeat to end.
Bow :
Ch 10 (last 3 count as 1 dc). Work 5 rows of 7 dc each. Wrap yarn around center to shape.
— 10. Sleeve Type B :
Ribbing :
Ch 16. Row 1: 15 sc, ch 1, turn. Row 2: 15 sc flo, ch 1, turn. Row 3: 15 sc blo, ch 1, turn. Repeat Rows 2-3 eighteen times.
Cuff Edge :
Along one long side, work 20 sc and 1 sl st. Join into a circle with 1 sc into the first sl st.
Cuff Shaping :
Work 20 sc around. Next row: 10 dec. Then work 5 rows of 10 sc each.
— 11. Collar Type B :
Row 1 :
Ch 39. Work 38 sc starting in 2nd ch. Ch 1, turn (38)
Row 2 :
12 sc, 3 sc in next st, 12 sc, 3 sc in next st, 12 sc (42)
Row 4 :
13 sc, 3 sc in next st, 14 sc, 3 sc in next st, 13 sc (46)
— 12. Flower Accessory :
Row 1 :
Ch 15. *Skip 1 ch, (1 sc, 1 hdc, 1 sc) all in the next ch* repeat 7 times.
Info :
Roll the petals up and secure with a few stitches at the back.
I can't wait to see the beautiful royal court you create with this pattern! There is something so magical about seeing these dolls come together, from the wide skirts to the tiny floral details. Whether you stick to the classic styles or experiment with your own favorite color palettes, I hope you enjoy every single stitch. Happy crocheting, and may your finished Meninas bring a little bit of artistic elegance to your home! 🧶✨