About This Mimosa Baby Amigurumi Pattern
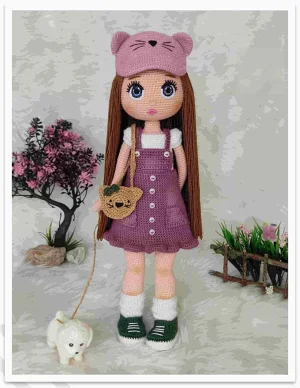
Style her, pose her, and fall in love with every tiny detail! This doll is an heirloom-quality project that showcases the incredible artistry of high-end handmade amigurumi.
Designed for experienced crocheters, these patterns involve intricate designs and complex techniques to challenge and inspire.
A 10-12 hour project—great for savoring the process over several sessions.
Delightful animal designs with sweet details that capture the essence of your favorite woodland and farmyard friends.
Style her, pose her, and fall in love with every tiny detail! This doll is an heirloom-quality project that showcases the incredible artistry of high-end handmade amigurumi.
I honestly think the best part of this pattern is seeing Mimosa's personality emerge through the eye embroidery. It’s so much more rewarding than just popping in safety eyes! Plus, the hair transplant technique creates such a lush, styleable mane that makes her feel like a real little character. You'll feel like a true artist by the time she's finished.
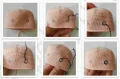
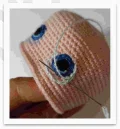
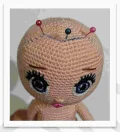
I remember the first time I tried to embroider eyes instead of using safety eyes—it was a total game-changer for my dolls! Mimosa is the perfect example of why that extra effort is so worth it. Her gaze has so much depth and personality. When I was designing her wardrobe, I wanted something that felt modern but still had that whimsical 'cat-lady' charm, which is how the little hat came to be.
Working with wire can be a bit fiddly at first, but don't let it intimidate you. It gives the body such a professional structure, especially in the neck and arms. My biggest tip for this pattern is to take your time with the hair. It is a labor of love, but once you style those long strands, she really comes into her own. I chose these specific colors because they feel cozy yet vibrant, but she would look just as sweet in autumnal oranges or spring pastels. I can't wait to see the unique spin you put on your own Mimosa Baby! Happy hooking, friends!
Meet Mimosa, a stylish and sophisticated amigurumi doll that brings a touch of modern fashion to the world of crochet. You will absolutely love the process of building her entire look, from her poseable wire-framed body to her adorable cat-themed accessories. She stands at an impressive 35cm, making her a standout piece for any collection or a truly special handmade gift for someone you love. This project is a wonderful journey through various techniques that will keep you engaged from the first stitch to the final assembly.
Start with skin color. 6 sc into a sh (6)
6 x inc (12)
(1 sc, inc) repeat 6 times (18)
(2 sc, inc) repeat 6 times (24)
(3 sc, inc) repeat 6 times (30)
(4 sc, inc) repeat 6 times (36)
(5 sc, inc) repeat 6 times (42)
(6 sc, inc) repeat 6 times (48)
(7 sc, inc) repeat 6 times (54)
(8 sc, inc) repeat 6 times (60)
(9 sc, inc) repeat 6 times (66)
(10 sc, inc) repeat 6 times (72)
sc in every st around (72)
Pause here for eye embroidery. Mark the midpoint between the 21st and 22nd rows. Space the pupils 11 stitches apart. Use black thread for pupils, dark and light blue for the iris, and white for the shimmer and whites of the eyes.
sc in every st around (72)
2 sc, dec, (10 sc, dec) repeat 5 times, 8 sc (66)
5 sc, dec, (9 sc, dec) repeat 5 times, 4 sc (60)
(8 sc, dec) repeat 6 times (54)
2 sc, dec, (7 sc, dec) repeat 5 times, 5 sc (48)
5 sc, dec, (6 sc, dec) repeat 5 times, 1 sc (42)
Begin stuffing the head firmly, ensuring a round shape. Note that the pattern sequence skips to Round 38.
2 sc, dec, (5 sc, dec) repeat 5 times, 3 sc (36)
(4 sc, dec) repeat 6 times (30)
(3 sc, dec) repeat 6 times (24)
(1 sc, dec) repeat 8 times, sl st (16)
Using skin color, 6 sc into a sh (6)
2 x inc, 1 sc, 2 x inc, 1 sc (10)
2 sc, inc, 4 sc, inc, 2 sc (12)
3 sc, inc, 5 sc, inc, 2 sc (14)
4 sc, inc, 9 sc (15)
sc in every st around (15)
4 sc, dec, 6 sc, dec, 1 sc (13)
11 sc (12) - Note: Adjust to 12 if count differs
sc in every st around, sl st at the end. Do not stuff. (12)
Using tan yarn, ch 9. Starting in 2nd ch: inc, 6 sc, 3 sc in last ch. Turn to work on other side: 7 sc (18)
inc, 8 sc, inc, 8 sc (20)
sc in every st around (20)
3 sc, ch 7, skip 9 st, 8 sc
3 sc, 7 sc across the ch, 8 sc (18)
(1 sc, dec) repeat 6 times (12)
6 x dec (6). Close the heel and fasten off.
Attach skin yarn to the 4th loop of the heel opening. 4 sc on the ch, 1 sc in gap, 9 sc across front, 1 sc in gap, 3 sc on ch (18)
4 sc, dec, flo 7 sc, dec, 3 sc (16)
sc in every st around (16)
inc, 15 sc (17)
sc in every st around (17)
1 sc, inc, 15 sc (18)
sc in every st around (18)
2 sc, inc, 15 sc (19)
3 sc, inc, 15 sc (20)
sc in every st around (20)
4 sc, inc, 15 sc (21)
sc in every st around (21)
5 sc, inc, 15 sc (22)
sc in every st around (22)
6 sc, inc, 15 sc (23)
sc in every st around (23)
5 sc, dec, 1 sc, dec, 13 sc (21)
sc in every st around (21)
4 sc, dec, 1 sc, dec, 12 sc (19)
5 sc, dec, 5 sc, 4 x inc, 3 sc (22)
sc in every st around (22)
11 sc, 4 x dec, 3 sc (18)
4 sc, inc, 1 sc, inc, 11 sc (20)
sc in every st around (20)
6 sc, inc, 13 sc (21)
sc in every st around (21)
6 sc, inc, 1 sc, inc, 12 sc (23)
sc in every st around (23)
8 sc, inc, 14 sc (24)
sc in every st around (24)
9 sc, inc, 14 sc (25)
sc in every st around (25)
10 sc, inc, 14 sc (26)
sc in every st around (26)
11 sc, inc, 14 sc (27)
sc in every st around (27)
12 sc, inc, 14 sc (28)
4 sc with tan, 24 sc with white (28)
sc in every st around in white (28)
4 sc, sl st, fasten off (28)
Follow the same instructions as the Left Leg until Round 26. The shaping for the calves is created by the placement of stuffing rather than different stitch counts.
5 sc, dec, 7 sc, 4 x inc, 1 sc (22)
sc in every st around (22)
13 sc, 4 x dec, 1 sc (18)
4 sc, inc, 1 sc, inc, 11 sc (20)
Follow Left Leg counts for Rounds 31-44.
23 sc with skin, 5 sc with white (28)
sc in every st around in white (28)
23 sc, do not break yarn; continue to body.
From right leg, ch 4. Join to left leg sl st: 14 sc, inc, 13 sc on left leg. Switch to right leg: 13 sc, inc, 14 sc. 4 sc across the ch (66)
sc in every st around (66)
15 sc, dec, 31 sc, dec, 16 sc (64)
14 sc, dec, 31 sc, dec, 15 sc (62)
13 sc, dec, 31 sc, dec, 14 sc (60)
12 sc, dec, 31 sc, dec, 13 sc (58)
11 sc, dec, 31 sc, dec, 12 sc (56)
10 sc, dec, 31 sc, dec, 11 sc (54)
9 sc, dec, 31 sc, dec, 10 sc (52)
8 sc, dec, 31 sc, dec, 9 sc (50)
7 sc, dec, 31 sc, dec, 8 sc (48)
6 sc, dec, 31 sc, dec, 7 sc (46)
5 sc, dec, 31 sc, dec, 6 sc (44)
4 sc, dec, 31 sc, dec, 5 sc (42)
3 sc, dec, 31 sc, dec, 4 sc. Switch to skin color. (40)
sc in every st around (40)
12 sc, join arm with 3 sc through both layers, 17 sc, join other arm with 3 sc through both layers, 5 sc (40)
12 sc, 9 sc around arm, 17 sc, 9 sc around arm, 5 sc (52)
10 sc, dec, 9 sc, dec, 13 sc, dec, 9 sc, dec, 3 sc (48)
10 sc, dec, 7 sc, dec, 13 sc, dec, 7 sc, dec, 3 sc (44)
9 sc, dec, 2 sc, m, 2 sc, dec, 11 sc, dec, 2 sc, m, 2 sc, dec, 2 sc (36)
7 sc, dec, 2 sc, m, 2 sc, dec, 7 sc, dec, 2 sc, m, 2 sc, dec (28)
dec, 3 sc, dec, 2 sc, m, 2 sc, dec, 3 sc, dec, 2 sc, m, 2 sc (20)
(3 sc, dec) repeat 4 times (16)
sc in every st around (16)
2 sc, sl st, fasten off.
Using white, ch 40. Starting in 2nd ch: 5 sc, hdc inc, 8 hdc inc, hdc inc, 9 sc, hdc inc, 8 hdc inc, hdc inc, 5 sc. Turn.
ch 1, 59 sc. Turn.
ch 1, 6 sc, inc, 16 hdc, inc, 11 sc, inc, 16 hdc, inc, 6 sc. Turn.
ch 1, 63 sc. Turn.
ch 1, 7 sc, inc, 5 hdc, 3 hdc dec, 5 hdc, inc, 13 sc, inc, 5 hdc, 3 hdc dec, 5 hdc, inc, 7 sc. Turn.
ch 1, 9 sc, ch 3, skip 13 hdc, 17 sc, ch 3, skip 13 hdc, 9 sc. Turn.
ch 1, 3 sc, inc, 5 sc, 3 sc on ch, 17 sc, 3 sc on ch, 5 sc, inc, 3 sc (41)
ch 1, 41 sc. Turn.
ch 1, 4 sc, inc, 31 sc, inc, 4 sc (43)
ch 1, 43 sc. Turn.
ch 1, 5 sc, inc, 31 sc, inc, 5 sc (45)
ch 1, 45 sc. Turn.
Work down the side for buttonholes: 6 sc, ch 7, 7 sc, ch 7, 7 sc, ch 7, 2 sc, sl st. Fasten off.
Attach yarn to armhole. ch 1, 1 sc at junction, 13 sc on arm, 1 sc at junction, 3 sc on ch. sl st, fasten off (18)
Using purple, ch 59. Starting in 8th ch: 52 sc. Turn.
ch 1, 52 sc. Turn.
ch 1, 1 sc, inc, 10 sc, inc, 26 sc, inc, 10 sc, inc, 1 sc (56)
ch 1, 56 sc. Turn.
ch 1, 13 sc, inc, 28 sc, inc, 13 sc (58)
ch 1, 58 sc. Turn.
ch 1, 1 sc, inc, 54 sc, inc, 1 sc (60)
ch 1, 60 sc. Turn.
ch 1, 14 sc, inc, 30 sc, inc, 14 sc (62)
ch 1, 62 sc. Turn.
ch 1, 1 sc, inc, 58 sc, inc, 1 sc (64)
ch 1, 15 sc, inc, 32 sc, inc, 15 sc (66)
ch 1, 1 sc, inc, 62 sc, inc, 1 sc (68)
Join to first loop of row. ch 1, 68 sc, sl st.
ch 1, 68 sc, sl st.
ch 1, 17 sc, inc, 33 sc, inc, 16 sc, sl st (70)
ch 1, 70 sc, sl st.
ch 1, 18 sc, inc, 34 sc, inc, 16 sc, sl st (72)
ch 1, 72 sc, sl st.
ch 1, 19 sc, inc, 36 sc, inc, 15 sc, sl st (74)
ch 1, 74 sc, sl st.
ch 1, flo 74 x inc, sl st (148)
ch 1, 148 sc, sl st. Fasten off.
Attach yarn to 21st st of top edge. Rows 1-8: ch 1, 14 sc, turn. Row 9: ch 1, skip 1, 11 sc, skip 1, sl st. Fasten off.
Using white, ch 8. Starting in 2nd ch: 2 hdc in one loop, 5 hdc, 5 hdc in last loop. Turn: 5 hdc, 3 hdc in last loop, sl st (20)
ch 1, 2 hdc inc, 5 hdc, 5 hdc inc, 5 hdc, 3 hdc inc, sl st (30)
ch 1, (1 hdc, hdc inc) repeat 2 times, 5 hdc, (1 hdc, hdc inc) repeat 5 times, 5 hdc, (1 hdc, hdc inc) repeat 3 times, sl st (40)
ch 1, 40 sl st around, sl st to first st.
ch 2, 40 dc into the sl st loops of Row 4, sl st. Fasten off white.
Attach green. ch 2, 40 dc, sl st.
ch 1, 40 sc through blo of white and both loops of green together.
ch 1, 12 sc, 4 hdc, hdc dec, 2 hdc, hdc dec, 2 hdc, hdc dec, 4 hdc, 10 sc, sl st (37)
ch 1, 12 sc, hdc, 2 hdc dec, hdc, 2 hdc dec, hdc, 2 hdc dec, hdc, 9 sc, sl st (31)
ch 1, 11 sc, dec, 8 sc, dec, 8 sc, sl st (29)
ch 1, 9 sc, hdc, 6 hdc dec, hdc, 6 sc, sl st (23)
ch 1, 12 sc, (hdc & dc in same st), 2 dc inc, (dc & hdc in same st), 7 sc, sl st.
ch 1, 27 sl st, sl st to first st. Fasten off.
Attach white to flo of Row 3 of sole. 40 sl st. Fasten off.
Using lilac, 6 sc into sh (6)
6 x inc (12)
(1 sc, inc) repeat 6 times (18)
(2 sc, inc) repeat 6 times (24)
(3 sc, inc) repeat 6 times (30)
(4 sc, inc) repeat 6 times (36)
(5 sc, inc) repeat 6 times (42)
(6 sc, inc) repeat 6 times (48)
(7 sc, inc) repeat 6 times (54)
(8 sc, inc) repeat 6 times (60)
(9 sc, inc) repeat 6 times (66)
(10 sc, inc) repeat 6 times (72)
(11 sc, inc) repeat 6 times (78)
(12 sc, inc) repeat 6 times (84)
sc in every st around (84)
84 sc, sl st, fasten off.
Attach yarn to blo of 37th st of hat. Follow Row 1-11 instructions to create the visor shape using increases at the edges.
There's something so incredibly rewarding about finishing a project as detailed as Mimosa. From the tip of her lilac cat ears to the soles of her tiny green shoes, every single stitch tells a story of patience and craft. I truly hope you enjoy the process of bringing her to life as much as I did. She is more than just a doll; she is a handmade keepsake that will be cherished for years to come. Don't forget to give her little dog a pat for me! Happy crafting! 🧶✨
You can use 10mm or 12mm safety eyes, but keep in mind that the character's soulful look comes from the layered embroidery. If you switch, place them between Rounds 21 and 22.
Amigurumi height can vary based on stuffing. If your doll is taller, simply add a few more repeat rows of 74 sc before starting the ruffle on Row 31.
While she will still be cute without it, the wire is essential for her to stand properly and hold her dog's leash. Use 2.5mm electrical wire for the best stability.
The secret is the double-layer transplanting. By using two strands of yarn for every 'plug' and following the midline technique, you get a full, realistic mane.
