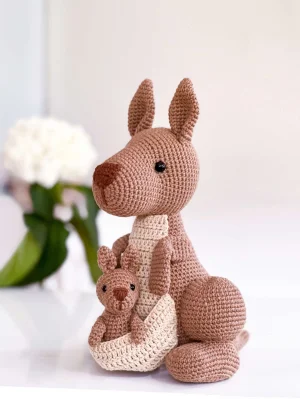
There is something so incredibly heartwarming about a mama animal and her little one, and this kangaroo duo captures that bond perfectly. You are going to love watching these two come to life under your hook, from the sturdy mama with her functional pouch to the tiny, sweet joey that fits right inside. It is a wonderful project for anyone looking to practice shaping and assembly while creating a gift that will be cherished for years. Grab your favorite earthy tones and let's get started on this Australian-inspired adventure together.
Progress Tracker
0% Complete
— 1. Mommy Kangaroo - Head :
Round 1 :
Start by placing 6 sc into a magic loop (6)
Round 2 :
Work 1 inc in every stitch around (12)
Round 3 :
(1 sc, 1 inc) repeated 6 times (18)
Round 4 :
1 sc, 1 inc, then (2 sc, 1 inc) 5 times, finishing with 1 sc (24)
Round 5 :
(3 sc, 1 inc) repeated 6 times (30)
Round 6 :
Work 1 sc in each stitch around (30)
Round 7 :
2 sc, 1 inc, then (4 sc, 1 inc) 5 times, finishing with 2 sc (36)
Round 8 :
Work 1 sc in each stitch around (36)
Round 9 :
Work 1 sc in each stitch around (36)
Round 10 :
Work 1 sc in each stitch around (36)
Round 11 :
Work 1 sc in each stitch around (36)
Round 12 :
18 sc, 1 inc, 17 sc (37)
Round 13 :
18 sc, 1 inc, 18 sc (38)
Round 14 :
19 sc, 1 inc, 18 sc (39)
Round 15 :
19 sc, 1 inc, 19 sc (40)
Round 16 :
20 sc, 1 inc, 19 sc (41)
Round 17 :
20 sc, 1 inc, 20 sc (42)
Round 18 :
3 sc, 1 inc, then (6 sc, 1 inc) 5 times, finishing with 3 sc (48)
Info :
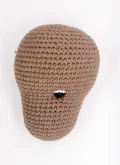
In the next round, use scrap yarn to mark the spots for the safety eyes as indicated.
Round 19 :
7 sc, 1 inc, 7 sc, mark next hole for eye, 1 inc, (7 sc, 1 inc) twice, mark next hole for eye, 1 sc, 6 sc, 1 inc, 7 sc, 1 inc (54)
Round 20 :
4 sc, 1 inc, then (8 sc, 1 inc) 5 times, finishing with 4 sc (60)
Round 21 :
Work 1 sc in each stitch around (60)
Round 22 :
Work 1 sc in each stitch around (60)
Round 23 :
Work 1 sc in each stitch around (60)
Round 24 :
Work 1 sc in each stitch around (60)
Round 25 :
Work 1 sc in each stitch around (60)
Round 26 :
Work 1 sc in each stitch around (60)
Round 27 :
Work 1 sc in each stitch around (60)
Round 28 :
Work 1 sc in each stitch around (60)
Info :
Insert the 11 mm safety eyes into the marked holes from Round 19 now.
Round 29 :
4 sc, 1 dec, then (8 sc, 1 dec) 5 times, finishing with 4 sc (54)
Round 30 :
Work 1 sc in each stitch around (54)
Round 31 :
(7 sc, 1 dec) repeated 6 times (48)
Round 32 :
Work 1 sc in each stitch around (48)
Round 33 :
3 sc, 1 dec, then (6 sc, 1 dec) 5 times, finishing with 3 sc (42)
Round 34 :
(5 sc, 1 dec) repeated 6 times (36)
Round 35 :
2 sc, 1 dec, then (4 sc, 1 dec) 5 times, finishing with 2 sc (30)
Info :
Firmly stuff the head with fiberfill and continue stuffing as you close.
Round 36 :
(3 sc, 1 dec) repeated 6 times (24)
Round 37 :
1 sc, 1 dec, then (2 sc, 1 dec) 5 times, finishing with 1 sc (18)
Round 38 :
(1 sc, 1 dec) repeated 6 times (12)
Round 39 :
Work 6 decreases around (6)
Info :
Cut yarn, weave through front loops to close the gap tightly.
— 2. Mommy Kangaroo - Ears :
Round 1 :
Start with 6 sc into a magic loop (6)
Round 2 :
(2 sc, 1 inc) twice (8)
Round 3 :
(3 sc, 1 inc) twice (10)
Round 4 :
(4 sc, 1 inc) twice (12)
Round 5 :
(5 sc, 1 inc) twice (14)
Round 6 :
(6 sc, 1 inc) twice (16)
Round 7 :
(7 sc, 1 inc) twice (18)
Round 8 :
(8 sc, 1 inc) twice (20)
Round 9 :
Work 1 sc in each stitch around (20)
Round 10 :
Work 1 sc in each stitch around (20)
Round 11 :
Work 1 sc in each stitch around (20)
Round 12 :
Work 1 sc in each stitch around (20)
Round 13 :
Work 1 sc in each stitch around (20)
Round 14 :
Work 1 sc in each stitch around (20)
Round 15 :
(8 sc, 1 dec) twice (18)
Round 16 :
(7 sc, 1 dec) twice (16)
Info :
Flatten the ear (do not stuff). Crochet 4 sc through both layers to close the opening. Leave a long tail for sewing.
— 3. Mommy Kangaroo - Nose :
Row 1 :
In dark brown, work 3 sc into a magic ring, ch 1, turn (3)
Row 2 :
Skip the ch, work 1 inc, 1 sc, 1 inc, ch 1, turn (5)
Row 3 :
Skip the ch, work 1 inc, 3 sc, 1 inc, ch 1, turn (7)
Row 4 :
Skip the ch, work 7 sc, ch 1, turn (7)
Row 5 :
Skip the ch, work 7 sc, ch 1, turn (7)
Row 6 :
Skip the ch, work 7 sc (7)
Info :
Fasten off and leave a tail for attaching to the snout.
— 4. Mommy Kangaroo - Body :
Round 1 :
Place 6 sc into a magic loop (6)
Round 2 :
Work 6 increases around (12)
Round 3 :
(1 sc, 1 inc) repeated 6 times (18)
Round 4 :
1 sc, 1 inc, then (2 sc, 1 inc) 5 times, finishing with 1 sc (24)
Round 5 :
(3 sc, 1 inc) repeated 6 times (30)
Round 6 :
2 sc, 1 inc, then (4 sc, 1 inc) 5 times, finishing with 2 sc (36)
Round 7 :
(5 sc, 1 inc) repeated 6 times (42)
Round 8 :
3 sc, 1 inc, then (6 sc, 1 inc) 5 times, finishing with 3 sc (48)
Round 9 :
(7 sc, 1 inc) repeated 6 times (54)
Round 10 :
4 sc, 1 inc, then (8 sc, 1 inc) 5 times, finishing with 4 sc (60)
Round 11 :
Work 1 sc in each stitch around (60)
Round 12 :
(9 sc, 1 inc) repeated 6 times (66)
Round 13-25 :
Work 1 sc in each stitch around for 13 rounds (66)
Round 26 :
(9 sc, 1 dec) repeated 6 times (60)
Round 27 :
3 sc, (2 sc, 1 dec) 4 times, 41 sc (56)
Round 28 :
6 sc, 1 dec, 4 sc, 1 dec, 42 sc (54)
Round 29 :
(7 sc, 1 dec) repeated 6 times (48)
Round 30 :
2 sc, (2 sc, 1 dec) 3 times, 34 sc (45)
Round 31 :
Work 1 sc in each stitch around (45)
Round 32 :
26 sc, 1 dec, 2 sc, 1 dec, 13 sc (43)
Round 33 :
Work 1 sc in each stitch around (43)
Info :
Stuff the body firmly as you progress.
Round 34 :
6 sc, 1 dec, 20 sc, 1 dec, 13 sc (41)
Round 35 :
6 sc, 1 dec, 33 sc (40)
Round 36 :
6 sc, 1 dec, 32 sc (39)
Round 37 :
(11 sc, 1 dec) repeated 3 times (36)
Round 38 :
Work 1 sc in each stitch around (36)
Round 39 :
2 sc, 1 dec, then (4 sc, 1 dec) 5 times, finishing with 2 sc (30)
Round 40-43 :
Work 1 sc in each stitch around for 4 rounds (30)
Info :
Fasten off leaving a long tail for sewing the head on.
— 5. Mommy Kangaroo - Belly :
Info :
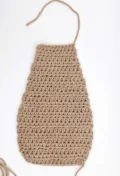
Work in rows. The turning ch does not count as a stitch. Skip the turning ch and start in the next st.
Row 1 :
Ch 12, start in 3rd ch from hook: 10 hdc, ch 2, turn (10)
Row 2 :
10 hdc, ch 2, turn (10)
Row 3 :
10 hdc, ch 2, turn (10)
Row 4 :
1 hdc-inc, 8 hdc, 1 hdc-inc, ch 2, turn (12)
Row 5 :
12 hdc, ch 2, turn (12)
Row 6 :
12 hdc, ch 2, turn (12)
Row 7 :
1 hdc-inc, 10 hdc, 1 hdc-inc, ch 2, turn (14)
Row 8 :
14 hdc, ch 2, turn (14)
Row 9 :
14 hdc, ch 2, turn (14)
Row 10 :
1 hdc-inc, 12 hdc, 1 hdc-inc, ch 2, turn (16)
Row 11 :
16 hdc, ch 2, turn (16)
Row 12 :
16 hdc, ch 2, turn (16)
Row 13 :
1 hdc-inc, 14 hdc, 1 hdc-inc, ch 2, turn (18)
Row 14-19 :
Work 18 hdc, ch 2, turn for 6 rows (18)
Row 20 :
18 hdc, ch 1, turn (18)
Row 21 :
Skip first hdc, 15 hdc, 1 dec, ch 1, turn (16)
Row 22 :
16 hdc, ch 1, turn (16)
Row 23 :
Skip first hdc, 13 hdc, 1 dec (14)
Info :
Fasten off with a long tail to sew onto the body.
— 6. Mommy Kangaroo - Pouch :
Info :
Work in rows using dc. Turning chains do not count as stitches.
Row 1 :
Ch 42, start in 3rd ch from hook: 40 dc, ch 2, turn (40)
Row 2 :
40 dc, ch 1, turn (40)
Row 3 :
Skip first dc, 1 dc, 1 dc-dec, 32 dc, (1 dc-dec) twice, 1 dc, ch 1, turn (36)
Row 4 :
33 dc, 1 dc-dec, ch 2, turn (34)
Row 5 :
34 dc, ch 1, turn (34)
Row 6 :
Skip first dc, 31 dc, 1 dc-dec, ch 1, turn (32)
Row 7 :
Skip first dc, 1 dc, (3 dc, 1 dc-dec) 6 times, 1 dc, ch 1, turn (25)
Row 8 :
Skip first dc, 2 dc, 1 dc-dec, (2 dc, 1 dc-dec) 5 times, 1 dc, ch 1, turn (18)
Row 9 :
Skip first dc, 1 dc, 1 dc-dec, (1 dc, 1 dc-dec) 4 times, 1 dc-dec, ch 1, turn (11)
Row 10 :
Skip first dc, 1 dc, (1 dc-dec) 4 times, 1 dc (6)
Info :
Fasten off and leave a tail for assembly.
— 7. Mommy Kangaroo - Legs :
Info :
Before starting, leave a long tail for sewing later.
Round 1 :
Place 6 sc into a magic loop (6)
Round 2 :
Work 6 increases around (12)
Round 3 :
(1 sc, 1 inc) repeated 6 times (18)
Round 4 :
1 sc, 1 inc, then (2 sc, 1 inc) 5 times, finishing with 1 sc (24)
Round 5 :
(3 sc, 1 inc) repeated 6 times (30)
Info :
Pull the long start tail through between Round 3 and 4 so it sits on the outside of the piece.
Round 6 :
2 sc, 1 inc, then (4 sc, 1 inc) 5 times, finishing with 2 sc (36)
Round 7 :
(17 sc, 1 inc) twice (38)
Round 8 :
(18 sc, 1 inc) twice (40)
Round 9 :
(19 sc, 1 inc) twice (42)
Round 10-15 :
Work 1 sc in each stitch around for 6 rounds (42)
Round 16 :
(5 sc, 1 dec) repeated 6 times (36)
Round 17 :
Work 1 sc in each stitch around (36)
Round 18 :
2 sc, 1 dec, then (4 sc, 1 dec) 5 times, finishing with 2 sc (30)
Round 19 :
(3 sc, 1 dec) repeated 6 times (24)
Round 20 :
(2 sc, 1 dec) repeated 6 times (18)
Info :
Stuff very lightly so it remains flat. Ch 8.
Round 21 :
Starting in 2nd ch: 1 inc, 6 sc, then work into the leg piece: 8 sc, (1 inc) twice, 8 sc, then back along the other side of the chain: 6 sc, 1 inc (36)
Round 22 :
(1 inc) twice, 5 sc, 1 dec, 8 sc, (1 inc) twice, 8 sc, 1 dec, 5 sc, (1 inc) twice (40)
Round 23 :
(1 sc, 1 inc) twice, 12 sc, (1 sc, 1 inc) 3 times, 14 sc, (1 sc, 1 inc) twice (47)
Round 24 :
(2 sc, 1 inc) twice, 12 sc, (2 sc, 1 inc) 3 times, 14 sc, (2 sc, 1 inc) twice (54)
Round 25-26 :
Work 1 sc in each stitch around for 2 rounds (54)
Round 27 :
(7 sc, 1 dec) repeated 6 times (48)
Round 28 :
3 sc, 1 dec, (6 sc, 1 dec) 5 times, 3 sc (42)
Round 29 :
Work 1 sc in each stitch around (42)
Round 30 :
Working in BLO: (5 sc, 1 dec) repeated 6 times (36)
Round 31 :
(4 sc, 1 dec) repeated 6 times (30)
Round 32 :
3 dec, 8 sc, 3 dec, 10 sc (24)
Round 33 :
2 dec, 5 sc, 3 dec, 7 sc, 1 dec (18)
Round 34 :
(1 sc, 1 dec) repeated 6 times (12)
Round 35 :
Work 6 decreases around (6)
Info :
Stuff the foot firmly to help it stand. Fasten off and close.
— 8. Mommy Kangaroo - Arms :
Round 1 :
Place 6 sc into a magic loop (6)
Round 2 :
Work 6 increases around (12)
Round 3 :
(5 sc, 1 inc) twice (14)
Round 4-10 :
Work 1 sc in each stitch around for 7 rounds (14)
Round 11 :
(5 sc, 1 dec) twice (12)
Info :
Flatten and work 6 sc through both layers to close. Do not stuff.
Round 12 :
Ch 1, turn, skip ch: 6 sc in FLO, then 6 sc in BLO of the same stitches (12)
Round 13-18 :
Work 1 sc in each stitch around for 6 rounds (12)
Round 19 :
(4 sc, 1 dec) twice (10)
Round 20 :
(3 sc, 1 dec) twice (8)
Round 21 :
Work 4 decreases around (4)
Info :
Fasten off and leave a tail for sewing.
— 9. Mommy Kangaroo - Tail :
Round 1 :
Place 6 sc into a magic loop (6)
Round 2 :
(2 sc, 1 inc) twice (8)
Round 3 :
(3 sc, 1 inc) twice (10)
Round 4 :
(4 sc, 1 inc) twice (12)
Round 5 :
(5 sc, 1 inc) twice (14)
Round 6 :
5 sc, (1 inc) twice, 5 sc, 1 dec (15)
Round 7 :
6 sc, (1 inc) twice, 7 sc (17)
Round 8 :
7 sc, (1 inc) twice, 6 sc, 1 dec (18)
Round 9 :
5 sc, (1 sc, 1 inc) twice, (1 inc, 1 sc) twice, 5 sc (22)
Round 10 :
Work 1 sc in each stitch around (22)
Round 11 :
5 sc, (2 sc, 1 inc) twice, (1 inc, 2 sc) twice, 5 sc (26)
Round 12 :
Work 1 sc in each stitch around (26)
Round 13 :
5 sc, (3 sc, 1 inc) twice, (1 inc, 3 sc) twice, 5 sc (30)
Round 14 :
1 dec, 28 sc (29)
Round 15 :
4 sc, (4 sc, 1 inc) twice, (1 inc, 4 sc) twice, 5 sc (33)
Round 16 :
31 sc, 1 dec (32)
Round 17 :
4 sc, (5 sc, 1 inc) twice, (1 inc, 5 sc) twice, 4 sc (36)
Round 18 :
1 dec, 34 sc (35)
Round 19 :
3 sc, (6 sc, 1 inc) twice, (1 inc, 6 sc) twice, 4 sc (39)
Round 20 :
1 dec, 37 sc (38)
Round 21 :
1 dec, 15 sc, (1 inc) twice, 19 sc (39)
Round 22 :
17 sc, (1 inc) twice, 20 sc (41)
Round 23 :
1 dec, 16 sc, (1 inc) twice, 21 sc (42)
Round 24 :
18 sc, (1 inc) twice, 22 sc (43)
Info :
Stuff the tail firmly and leave a tail for sewing.
— 10. Baby Kangaroo - Head :
Round 1 :
Start with 6 sc into a magic loop (6)
Round 2 :
Work 6 increases around (12)
Round 3 :
(1 sc, 1 inc) repeated 6 times (18)
Round 4-6 :
Work 1 sc in each stitch around for 3 rounds (18)
Round 7 :
1 sc, 1 inc, then (2 sc, 1 inc) 5 times, finishing with 1 sc (24)
Round 8 :
(3 sc, 1 inc) repeated 6 times (30)
Round 9-11 :
Work 1 sc in each stitch around for 3 rounds (30)
Info :
Place 7 mm eyes between Rounds 7 and 8, with 8 stitches between them.
Round 12 :
(3 sc, 1 dec) repeated 6 times (24)
Round 13 :
Work 1 sc in each stitch around (24)
Round 14 :
1 sc, 1 dec, then (2 sc, 1 dec) 5 times, finishing with 1 sc (18)
Round 15 :
(1 sc, 1 dec) repeated 6 times (12)
Round 16 :
Work 6 decreases around (6)
Info :
Stuff and close the head.
— 11. Baby Kangaroo - Body :
Round 1 :
Place 6 sc into a magic loop (6)
Round 2 :
Work 6 increases around (12)
Round 3 :
(1 sc, 1 inc) repeated 6 times (18)
Round 4 :
1 sc, 1 inc, then (2 sc, 1 inc) 5 times, finishing with 1 sc (24)
Round 5-8 :
Work 1 sc in each stitch around for 4 rounds (24)
Round 9 :
2 sc, 1 dec, (4 sc, 1 dec) 3 times, 2 sc (20)
Round 10-12 :
Work 1 sc in each stitch around for 3 rounds (20)
Round 13 :
(3 sc, 1 dec) repeated 4 times (16)
Round 14-15 :
Work 1 sc in each stitch around for 2 rounds (16)
Info :
Stuff the body and leave a tail for sewing.
I hope you enjoyed every stitch of this kangaroo family! There is something so rewarding about finishing the final assembly and seeing that little joey peek out from the pouch for the first time. Whether you made this as a nursery decoration or a special gift, it is sure to bring a smile to anyone who sees it. Don't forget to share your finished project with the community—I'd love to see the colors you chose! Happy crafting, and I'll see you in the next pattern! 🧶 ✨