🧶 Beautiful ✨ Detailed 💝 Adorable

Ollie the Lion Amigurumi Pattern

Ollie the Lion Amigurumi Pattern
4.5★Rating
5-8 HoursTime Needed
1.3KMade This
✂️

Intermediate Level

Ideal for those with basic crocheting experience, featuring slightly more advanced stitches and techniques to expand your skills.

⏱️

Weekend Treat

Takes 5-7 hours, making it an enjoyable project to finish over a couple of days.

🐰

Whimsical Buddy

Playful characters full of personality, designed to spark imagination and become cherished playtime favorites.

About This Ollie the Lion Amigurumi Pattern

Ollie the Lion Amigurumi Pattern crochet pattern - detailed view

This little guy makes a wonderful handmade gift for a baby shower or a cute addition to any animal lover's collection. He's sturdy enough for play but detailed enough to look beautiful on display.

Why You'll Love This Ollie the Lion Amigurumi Pattern

I honestly couldn't get enough of making that mane! It's so satisfying to see the ruffles sprout out. Plus, the way the tail is constructed with those hidden back loops is a clever little trick that I think you'll really appreciate as a fellow crafter.

Ollie the Lion Amigurumi Pattern step 1 Ollie the Lion Amigurumi Pattern step 2 Ollie the Lion Amigurumi Pattern step 3 Ollie the Lion Amigurumi Pattern step 4

Switch Things Up

I remember the first time I tried to design a lion. I spent ages trying to figure out a mane that didn't involve cutting hundreds of tiny strands of yarn—because let’s be real, nobody has time for that much fringe! That’s how the ruffled mane for Ollie was born. It’s worked in rounds, so it’s sturdy, bouncy, and stays looking great even after lots of hugs.

When you’re working on the tail, you might think those back-loop-only rounds are a bit fiddly, but trust the process. They create the perfect 'track' for the ruffles later on. It’s like magic watching that simple cord turn into a fancy pom-pom tail.

I love using a mercerized cotton for this project because it gives the stitches such great definition, especially on the face. If you want a moodier look, try a deep mustard for the body and a dark chocolate brown for the mane. It completely changes his vibe! Whatever colors you choose, take your time with the embroidery on the nose—it’s the secret to giving him that gentle, sleepy expression we all love.

Common Mistakes & How to Fix Them

✗ When working the tail ruffles into the back loops of rounds 2 through 7, it's easy to lose your place; use a contrasting thread to mark the start of that spiral so you don't skip a loop.✗ If you stuff the arms, they will stick out awkwardly from the body instead of resting naturally at Ollie's sides, so keep them empty exactly as the instructions suggest.✗ The mane is a separate piece that fits around the neck; if you crochet your chains too tightly in the first round, it won't slide over the head easily during assembly.✗ In round 25 of the head, the stitch count in the original instructions might feel a bit off—just focus on maintaining an even decrease to reach the final count for that round.

Ollie the Lion Amigurumi Pattern

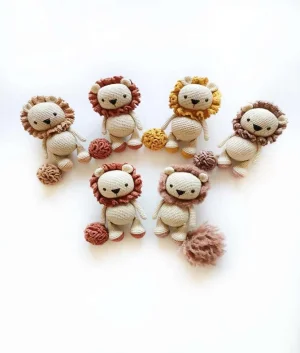
Meet Ollie, the sweetest little king of the jungle you'll ever hook up. This pattern is all about those charming details, from his ruffly mane to that adorable pom-pom tail. You're going to love how his personality shines through as he comes together. He's the perfect size for little hands to hold or to sit proudly on a nursery shelf. Grab your favorite cotton yarn and let's get started!

Intermediate 5-8 Hours

Materials Needed for Ollie the Lion Amigurumi Pattern

— Main Fabric

  • 01
    100% combed and mercerized cotton yarn (Schachenmayr Catania or similar) in a light cream or beige for the main body
  • 02
    Matching cotton yarn in a warm terracotta or rust shade for the mane and tail accents
  • 03
    A small amount of black embroidery thread for the facial details

— Tools Required

  • 01
    2.2 mm crochet hook or the size needed to get a tight fabric with your chosen yarn
  • 02
    One pair of 6 mm safety eyes
  • 03
    High-quality polyester fiberfill for stuffing
  • 04
    Sharp scissors
  • 05
    Stitch markers to keep track of your rounds
  • 06
    A tapestry needle for sewing the pieces together

Progress Tracker

0% Complete

— 1. Arms :

Round 1 :

Start by making 5 sc into a mr (5)

Round 2 :

Work 2 sc into every st around (10)

Round 3-19 :

Work 1 sc in every st around (10)

Round 20 :

Flatten the top of the arm and sc through both layers to close the opening (5)

Info :

Make a second arm exactly the same way. Do not add any stuffing to these pieces.

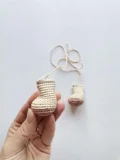
— 2. Feet and Legs :

Info :

Begin with your accent color (code 0437).

Round 1 :

Create a mr and work 5 sc into it (5)

Round 2 :

Work 2 sc into every st around (10)

Round 3 :

Repeat (1 sc, 1 inc) 5 times (15)

Round 4 :

Repeat (2 sc, 1 inc) 5 times (20)

Round 5 :

Repeat (3 sc, 1 inc) 5 times (25)

Round 6 :

Repeat (4 sc, 1 inc) 5 times (30)

Round 7 :

Work 1 sc in the BLO of every st around (30)

Colour Change :

Switch to your main body color (code 0404).

Round 8-10 :

Work 1 sc in every st around (30)

Round 11 :

Work 9 sc, then 6 dec, followed by 9 sc (24)

Round 12 :

Work 9 sc, then 3 dec, followed by 9 sc (21)

Round 13 :

Work 8 sc, 2 dec, 7 sc, then 1 dec (18)

Round 14-19 :

Work 1 sc in every st around (18)

Round 20 :

Flatten the opening and sc through both layers to close (9)

Info :

Make a second leg following the same steps. These will be attached to the body later.

— 3. Body :

Round 1 :

Start with 6 sc in a mr (6)

Round 2 :

Work 2 sc into every st around (12)

Round 3 :

Repeat (1 sc, 1 inc) 6 times (18)

Round 4 :

Repeat (2 sc, 1 inc) 6 times (24)

Round 5 :

Repeat (3 sc, 1 inc) 6 times (30)

Round 6 :

Repeat (4 sc, 1 inc) 6 times (36)

Round 7 :

Repeat (5 sc, 1 inc) 6 times (42)

Round 8 :

Repeat (6 sc, 1 inc) 6 times (48)

Round 9 :

Repeat (7 sc, 1 inc) 6 times (54)

Round 10-18 :

Work 1 sc in every st around (54)

Round 19 :

Work 11 sc, then repeat (1 dec, 4 sc) 5 times, finish with 1 dec and 11 sc (48)

Round 20 :

Work 1 sc in every st around (48)

Round 21 :

Work 11 sc, then repeat (1 dec, 3 sc) 5 times, finish with 1 dec and 10 sc (42)

Round 22 :

Work 1 sc in every st around (42)

Round 23 :

Work 11 sc, then repeat (1 dec, 2 sc) 5 times, finish with 1 dec and 9 sc (36)

Round 24 :

Work 1 sc in every st around (36)

Round 25 :

Work 11 sc, then repeat (1 dec, 1 sc) 5 times, finish with 1 dec and 8 sc (30)

Round 26 :

Work 1 sc in every st around (30)

Round 27 :

Repeat (3 sc, 1 dec) 6 times (24)

Round 28-29 :

Work 1 sc in every st around (24)

Info :

Cut the yarn, leaving a long tail for sewing the body to the head.
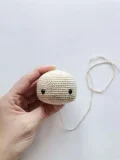
— 4. Head :

Round 1 :

Begin with 7 sc in a mr (7)

Round 2 :

Work 2 sc into every st around (14)

Round 3 :

Repeat (1 sc, 1 inc) 7 times (21)

Round 4 :

Repeat (2 sc, 1 inc) 7 times (28)

Round 5 :

Repeat (3 sc, 1 inc) 7 times (35)

Round 6 :

Repeat (4 sc, 1 inc) 7 times (42)

Round 7 :

Repeat (5 sc, 1 inc) 7 times (49)

Round 8 :

Repeat (6 sc, 1 inc) 7 times (56)

Round 9 :

Repeat (7 sc, 1 inc) 7 times (63)

Round 10-22 :

Work 1 sc in every st around (63)

Round 23 :

Repeat (7 sc, 1 dec) 7 times (56)

Round 24 :

Repeat (6 sc, 1 dec) 7 times (49)

Note :

The stitch count for Round 25 in the source is inconsistent; aim for 43 stitches by working (5 sc, 1 dec) around.

Round 25 :

Repeat (5 sc, 1 dec) 7 times (43)

Round 26 :

Repeat (4 sc, 1 dec) 7 times (35)

Round 27 :

Repeat (3 sc, 1 dec) 7 times (28)

Round 28 :

Repeat (5 sc, 1 dec) 4 times (24)

Info :

Fasten off and cut the yarn short. Place safety eyes between Rounds 16 and 17, spaced about 13 stitches apart (10 visible stitches between eyes).

— 5. Ears :

Round 1 :

Crochet 6 sc into a mr (6)

Round 2 :

Work 2 sc into every st around (12)

Round 3 :

Repeat (1 sc, 1 inc) 6 times (18)

Round 4-5 :

Work 1 sc in every st around (18)

Round 6 :

Repeat (1 sc, 1 dec) 6 times (12)

Round 7 :

Work 6 dec around (6)

Info :

Do not stuff the ears. Sew them to the head between Rounds 6 and 8.
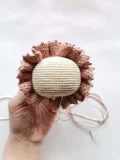
— 6. Mane :

Round 1 :

Ch 64 and sl st into the first ch to form a large ring

Round 2 :

Ch 2, then work 3 dc into every st around; sl st to the first st to join

Round 3 :

Ch 2, then work 1 hdc into every st around; sl st to the first st to join

Round 4 :

Ch 3 and 1 sc into the same st as the sl st, then repeat (3 sc, ch 3 and 1 sc into the same st) until you reach the end of the round

Info :

Fasten off, leaving a very long tail for attaching the mane to the head.

— 7. Tail :

Round 1 :

Crochet 6 sc into a mr (6)

Round 2 :

Work in BLO: 2 sc in every st (12)

Round 3 :

Work in BLO: Repeat (1 sc, 1 inc) 6 times (18)

Round 4-5 :

Work in BLO: 1 sc in every st around (18)

Round 6 :

Work in BLO: Repeat (1 sc, 1 dec) 6 times (12)

Round 7 :

Work in BLO: 6 dec around (6)

Round 8-27 :

Work 1 sc in every st around normally (6)

Info :

Fasten off and leave a tail for sewing.

— 8. Tail Ruffles :

Row 1 :

Using accent color 0437, work into the remaining BLO loops from Rounds 2 to 7 of the tail: work 2 hdc in every loop

Row 2 :

Ch 2 and turn, then work 3 dc into every hdc from the previous row

Assembly Instructions

  • Position the safety eyes between rounds 16 and 17 of the head, leaving about 10 visible stitches between them.
  • Embroider a small triangular nose and a simple mouth right between the eyes using your black thread.
  • Secure the ears onto the head between rounds 6 and 8, making sure they are symmetrical.
  • Stitch the legs to the lower part of the body between rounds 9 and 10.
  • Attach the arms to the sides of the body, just a few rounds below the neck area.
  • Slide the mane over the neck and sew it firmly in place so it frames the face beautifully.
  • Fix the tail to the back of the body between rounds 11 and 12, ensuring the ruffled end is secure.

Important Notes

  • 💡Keep your tension consistent throughout to ensure all pieces fit together perfectly.
  • 💡Stuff the head and body firmly to help Ollie maintain his shape, but leave the ears and arms empty.
  • 💡When changing colors on the legs, do it on the last pull-through of the previous stitch for a clean transition.
  • 💡Weave in your ends as you go to make the final assembly much less daunting.
  • 💡The mane is worked separately and then joined, which gives it that great 3D effect.
  • 💡Don't forget to use stitch markers, especially in the long stretches of identical rounds.

I hope you have the best time bringing Ollie to life! There’s something so special about seeing a little character emerge from just a ball of yarn and a hook. He’s been such a joy to design, and I know he’ll be a hit wherever he goes. Don't forget to give his mane a little fluff once he's all finished and maybe snap a few photos to share with your friends. Happy crocheting, and I can't wait to see your finished lions! 🧶🦁✨

You ask,

we answer.

FAQs

Can I use safety eyes smaller than 6mm?

You can, but it will give Ollie a very different expression. 6mm provides that classic 'kawaii' look that works so well with his proportions.

What if I don't have the specific brand of yarn mentioned?

Any mercerized sport weight cotton will work perfectly. Just make sure your hook size gives you a tight enough fabric so the stuffing doesn't peek through.

Is the mane hard to attach?

Not at all! Since it's a ring, you just slide it on. The trick is to pin it in several spots before you start sewing to keep it centered.

Why aren't the arms stuffed?

Leaving them empty allows them to lie flat against the body, which looks much neater and makes the lion easier to pose.