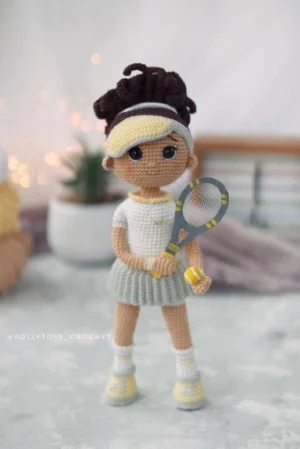
Meet Penny — a sporty little crochet doll dressed head to toe in her tennis best, complete with a pleated grey skirt, yellow sneakers, a visor cap, and her very own handmade racket and clay ball. This pattern walks you through every detail, from her curly brown ponytail secured with a white scrunchie to the embroidered logo on her T-shirt. You'll build her piece by piece — legs, body, arms, head, hair, and accessories — using a wire skeleton that lets her actually pose. If you love making dolls with real personality and a story behind them, Penny is your next project.
Progress Tracker
0% Complete
— 1. Arms (make 2, beige — hand and lower arm worked first) :
Info :
Make 2 arms in beige. Do not stuff with fiberfill. The hand section is worked the same for both arms; color changes for the wristband differ between left and right (see below).
Round 1 :
Start with MR, work 5sc into the ring. (5)
Round 2 :
Work 1inc in each stitch around. (10)
Round 4 :
Work 1 three-dc bubble stitch, then 9sc. (10) — Note: a 3dc bubble is worked by making 3 dc all into the same stitch and pulling through together to form a raised cluster; this creates the thumb.
Round 5 :
Work (1dec-3sc) twice. (8) — The first dec must fall directly above the 3dc bubble.
Info :
For the LEFT arm: work 3 shifting sc at this point to position the color change correctly. For the RIGHT arm: work 5 shifting sc later (before Row 25) to center the color change on the inner arm side. Wristband colors: the original uses different colors per arm, but one color for both is fine.
— 2. Right Arm — Wristband and Upper Arm :
Colour Change :
Switch to white yarn; keep beige attached (do not cut).
Round 7 :
Work 8sl st loosely. (8)
Colour Change :
Switch to yellow yarn; cut white.
Round 8 :
Working into BLO of Round 6 and the sc of that round simultaneously, work 8sc. (8)
Colour Change :
Switch to grey yarn; cut yellow.
Colour Change :
Switch to beige yarn; cut grey.
Round 10 :
Work 8sl st loosely. (8)
Round 11 :
Working into BLO of Round 9 and those sc simultaneously, work 8sc. (8)
Round 18 :
Work (1inc-3sc) twice. (10) — Increases must fall on opposite sides of the arm.
Round 19 :
Work 10sc. (10)
Round 20 :
Work 10sc. (10)
Round 21 :
Work 10sc. (10)
Round 22 :
Work 10sc. (10)
Round 23 :
Work 10sc. (10)
Round 24 :
Work 10sc. (10)
Info :
Work 5 shifting sc on the right arm so the upcoming color change lands at the center of the inner arm side.
Colour Change :
Switch to white yarn; cut beige.
Round 25 :
Work 10sl st loosely. (10)
Colour Change :
Switch to grey yarn; keep white attached.
Round 26 :
Working into BLO of Round 24 and those sc together, work 10sc. (10)
Colour Change :
Switch to white yarn; cut grey.
Round 27 :
Work 10sc. (10) — Fasten off and weave in the end.
— 3. Left Arm — Wristband and Upper Arm :
Info :
The left arm follows the same structure as the right arm from Round 7 onward, with one difference: the wristband uses yellow instead of white for Row 7, and the shifting sc count before the sleeve stripe differs. Work 4 shifting sc (not 5) before Row 25 on the left arm.
Colour Change :
Switch to yellow yarn; keep beige attached.
Round 7 :
Work 8sl st loosely. (8)
Round 8 :
Working into BLO of Round 6 and those sc simultaneously, work 8sc. (8)
Colour Change :
Switch to beige yarn; cut yellow.
Round 10 :
Work 8sl st loosely. (8)
Round 11 :
Working into BLO of Round 9 and those sc together, work 8sc. (8)
Round 18 :
Work (1inc-3sc) twice. (10) — Increases must fall exactly on opposite sides.
Round 19 :
Work 10sc. (10)
Round 20 :
Work 10sc. (10)
Round 21 :
Work 10sc. (10)
Round 22 :
Work 10sc. (10)
Round 23 :
Work 10sc. (10)
Round 24 :
Work 10sc. (10)
Info :
Work 4 shifting sc on the left arm to center the color change on the inner arm side.
Colour Change :
Switch to white yarn; cut beige.
Round 25 :
Work 10sl st loosely. (10)
Colour Change :
Switch to grey yarn; keep white attached.
Round 26 :
Working into BLO of Round 24 and those sc together, work 10sc. (10)
Colour Change :
Switch to white yarn; cut grey.
Round 27 :
Work 10sc. (10) — Fasten off and weave in the end.
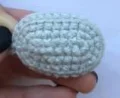
— 4. Legs (make 2, begin with sneaker in grey) :
Info :
Make 2 legs. Do not stuff with fiberfill yet — insert the insole and wire skeleton at the specified points. Begin with grey yarn for the sneaker sole.
Foundation :
Chain 8, turn, and begin working from the 2nd ch from the hook to form an oval base.
Round 1 :
Work 6sc along one side, 3sc into the corner stitch, 5sc along the other side, then 2sc into the last stitch. (16)
Round 2 :
Work 1inc, 5sc, 3inc, 5sc, 2inc. (22)
Round 3 :
Work 1sc-1inc, 5sc, (1sc-1inc) 3 times, 5sc, (1sc-1inc) twice. (28)
Round 4 :
Working BLO only, work 28sc. (28)
Colour Change :
Switch to yellow yarn; cut grey.
Round 5 :
Work 28sl st loosely. (28)
Round 6 :
Working into BLO of Round 4 and those sc together, work 28sc. (28)
Info :
Insert the cardboard or plastic insole now. Cut an oval to the length of the foot — approximately 0.98 x 1.38 inches. Insert or glue it inside the foot. Cut both insoles at once so they match.
Info :
The decreases for Rows 7–9 must fall exactly at the center of the toe end. Use shifting sc if needed to get into position before starting the dec sequence.
Round 7 :
Work 8sc, 5dec, 10sc. (23)
Round 8 :
Work 7sc, 3dec, 10sc. (20)
Round 9 :
Work 7sc, 2dec, 9sc. (18)
Info :
Insert the wire skeleton now. Use 2mm thick wire approximately 11 inches long. Coil and twist it into a spiral and wrap both ends securely with adhesive plaster, then bend it into the shape of the foot. Insert it with the wrapped section pointing down into the sole. Pack fiberfill firmly into the foot with a skewer, then continue stuffing as you work up the leg.
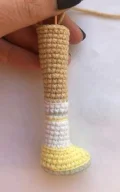
Colour Change :
Switch to white yarn; keep yellow attached.
Round 10 :
Working BLO, work 3sc, 1dec, (2sc-1dec) twice, 3sc, 1dec. (14)
Round 11 :
Work 14sc. (14)
Round 12 :
Work 14sc. (14)
Round 13 :
Work 14sc. (14)
Round 14 :
Work 14sc. (14)
Round 15 :
Work 14sc. (14)
Info :
Work 1 shifting sc to position the upcoming color change directly above the heel at the back of the leg.
Colour Change :
Switch to yellow yarn; keep white attached.
Round 16 :
Work 14sl st loosely. (14)
Colour Change :
Switch to white yarn; cut yellow.
Round 17 :
Working into BLO of Round 15 and those sc together, work 14sc. (14)
Colour Change :
Switch to grey yarn; keep white attached.
Round 18 :
Work 14sl st loosely. (14)
Colour Change :
Switch to white yarn; cut grey.
Round 19 :
Working into BLO of Round 17 and those sc together, work 14sc. (14)
Round 20 :
Work 14sc. (14)
Colour Change :
Switch to beige yarn; cut white.
Round 21 :
Working BLO, work 14sc. (14)
Round 22 :
Work 14sc. (14)
Round 23 :
Work 14sc. (14)
Round 24 :
Work 14sc. (14)
Round 25 :
Work 14sc. (14)
Round 26 :
Work 3sc, 1inc, 7sc, 1inc, 2sc. (16) — Increases must fall on both sides of the leg. Use shifting sc if needed to position them correctly.
Round 27 :
Work 16sc. (16)
Round 28 :
Work 16sc. (16)
Round 29 :
Work 16sc. (16)
Round 30 :
Work 4sc, 1inc, 8sc, 1inc, 2sc. (18) — Increases must fall on both sides of the leg.
Round 31 :
Work 18sc. (18)
Round 32 :
Work 18sc. (18)
Round 33 :
Work 18sc. (18)
Round 34 :
Work 18sc. (18)
Round 35 :
Work 18sc. (18)
Info :
Work 3 shifting sc so the color change falls exactly at the center back of the leg.
Colour Change :
Switch to white yarn; cut beige.
Round 36 :
Work 18sl st loosely. (18)
Round 37 :
Working into BLO of Round 35 and those sc together, work 18sc. (18)
Round 38 :
Work 18sc. (18)
Info :
LEFT LEG: Leave the last 4 stitches unworked (shifting sc). Fasten off and weave in the end. RIGHT LEG: Work 5 shifting sc, then do not cut the yarn — continue directly into the body section.
— 5. Leg Finishing Details :
Bind Off Foot :
Join grey yarn to the FLO of Round 3 of the sneaker sole and work 28sc around. Fasten off and weave in the end.
Sneaker Edge — Row 1 :
Join yellow yarn to the FLO of Round 9. Work 18sc around. (18)
Colour Change :
Switch to grey yarn; cut yellow.
Sneaker Edge — Row 2 :
Work 18sl st loosely. (18)
Sneaker Edge — Row 3 :
Working into BLO of Row 1 and those sc together, work 18sc. (18) — Fasten off and weave in the end.
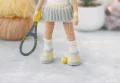
Bind Off Stockings :
Join white yarn to the FLO of Round 20 and work 14sc around. Fasten off and weave in the end.
Info :
Using grey yarn, embroider shoelace crosses on the sneaker upper.
— 6. Body (continued from right leg) :
Info :
Stuff the body with fiberfill as you work. Position both legs so the toes point straight forward. The inside seam of each leg must run along the center of the inner thigh. Chain 4 and sl st into the last sc of the left leg to join. Twist the wire ends of both legs together before beginning Row 39.
Round 39 :
Work 18sc along the right leg, 4sc across the chain, 18sc along the left leg, 4sc along the other side of the chain. (44) — Place a stitch marker at the back center.
Round 40 :
Work 44sc. (44)
Round 41 :
Work 44sc. (44)
Round 42 :
Work 44sc. (44)
Round 43 :
Work 44sc. (44)
Round 44 :
Work 44sc. (44)
Round 45 :
Work 44sc. (44)
Round 46 :
Work 44sc. (44)
Round 47 :
Work 44sc. (44)
Info :
Work several shifting sc (approximately 9) to move the marker to the side of the body before beginning the skirt attachment.
Colour Change :
Switch to grey yarn; keep white attached.
Round 48 :
Work 44sc. (44)
— 7. Skirt (worked separately in grey, turning rows) :
Info :
Work the skirt separately using grey yarn. Use the same hook size or one size larger for a looser, more flowing fabric. Work in turning rows. You may need to add or remove 1–2 rows to fit the doll's waist — check as you go. Start with a foundation chain of 12ch, turn, begin in the 2nd ch from the hook.
Row 1 :
Working BLO, work 9sc, then 2sl st BLO, ch1, turn. (11)
Row 2 :
Working BLO, work 2sl st, then 9sc BLO, ch1, turn. (11)
Info :
Repeat Rows 1 and 2 alternately a total of 26 more times, for a total of 54 rows.
Row 55 :
Working BLO, work 9sc, then 2sl st BLO, ch1, turn. (11)
Info :
Fold the skirt piece in half so the two short ends meet. Join with 11sc worked through both layers simultaneously. Fasten off and weave in the end. Place the skirt onto the body with the sl st edge facing upward, then work Row 49 of the body to attach it.
— 8. Body continued — T-shirt and shoulder shaping :
Round 49 :
Catching one stitch of the skirt and one stitch of the body together with each sc, work 44sc. (44)
Info :
Wrap the twisted leg wire joins with adhesive plaster for safety.
Colour Change :
Switch to yellow yarn; cut grey.
Round 50 :
Work 44sl st loosely. (44)
Round 51 :
Working into BLO of Round 49 and those sc together, work 44sc. (44)
Colour Change :
Switch to white yarn; cut yellow.
Round 52 :
Work 44sl st loosely. (44)
Round 53 :
Working into BLO of Round 51 and those sc together, work 1dec, 20sc, 1dec, 20sc. (42) — Decreases must sit exactly on opposite sides of the body.
Round 54 :
Work (5sc-1dec) 6 times. (36)
Round 55 :
Work 36sc. (36)
Round 56 :
Work 36sc. (36)
Round 57 :
Work 36sc. (36)
Round 58 :
Work (4sc-1dec) 6 times. (30)
Round 59 :
Work 30sc. (30)
Round 60 :
Work 30sc. (30)
Round 61 :
Work 30sc. (30)
Round 62 :
Work 30sc. (30)
Info :
Attach both arms now. The arms attach at 1sc each. Shift the marker if necessary so it sits just before the right arm position (shift approximately 2sc). Position arms so fingers point straight ahead.
Round 63 :
Work 10sc along the left arm (joining the first sc through both the body and arm together), 14sc along the body, 10sc along the right arm (joining in the same way), 14sc along the body. (48)
Info :
Insert the arm wire skeleton now. Take 1mm–1.5mm wire approximately 9 inches long, bend both ends inward about 0.39 inches, wrap all ends with adhesive plaster, and slide it through both arms behind the main body skeleton. Stuff the palms firmly and the rest of the arms lightly.
Round 64 :
Work 48sc. (48)
Round 65 :
Work 3sc, 1 triple-dec, 21sc, 1 triple-dec, 18sc. (44) — Triple-decs must fall exactly at the center of each shoulder side. A triple-dec joins 3 stitches together at once.
Round 66 :
Work 2sc, 2dec, 18sc, 2dec, 16sc. (40) — Decs stay at the shoulder center.
Round 67 :
Work 1sc, 2dec, 16sc, 2dec, 15sc. (36)
Round 68 :
Work (4sc-1dec) 6 times. (30)
Round 69 :
Work (3sc-1dec) 6 times. (24)
Info :
Work 2 shifting sc to move the marker to the side of the body.
Colour Change :
Switch to beige yarn; cut white.
Round 70 :
Working BLO, work (2sc-1dec) 6 times. (18)
Round 71 :
Work (1sc-1dec) 6 times. (12)
Round 72 :
Work 12sc. (12)
Round 73 :
Work 12sc. (12)
Round 74 :
Work 12sc. (12)
Round 75 :
Work 12sc. (12)
Round 76 :
Work 12sc. (12)
Round 77 :
Work 12sc. (12)
Round 78 :
Work 12sc. (12)
Round 79 :
Work 12sc. (12) — Work any remaining shifting sc needed to return the marker to the side. Fasten off and weave in the end.
— 9. Collar :
Info :
Join yellow yarn to the FLO of Round 69 of the body.
Collar Row :
Work the following sequence across the round: 12sc, 1hdc, 4dc, 1sl st, 4dc, 1hdc, 1sc. The sl st must fall exactly at the center front of the collar.
— 10. Logo Embroidery :
Info :
Using yellow and white yarn, embroider a small decorative logo onto the front of the T-shirt section of the body.
— 11. Head :
Info :
Work in beige yarn. Stuff the head with fiberfill as you go. Start with a chain of 13ch, turn, begin from the 2nd ch from the hook. The head is worked as an oval.
Round 1 :
Work 11sc along one side, 3sc into the corner stitch, 10sc along the other side, 1inc at the end. (26)
Round 2 :
Work 1inc, 10sc, 3inc, 10sc, 2inc. (32)
Round 3 :
Work 1sc-1inc, 10sc, (1sc-1inc) 3 times, 10sc, (1sc-1inc) twice. (38)
Round 4 :
Work 2sc-1inc, 10sc, (2sc-1inc) 3 times, 10sc, (2sc-1inc) twice. (44)
Round 5 :
Work 3sc-1inc, 10sc, (3sc-1inc) 3 times, 10sc, (3sc-1inc) twice. (50)
Round 6 :
Work 4sc-1inc, 10sc, (4sc-1inc) 3 times, 10sc, (4sc-1inc) twice. (56)
Round 7 :
Work 25sc, 1inc, 27sc, 1inc, 2sc. (58) — Both increases must sit exactly on opposite sides.
Round 9 :
Work 26sc, 1inc, 28sc, 1inc, 2sc. (60) — Increases on opposite sides.
Round 10 :
Work 60sc. (60)
Round 11 :
Work 60sc. (60)
Round 12 :
Work 60sc. (60)
Round 13 :
Work 60sc. (60)
Round 14 :
Work 60sc. (60)
Info :
If using safety eyes with a locking back, insert them now — between Rounds 11 and 14, spaced 6sc apart.
Round 15 :
Work 60sc. (60)
Round 16 :
Work 60sc. (60)
Round 17 :
Work 60sc. (60)
Round 18 :
Work 4sc, 1dec, (8sc-1dec) 5 times, 4sc. (54)
Round 19 :
Work (7sc-1dec) 6 times. (48)
Round 20 :
Work 3sc, 1dec, (6sc-1dec) 5 times, 3sc. (42)
Round 21 :
Work (5sc-1dec) 6 times. (36)
Round 22 :
Work 2sc, 1dec, (4sc-1dec) 5 times, 2sc. (30)
Round 23 :
Work (3sc-1dec) 6 times. (24)
Round 24 :
Work 1sc, 1dec, (2sc-1dec) 5 times, 1sc. (18)
Round 25 :
Work (4sc-1dec) 3 times. (15)
Round 26 :
Working BLO, work 15sc. (15)
Round 27 :
Work 15sc. (15)
Round 28 :
Work 15sc. (15)
Round 29 :
Work 15sc. (15)
Round 30 :
Work 15sc. (15)
Round 31 :
Work 15sc. (15)
Round 32 :
Work 15sc. (15)
Round 33 :
Work 15sc. (15) — Fasten off and weave in the end. Stuff the head firmly with fiberfill.
Info :
Using a sushi stick or chopstick, tuck the neck tube (Rounds 26–33) up into the head cavity. The head must be firmly stuffed but the neck opening should still slide easily onto the body's neck tube.
— 12. Ears (make 2, beige) :
Round 1 :
Work 6sc into MR, ch1, turn. (6)
Round 2 :
Work 6sc. (6) — Fasten off, leaving a long tail for sewing on.
— 13. Face Decoration :
Info :
Create eye indentations (contractions) by pulling the yarn through the fabric from behind each eye position to create a slight recess — this gives the eyes a more expressive, sunken look.
Info :
If you haven't inserted the eyes yet, do so now: place them between Rounds 11 and 14 with exactly 6sc between them.
Info :
Embroider the whites of the eyes using white yarn. Using black moulinet floss in 4 strands, embroider the upper eyelids. Using black moulinet floss in 2 strands, add the eyelashes.
Info :
Embroider eyebrows using a strand of brown hair yarn. Embroider the nose in beige yarn — position it 1sc below the eyes and make it 2sc wide. Embroider the mouth using light-brown moulinet floss in a single strand — place it 2sc below the nose and work it 4sc wide.
Info :
Apply pink oil pastel or powder blush to the cheeks and tip of the nose. Lightly dust the eyebrows with brown oil pastel.
Info :
Sew the ears to the head between Rounds 13 and 17, placing them 6sc away from each eye on either side.
— 14. Hair and Cap :
Info :
Work in brown yarn. Do not stuff. Start with a chain of 13ch, turn, begin from the 2nd ch from the hook. This piece is worked the same shape as the head oval.
Round 1 :
Work 11sc along one side, 3sc into the corner stitch, 10sc along the other side, 1inc. (26)
Round 2 :
Working BLO, work 1inc, 10sc, 3inc, 10sc, 2inc. (32)
Round 3 :
Work 1sc-1inc, 10sc, (1sc-1inc) 3 times, 10sc, (1sc-1inc) twice. (38)
Round 4 :
Work 2sc-1inc, 10sc, (2sc-1inc) 3 times, 10sc, (2sc-1inc) twice. (44)
Round 5 :
Work 3sc-1inc, 10sc, (3sc-1inc) 3 times, 10sc, (3sc-1inc) twice. (50)
Round 6 :
Work 4sc-1inc, 10sc, (4sc-1inc) 3 times, 10sc, (4sc-1inc) twice. (56)
Round 7 :
Work 25sc, 1inc, 27sc, 1inc, 2sc. (58) — Increases exactly on opposite sides.
Round 9 :
Work 26sc, 1inc, 28sc, 1inc, 2sc. (60) — Increases exactly on opposite sides.
Round 10 :
Work 60sc. (60)
Round 11 :
Work 60sc. (60)
Round 12 :
Work 60sc. (60)
Info :
Fasten off, leaving a short tail — do not weave it in yet. Continue to the ponytail before adding the cap rows.
Ponytail :
Join brown yarn to the FLO of Round 1 of the hair piece. Work the following sequence: 1sc, then repeat (ch16, turn, work 15hdc back along the chain, 1sc in the next stitch of Round 1) 26 times total. This creates the curly ponytail loops. Fasten off and weave in the end.
Colour Change :
Switch to grey yarn and continue on the hair piece.
Round 13 :
Work 60sl st loosely. (60)
Round 14 :
Working into BLO of Round 12 and those sc together, work 60sc. (60) — Do not cut grey thread; set aside and work the cap peak next.
— 15. Cap Peak (yellow, turning rows) :
Info :
Work the peak in yellow yarn in turning rows. Start with a foundation chain of 15ch, turn, begin from the 2nd ch from the hook.
Row 1 :
Work 14sc, ch1, turn. (14)
Row 2 :
Work 14sc, ch1, turn. (14)
Row 3 :
Work 1inc, 12sc, 1inc, ch1, turn. (16)
Row 4 :
Work 16sc, ch1, turn. (16)
Row 5 :
Work 1inc, 14sc, 1inc, ch1, turn. (18)
Row 6 :
Work 18sc, ch1, turn. (18)
Row 7 :
Work 1inc, 16sc, 1inc, ch1. (20)
Info :
Bind off the peak along 3 sides (the two short sides and the outer curved edge) using sc. Follow the direction of the arrows shown in the photo guide.
Round 15 :
Return to the grey yarn on the hair piece. Work 29sc, then work 20sc simultaneously through both the hair piece and the peak edge to join them, then work 11sc to complete the round. (60) — Bind off the cap edge with sc all around. Fasten off and weave in the end.
Info :
Sew or pin the completed hair and cap unit onto the head.
— 16. Scrunchie :
Foundation :
Using white yarn, chain 33, turn, begin from the 2nd ch from the hook.
Row 1 :
Work 32hdc across the chain. (32) — Try the piece around the ponytail to check fit before joining. Join the ends with sl st, then sew closed using the tail. Fasten off and weave in the end.
— 17. Tennis Racket (non-crocheted craft element) :
Info :
Draw a racket shape on grid paper, then trace and cut 4 identical shapes from cardboard. Glue two pairs of shapes together so you have 2 sturdy racket frames. Paint the front face of both rackets grey and add yellow stripe details.
Info :
Take one racket frame and glue a piece of tulle mesh to its unpainted side. Press the second matching frame on top to sandwich the tulle. Trim any tulle that extends beyond the frame edges. Glue a small strip of yellow paper around the handle to finish it.
— 18. Tennis Ball (non-crocheted craft element) :
Info :
Shape yellow polymer clay or air-dry clay into a ball approximately 0.59 inches in diameter. Cure or dry it according to the clay manufacturer's instructions. Once dry and firm, paint two curved white stripes using acrylic paint and a fine brush.
Penny has officially taken the court — and she's ready to come home with you! 🎾 This pattern is one of those projects that feels like a real achievement when it's done. From the first magic ring of her little hand all the way to tying the scrunchie around her curly ponytail, every step of making Penny is genuinely fun. She's detailed, she's sporty, and she has so much personality — the kind of doll you'll want to keep on your desk rather than give away (though she makes an incredible gift for any tennis fan). Take your time, enjoy the color changes, and don't stress about the wire — it's much easier than it sounds. You've got this. 🧶✨