About This Piggy Pocket Phone Pouch Amigurumi Pattern
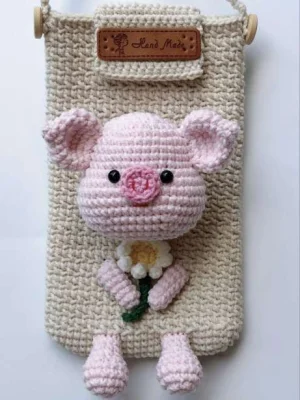
A fantastic project for creating a personalized, handmade gift that friends and family will cherish, or a delightful conversation starter to carry with you wherever you go.
Ideal for those with basic crocheting experience, featuring slightly more advanced stitches and techniques to expand your skills.
Fits nicely into a free afternoon — 2 to 5 hours of focused, enjoyable crocheting.
An adorable friend to cherish, handcrafted with love to bring comfort and joy for years to come.
A fantastic project for creating a personalized, handmade gift that friends and family will cherish, or a delightful conversation starter to carry with you wherever you go.
I absolutely adore how this project combines utility with pure cuteness. The textured stitch is incredibly satisfying to work up, and watching the little pig's personality emerge as you sew the pieces together is pure crafting joy.
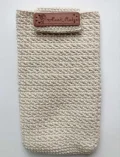
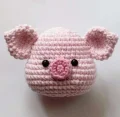
I will never get tired of how versatile crochet can be! When I first designed this little pouch, I wanted something that was highly functional but still brought a smile to my face every single time I reached for my phone. The combination of the sturdy, textured moss-like stitch with the whimsical 3D pig elements is just magical.
If you want to customize your pouch, try playing around with the color palette! A soft lavender or mint green background would make the pink piggy pop beautifully. You could also substitute the flower for a tiny crocheted strawberry or acorn depending on the season.
One of my favorite tips for this project is to sew a soft fabric lining inside the pouch. It only takes a few minutes but adds a luxurious, professional finish that protects your phone screen from any tiny gaps in the stitches. I can't wait to see how you make this pattern your own!
Keep your phone safe and incredibly cute with this adorable pig-themed pouch! Crocheted with a textured stitch that gives it a lovely, sturdy feel, this bag is as practical as it is charming. You'll love bringing this little pink piggy to life while crafting a highly useful everyday accessory.
Start by making 24 ch. We will work in continuous spirals. For a neat texture, use the yarn-under single crochet method.
Work 22 sc starting in the second ch from your hook. In the final chain stitch, make 3 sc. Turn to work along the opposite side of the foundation chain: work 21 sc, then make 1 inc in the last stitch. (48)
1 inc, 21 sc, 3 inc, 21 sc, 2 inc (54)
1 inc, 24 sc, 3 inc, 24 sc, 2 inc (60)
Work 60 sc around (60)
Repeat this sequence 30 times: ch 1, skip 1 stitch, 1 sc in the next stitch (60)
Repeat this sequence 30 times: 1 sc in the ch-1 space, 1 sc in the next stitch (60)
Alternate the textured pattern by repeating Round 5 on all odd rounds and repeating Round 6 on all even rounds until you finish Round 48. (60)
Identify the 14 central stitches on the back of the pouch at Round 46.
Work 14 sc across, then ch 1 and turn. (14)
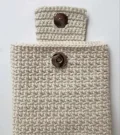
Work 14 sc across, ch 1 and turn. At the end of Row 13, fasten off and weave in your ends. Sew one button onto the front of the lid.
ch 3, start in the second ch from hook: 2 sc, ch 1, turn. (2)
2 sc, ch 1, turn. (2)
Repeat Row 2 continuously until your strap measures approximately 120 cm. Fasten off, leaving a long tail for sewing.
Using pastel pink yarn, work 6 sc into a magic ring. (6)
Work 6 inc around. (12)
Repeat (1 sc, 1 inc) 6 times. (18)
Repeat (1 inc, 2 sc) 6 times. (24)
Repeat (3 sc, 1 inc) 6 times. (30)
1 sc, 1 inc, then repeat (4 sc, 1 inc) 5 times, then 3 sc. (36)
Work 36 sc around. (36)
7 sc, 7 inc, 7 sc, 7 inc, 8 sc. (50)
Work 50 sc around. (50)
7 sc, 1 dec, 10 sc, 1 dec, 7 sc, 1 dec, 10 sc, 1 dec, 8 sc. (46)
7 sc, 1 dec, 8 sc, 1 dec, 7 sc, repeat (1 dec, 8 sc) 2 times. (42)
7 sc, repeat (1 dec, 2 sc) 2 times, 1 dec, 7 sc, repeat (1 dec, 2 sc) 2 times, 1 dec, 8 sc. (36)
Repeat (1 dec, 4 sc) 6 times. (30)
Repeat (3 sc, 1 dec) 6 times. (24)
Firmly stuff the head with fiberfill at this point.
Work 12 dec around. (12)
Work 6 dec, then sl st to finish. (6)
Add any final stuffing needed to shape the head. Fasten off and weave in the yarn tail. Insert the safety eyes between Rounds 11 and 12, leaving a space of 6 stitches between them.
Using pastel pink yarn, work 4 sc in a magic ring. (4)
Repeat (1 sc, 1 inc) 2 times. (6)
Work 6 inc around. (12)
Repeat (1 sc, 1 inc) 6 times. (18)
Repeat (1 inc, 2 sc) 6 times. (24)
Work 24 sc around. (24)
Repeat (2 sc, 1 dec) 6 times. (18)
Repeat (1 sc, 1 dec) 6 times, then sl st to finish. (12)
Fasten off, leaving a long tail for sewing. Do not stuff the ears. Flatten them and fold the top edge down slightly before sewing.
Using bright pink yarn, work 6 sc in a magic ring. (6)
Work 6 inc around. (12)
Fasten off and weave in the end. Embroider two nostrils onto the snout using red yarn, then sew the mouth between Rounds 14 and 15 of the head using red yarn.
Using pastel pink yarn, work 6 sc in a magic ring. (6)
Work 6 inc around. (12)
Repeat (2 sc, 1 inc) 4 times. (16)
Work 16 sc around. (16)
Repeat (2 sc, 1 dec) 4 times. (12)
Repeat (1 dec, 2 sc) 3 times. (9)
Work 9 sc around. (9)
sl st to finish, then fasten off leaving a long tail. Stuff the leg only up to Round 5.
Using pastel pink yarn, work 7 sc in a magic ring. (7)
Work 7 sc around. (7)
sl st to finish, then fasten off leaving a long tail. Do not stuff the arms.
Using yellow yarn, work 6 sc in a magic ring. (6)
Repeat (1 sc, 1 inc) 3 times. (9)
Switch to cream yarn to make the petals: repeat (ch 4, start in the second ch from hook and work 3 sc down the chain, then sl st into the next sc of Round 2) 9 times. Fasten off and weave in the ends.
Using green yarn, ch 13. Starting in the second ch from your hook, work 12 sl st back down the chain. Fasten off and weave in the ends.
I hope you have the absolute best time crafting this sweet little companion! There is nothing quite like pulling your phone out of a cute, handmade pouch that you made yourself. Don't forget to share your finished piggies with our wonderful crafting community. Happy crocheting, and may your stitches always be cozy! 🧶 ✨ 🐷
Absolutely! You can easily increase the width by starting with a longer foundation chain (add chains in multiples of 2) and work more rounds to match the height of your device.
Any sport weight or light DK weight cotton-acrylic blend will work beautifully. Look for yarns with a similar matte finish and tight twist to preserve the crisp texture.
Not at all! While the pattern suggests fabric glue for a quick finish, you can absolutely sew all the pieces onto the pouch using a yarn needle and matching thread for extra durability.
Double-check that you are alternating the ch-1 spaces correctly. Round 5 creates the spaces, and Round 6 fills them. Keeping a consistent tension is key to making this stitch pop.
