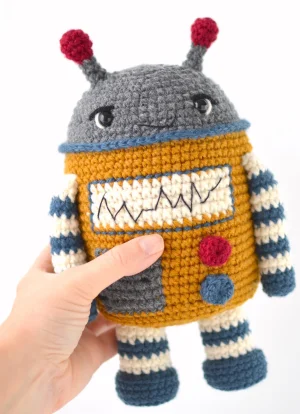
Meet your next favorite crochet project! This charming little robot brings a wonderful splash of vintage sci-fi nostalgia right to your yarn basket. With its adorable embroidered screen and playful control buttons, you will absolutely love watching this quirky character come to life stitch by stitch. It is the perfect blend of simple shapes and creative colorwork, making it an incredibly engaging make from start to finish.
Progress Tracker
0% Complete
— 1. Head & Body :
Round 1 :
Using color A, create a MR and make 8 sc into the loop. Do not join, as we will be working in a spiral. Mark your last stitch to keep track of the rounds. (8)
Round 2 :
Increase by making 2 sc in every stitch around. (16)
Round 3 :
Repeat *1 sc, then 2 sc in the next stitch* all the way around. (24)
Round 4 :
Repeat *sc in the next 2 stitches, then 2 sc in the next stitch* all the way around. (32)
Round 5 :
Repeat *sc in the next 3 stitches, then 2 sc in the next stitch* all the way around. (40)
Round 6 :
Repeat *sc in the next 4 stitches, then 2 sc in the next stitch* all the way around. (48)
Round 7 :
Work 1 sc in each stitch around. (48)
Round 8 :
Repeat *sc in the next 5 stitches, then 2 sc in the next stitch* all the way around. (56)
Round 9 :
Work 1 sc in each stitch around. (56)
Round 10 :
Work 1 sc in each stitch around. (56)
Round 11 :
Repeat *sc in the next 6 stitches, then 2 sc in the next stitch* all the way around. (64)
Round 12 :
Work 1 sc in each stitch around. (64)
Round 13 :
Work 1 sc in each stitch around, switching to color B in the final stitch. Cut color A. (64)
Round 14 :
Using color B, work in FLO and make 1 sc in every stitch around. Join with a sl st into the first stitch of this round, then cut the yarn. (64)
Round 15 :
With the RS facing, join color C with a sc in the BLO of the very first stitch of Round 13. Work 1 sc in each remaining stitch around. (64)
Round 16 :
Using color C, work 1 sc in each stitch around. (64)
Round 17 :
Using color C, work 1 sc in each stitch around. (64)
Round 18 :
Using color C, work 1 sc in each stitch around. (64)
Round 19 :
With color C, sc in the first 24 stitches; switch to color D and sc in the next 16 stitches; switch back to color C and sc in the remaining 24 stitches. (64)
Round 20 :
With color C, sc in the first 24 stitches; switch to color D and sc in the next 16 stitches; switch back to color C and sc in the remaining 24 stitches. (64)
Round 21 :
With color C, sc in the first 24 stitches; switch to color D and sc in the next 16 stitches; switch back to color C and sc in the remaining 24 stitches. (64)
Round 22 :
With color C, sc in the first 24 stitches; switch to color D and sc in the next 16 stitches; switch back to color C and sc in the remaining 24 stitches. Cut color D. (64)
Round 23 :
Using color C, work 1 sc in each stitch around. (64)
Round 24 :
Using color C, work 1 sc in each stitch around. (64)
Round 25 :
Using color C, work 1 sc in each stitch around. (64)
Round 26 :
With color C, sc in the first 24 stitches; switch to color A and sc in the next 8 stitches; switch back to color C and sc in the remaining 32 stitches. (64)
Round 27 :
With color C, sc in the first 24 stitches; switch to color A and sc in the next 8 stitches; switch back to color C and sc in the remaining 32 stitches. (64)
Round 28 :
With color C, sc in the first 24 stitches; switch to color A and sc in the next 8 stitches; switch back to color C and sc in the remaining 32 stitches. (64)
Round 29 :
With color C, sc in the first 24 stitches; switch to color A and sc in the next 8 stitches; switch back to color C and sc in the remaining 32 stitches. (64)
Round 30 :
With color C, sc in the first 24 stitches; switch to color A and sc in the next 8 stitches; switch back to color C and sc in the remaining 32 stitches. (64)
Round 31 :
With color C, sc in the first 24 stitches; switch to color A and sc in the next 8 stitches; switch back to color C and sc in the remaining 32 stitches. Cut color A. (64)
Round 32 :
Using color C, work 1 sc in each stitch around. (64)
Round 33 :
Using color C, work 1 sc in each stitch around. (64)
Info :
Insert the 10mm safety eyes on the front of the head, positioning them between Rounds 10 and 13, spaced about 9 stitches apart.
Round 34 :
Working in BLO, repeat *sc in the next 6 stitches, then sc2tog* all the way around. (56)
Info :
Start stuffing the body with fiberfill, and keep adding more as you work the remaining decrease rounds.
Round 35 :
Repeat *sc in the next 5 stitches, then sc2tog* all the way around. (48)
Round 36 :
Repeat *sc in the next 4 stitches, then sc2tog* all the way around. (40)
Round 37 :
Repeat *sc in the next 3 stitches, then sc2tog* all the way around. (32)
Round 38 :
Repeat *sc in the next 2 stitches, then sc2tog* all the way around. (24)
Round 39 :
Repeat *sc in the next stitch, then sc2tog* all the way around. (16)
Round 40 :
Repeat *sc2tog* all the way around. (8)
Info :
Fasten off, ensuring you leave a long tail. Thread this tail through the front loops of the final round, pull tight to close the opening, and secure with a knot.
— 2. Knobs (Make 2) :
Round 1 :
Leaving a generous starting tail, create a MR and work 10 sc into it. Do not join. (10)
Round 2 :
Working in BLO, work 1 sc in each of the 10 stitches. Join with a sl st to the first stitch of this round. Fasten off, leaving a long tail for sewing. (10)
— 3. Antennae (Make 2) :
Round 1 :
Using color E, make a MR and work 6 sc into it. Do not join, work in a continuous spiral. (6)
Note :
The original pattern skips Round 2; proceed directly from Round 1 to Round 3 as written.
Round 3 :
Repeat *sc in the next stitch, 2 sc in the next stitch* 3 times. (9)
Round 4 :
Work 1 sc in each of the next 9 stitches. (9)
Round 5 :
Work 1 sc in the first stitch, then repeat *sc2tog* 4 times, switching to color A in the final stitch. Cut color E. (5)
Round 6 :
Using color A, work 1 sc in each of the next 5 stitches. (5)
Round 7 :
Using color A, work 1 sc in each of the next 5 stitches. (5)
Round 8 :
Using color A, work 1 sc in the first stitch, 2 sc in the next stitch, 1 sc in the next stitch, 2 sc in the next stitch, and 1 sc in the final stitch. (7)
Info :
Fasten off, leaving a long yarn tail to sew the antenna to the head.
— 4. Legs (Make 2) :
Round 1 :
Using color B, make a MR and work 8 sc into it. Do not join. (8)
Round 2 :
Work 2 sc in each stitch around. (16)
Round 3 :
Repeat *sc in the next stitch, 2 sc in the next stitch* all the way around. (24)
Round 4 :
Working in BLO, work 1 sc in each stitch around. (24)
Round 5 :
Work 1 sc in each stitch around. (24)
Round 6 :
Work 1 sc in each stitch around. (24)
Note :
When changing colors for the leg stripes, do not cut the inactive yarn. Carry it along the inside (wrong side) of the leg.
Round 7 :
Working in BLO, repeat *sc in the next stitch, sc2tog* all the way around, switching to color D in the final stitch. (16)
Info :
Begin stuffing the leg firmly with fiberfill and continue stuffing as you go.
Round 8 :
Using color D and working in FLO, work 1 sc in each stitch around. (16)
Round 9 :
Using color D, work 1 sc in each stitch around, switching to color B in the final stitch. (16)
Round 10 :
Using color B, work 1 sc in each stitch around. (16)
Round 11 :
Using color B, work 1 sc in each stitch around, switching to color D in the final stitch. Cut color B. (16)
Round 12 :
Using color D, work 1 sc in each stitch around. (16)
Round 13 :
Using color D, work 1 sc in each stitch around. Fasten off, leaving a long tail for sewing. (16)
— 5. Arms (Make 2) :
Round 1 :
Using color B, make a MR and work 5 sc into it. Do not join. (5)
Round 2 :
Work 2 sc in each stitch around. (10)
Round 3 :
Working in BLO, work 1 sc in each stitch around. (10)
Note :
When changing colors for the arm stripes, do not cut the inactive yarn. Carry the unused color along the inside (wrong side) of the piece.
Round 4 :
Work 1 sc in each stitch around, switching to color D in the final stitch. (10)
Round 5 :
Using color D, work 1 sc in each stitch around. (10)
Round 6 :
Using color D, work 1 sc in each stitch around, switching to color B in the final stitch. (10)
Round 7 :
Using color B, work 1 sc in each stitch around. (10)
Round 8 :
Using color B, work 1 sc in each stitch around, switching to color D in the final stitch. (10)
Info :
Begin stuffing the arm with fiberfill and continue stuffing as you complete the rounds.
Round 9 :
Using color D, work 1 sc in each stitch around. (10)
Round 10 :
Using color D, work 1 sc in each stitch around, switching to color B in the final stitch. (10)
Round 11 :
Using color B, work 1 sc in each stitch around. (10)
Round 12 :
Using color B, work 1 sc in each stitch around, switching to color D in the final stitch. (10)
Round 13 :
Using color D, work 1 sc in each stitch around. (10)
Round 14 :
Using color D, work 1 sc in each stitch around, switching to color B in the final stitch. (10)
Round 15 :
Using color B, work 1 sc in each stitch around. (10)
Round 16 :
Using color B, work 1 sc in each stitch around, switching to color D in the final stitch. Cut color B. (10)
Round 17 :
Using color D, work 1 sc in each stitch around. (10)
Round 18 :
Using color D, repeat *sc in the next 3 stitches, sc2tog* 2 times. Fasten off, leaving a long tail for sewing. (8)
I hope you have the absolute best time bringing this sweet little retro robot to life! Pixie is such a joyful, nostalgic character to make, and those tiny embroidered details really give them a personality of their own. Don't be afraid to play around with different colors for the buttons or screen to make your robot truly unique. Happy crocheting, and may your stitches be cozy! 🧶✨🤖