About This Classic Tigger Amigurumi Pattern
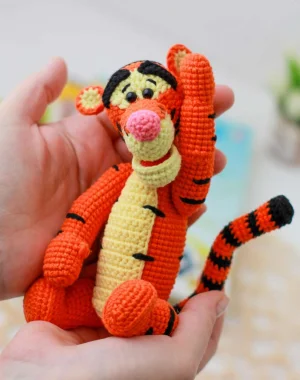
A wonderful gift for any fan of the Hundred Acre Wood, this handmade plushie is sturdy enough for play but detailed enough for collectors and shelf display.
Ideal for those with basic crocheting experience, featuring slightly more advanced stitches and techniques to expand your skills.
Takes 5-7 hours, making it an enjoyable project to finish over a couple of days.
Playful characters full of personality, designed to spark imagination and become cherished playtime favorites.
A wonderful gift for any fan of the Hundred Acre Wood, this handmade plushie is sturdy enough for play but detailed enough for collectors and shelf display.
I absolutely adore how the muzzle is constructed in this pattern—it gives him so much expression! Plus, the way the limbs are attached makes him feel really high-quality and professional once he's finished.
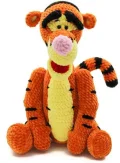
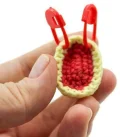
When I first sat down to make this Tigger, I was most excited about his muzzle. It's such a unique shape, and I really wanted to get that bouncy expression just right! Crocheting the lower jaw separately and then joining it as you go might feel a bit fiddly at first, but trust me, the result is so worth it. It gives him that open-mouthed, happy look that we all know and love.
I decided to use a semi-cotton blend for mine because it gives such great stitch definition, which is perfect for when you're adding those iconic black stripes later. Speaking of stripes, don't feel like they have to be perfect! Real tigers have unique patterns, and our friend Tigger is no different. I actually find the embroidery part quite relaxing—it's like the character finally wakes up once the details are on.
One little tip from my hook to yours: if you're using the wire in the tail, make sure you wrap the ends really well with a fabric bandage or some strong tape. It keeps everything safe and snug. I can't wait for you to feel that same spark of joy when you finish his last stripe and see him sitting there on your desk!
You're going to love bringing this energetic little guy to life! He's got that classic bouncy personality we all grew up with, and making him is such a nostalgic trip. I've designed him to be just the right size for hugging or sitting on a shelf. Grab your orange yarn and let's get started on your very own bouncy friend!
Start with red yarn. We will work in a spiral to create an oval shape.
ch 6
Starting in the 2nd ch from your hook: 4 sc, 3 sc into the last ch. Continue on the other side of the chain: 3 sc, 1 inc (12)
1 inc, 3 sc, 3 inc, 3 sc, 2 inc (18)
1 sc, 1 inc, 3 sc, (1 sc, 1 inc) x 3, 3 sc, (1 sc, 1 inc) x 2 (24)
Secure and cut the red yarn.
Switch to light yellow yarn.
ch 6
Starting in the 2nd ch from hook: 4 sc, 3 sc into the last ch. Continue on the other side: 3 sc, 1 inc (12)
1 inc, 3 sc, 3 inc, 3 sc, 2 inc (18)
1 sc, 1 inc, 3 sc, (1 sc, 1 inc) x 3, 3 sc, (1 sc, 1 inc) x 2 (24)
24 sc
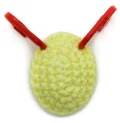
Fasten off the yellow yarn. Mark 6 sc at the top of the oval for the attachment point. Reattach yellow yarn in the next st to the left of your marker and work 18 sc until you reach the next marker. Now, place the red inner part face up against the yellow part and join them together by working 24 sc through both layers, adding a bit of stuffing as you go. Hide the yarn ends inside. Mark a 6 sc gap at the top where it will eventually attach to the head.
Make two inner parts using light yellow yarn.
6 sc in mr
6 inc (12)
Fasten off. Now make two outer parts using orange yarn.
6 sc in mr
6 inc (12)
Do not fasten off the orange part. Place a yellow inner part face up against it and work 12 sc through both layers to join. Work 12 sc for one more round. Fold the ear in half and close the bottom by working sc through both sides. Leave a tail for sewing.
Use orange yarn. Turn and work a ch at the end of every row.
ch 5
Starting in 2nd ch: 4 sc
1 inc, 2 sc, 1 inc (6)
1 inc, 4 sc, 1 inc (8)
8 sc
Fasten off and leave a long tail for assembly.
Start with light yellow yarn and stuff as you go.
6 sc in mr
(1 sc, 3 sc in the next st) x 3 (12)
2 sc, (3 sc in the next st, 3 sc) x 2, 3 sc in the next st, 1 sc (18)
3 sc, (3 sc in the next st, 5 sc) x 2, 3 sc in the next st, 2 sc (24)
24 sc
In the next round, we attach the jaw and muzzle stripe. Mark 8 sc on top for the stripe and 6 sc on the bottom for the jaw, leaving 5 sc on each side. Switch to orange yarn.
5 sc, 8 sc through both the head and stripe, 5 sc, 6 sc through both the head and jaw (24)
9 sc, 1 inc hdc, switch to light yellow, 4 inc hdc, switch to orange, 1 inc hdc, 9 sc (30)
Insert eyes into Round 12 about 3-4 stitches apart.
9 sc, 1 hdc, 1 inc hdc, switch to light yellow, (1 hdc, 1 inc hdc) x 4, switch to orange, 1 hdc, 1 inc hdc, 9 sc (36)
9 sc, 2 hdc, 1 inc hdc, switch to light yellow, (2 hdc, 1 inc hdc) x 4, switch to orange, 2 hdc, 1 inc hdc, 9 sc (42)
42 sc
11 sc, 1 sc together with ear, 18 sc, 1 sc together with ear, 11 sc (42)
(5 sc, 1 dec) x 6 (36)
(4 sc, 1 dec) x 6 (30)
(3 sc, 1 dec) x 6 (24)
(2 sc, 1 dec) x 6 (18)
(1 sc, 1 dec) x 6 (12)
6 dec (6)
Close the hole, fasten off, and hide the end.
Use pink yarn.
6 sc in mr
(1 sc, 3 sc in the next st) x 3 (12)
2 sc, (1 inc, 3 sc) x 2, 1 inc, 1 sc (15)
15 sc
Fasten off and leave a tail for sewing to the muzzle.
Make two using black yarn. Leave a long starting tail.
ch 10
Starting in 4th ch from hook: 1 dc, 1 hdc, 5 sc
Fasten off and leave a tail for sewing.
Make a left and right arm using orange yarn. Stuff as you go.
ch 5
Starting in 2nd ch: 3 sc, 3 sc in the last ch, other side: 2 sc, 1 inc (10)
1 inc, 2 sc, 3 inc, 2 sc, 2 inc (16)
16 sc
7 sc, 1 ps (thumb), 8 sc (16)
16 sc
4 dec, 2 sc, 4 inc, 2 sc (16)
2 sc, 4 inc, 2 sc, 4 dec (16)
16 sc
12 sc, 4 inc (20)
4 inc, 12 sc (20)
12 sc, 4 dec (16)
4 dec, 12 sc (16)
16 sc
(2 sc, 1 dec) x 4 (12)
(1 sc, 1 dec) x 4 (8)
Close the gap and hide the thread.
Make two using orange yarn. Stuff while working.
ch 8
Starting in 2nd ch: 6 sc, 3 sc in the last ch, other side: 5 sc, 1 inc (16)
1 inc, 5 sc, 3 inc, 5 sc, 2 inc (22)
1 sc, 1 inc, 5 sc, (1 sc, 1 inc) x 3, 5 sc, (1 sc, 1 inc) x 2 (28)
28 bpsc
28 sc
7 sc, 7 dec, 7 sc (21)
5 sc, 6 dec, 4 sc (15)
6 sc, 3 inc, 6 sc (18)
1 dec, 14 sc, 1 dec (16)
5 sc, (1 inc, 1 sc) x 2, 1 inc, 6 sc (19)
19 sc
6 sc, (1 inc, 2 sc) x 2, 1 inc, 6 sc (22)
1 dec, 18 sc, 1 dec (20)
6 sc, (1 inc, 3 sc) x 2, 1 inc, 5 sc (23)
2 inc, 19 sc, 2 inc (27)
8 sc, (1 dec, 3 sc) x 2, 1 dec, 7 sc (24)
1 inc, 22 sc, 1 inc (26)
8 sc, (1 dec, 2 sc) x 2, 1 dec, 8 sc (23)
23 sc
(2 sc, 1 dec) x 5, 3 sc (18)
(1 sc, 1 dec) x 6 (12)
6 dec (6)
Secure and hide the thread.
The body is attached to the head in a 6x6 sc square. Use orange yarn and stuff firmly, especially the neck.
18 sc
(5 sc, 1 inc) x 3 (21)
21 sc
(6 sc, 1 inc) x 3 (24)
3 sc, 1 inc, 4 sc, 1 inc, 6 sc, 1 inc, 4 sc, 1 inc, 3 sc (28)
4 sc, 1 inc, 4 sc, 1 inc, 8 sc, 1 inc, 4 sc, 1 inc, 4 sc (32)
5 sc, 1 inc, 4 sc, 1 inc, 10 sc, 1 inc, 4 sc, 1 inc, 5 sc (36)
36 sc
8 sc, (2 sc, 1 inc) x 6, 10 sc (42)
42 sc
(5 sc, 1 dec) x 6 (36)
36 sc
(4 sc, 1 dec) x 6 (30)
(3 sc, 1 dec) x 6 (24)
(2 sc, 1 dec) x 6 (18)
(1 sc, 1 dec) x 6 (12)
6 dec (6)
Fasten off and hide the tail.
Use light yellow yarn. Turn and ch at the end of each row.
ch 5
Starting in 2nd ch: 4 sc
1 inc, 3 sc (5)
1 inc, 4 sc (6)
1 inc, 5 sc (7)
1 inc, 6 sc (8)
8 sc
skip 1 st, 5 sc, 1 dec (6)
skip 1 st, 3 sc, 1 dec (4)
Ch 1 and work sc around the entire edge of the piece, working increases at the corners. Leave a long tail for sewing.
Start with black yarn.
6 sc in mr
6 inc (12)
12 bpsc
12 sc
Switch to orange, 12 sc
Switch to black, 12 sc
Switch to orange, 12 sc
Switch to black, 12 sc
Switch to orange, 12 sc
Switch to black, 12 sc
Switch to orange, 12 sc
Switch to black, 12 sc
Switch to orange, 12 sc
Switch to black, 12 sc
Switch to orange, 12 sc
Switch to black, 12 sc
Switch to orange, 12 sc
Switch to black, 12 sc
Switch to orange, 12 sc
Fasten off. If using wire, insert it now and secure the ends before sewing the tail to the body.
There's nothing quite like the joy of finishing a classic character like Tigger! I hope you enjoyed every stitch of this project. He's such a cheerful addition to any room, and I bet he'll bring a smile to anyone who sees him. Don't forget to give his tail a little bounce once you're done! Happy crocheting, and I can't wait to see your finished buddy. 🧶✨
Yes! Use a 3.5mm-4.5mm hook and 8mm eyes. He will turn out much larger, about 39cm tall.
When embroidering the black stripes, try to follow the natural lines of the stitches and don't pull the yarn too tight or it will pucker the fabric.
It's a way to attach limbs using a long needle and strong thread so they can move slightly rather than being sewn stiffly in place.
Not at all! He looks great with a soft stuffed tail too. The wire just allows you to bend it into fun shapes.
