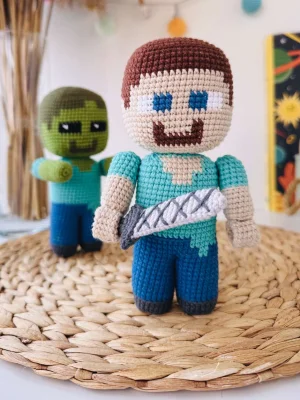
Get ready to bring the blocky world of your favorite sandbox game to life with this detailed Steve and Zombie duo. You will love how these iconic characters take shape, from their perfectly square heads to the clever way their arms move. It is a fantastic project for any gamer in your life, or just a fun way to challenge your colorwork skills. Grab your hook and let's start building these pixelated friends one stitch at a time!
Progress Tracker
0% Complete
— 1. Steve's Head :
Info :
Work in brown yarn to start the top of the head.
Round 1 :
Make a MR and work 8 sc into it (8)
Round 2 :
Repeat (1 sc, 3in1) 4 times (16)
Round 3 :
2 sc, repeat (3in1, 3 sc) 3 times, 3in1, 1 sc (24)
Round 4 :
3 sc, repeat (3in1, 5 sc) 3 times, 3in1, 2 sc (32)
Round 5 :
4 sc, repeat (3in1, 7 sc) 3 times, 3in1, 3 sc (40)
Round 6 :
5 sc, repeat (3in1, 9 sc) 3 times, 3in1, 4 sc (48)
Round 7 :
6 sc, repeat (3in1, 11 sc) 3 times, 3in1, 5 sc (56)
Round 8 :
7 sc, repeat (3in1, 13 sc) 3 times, 3in1, 6 sc (64)
Round 9 :
Work 64 sc into the BLO (64)
Round 10-12 :
Work 3 rounds of 64 sc in each (64)
Info :
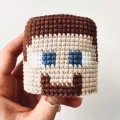
Begin alternating colors for the hair and face: brown, blue, white, and beige.
Round 13-14 :
25 sc in brown, 15 sc in beige, 24 sc in brown (64)
Round 15-16 :
23 sc in brown, 19 sc in beige, 22 sc in brown (64)
Round 17-18 :
18 sc in brown, 3 sc in beige, 2 sc in brown, 2 sc in beige, 3 sc in white, 3 sc in blue, 3 sc in beige, 3 sc in blue, 3 sc in white, 2 sc in beige, 2 sc in brown, 3 sc in beige, 17 sc in brown (64)
Round 19 :
18 sc in brown, 7 sc in beige, 3 sc in white, 3 sc in blue, 3 sc in beige, 3 sc in blue, 3 sc in white, 7 sc in beige, 17 sc in brown (64)
Round 20-21 :
18 sc in brown, 29 sc in beige, 17 sc in brown (64)
Round 22-23 :
18 sc in brown, 10 sc in beige, 2 sc in brown, 5 sc in beige, 2 sc in brown, 10 sc in beige, 17 sc in brown (64)
Round 24 :
15 sc in brown, 13 sc in beige, 9 sc in brown, 13 sc in beige, 14 sc in brown (64)
Round 25 :
15 sc in brown, 13 sc in beige, 9 sc in brown, 27 sc in beige (64)
Info :
Switch to beige yarn only for the remainder of the head.
Round 26 :
7 sc, repeat (sc3tog, 13 sc) 3 times, sc3tog, 6 sc (56)
Round 27 :
6 sc, repeat (sc3tog, 11 sc) 3 times, sc3tog, 5 sc (48)
Round 28 :
5 sc, repeat (sc3tog, 9 sc) 3 times, sc3tog, 4 sc (40)
Info :
Pack the head firmly with stuffing before the hole gets too small.
Round 29 :
4 sc, repeat (sc3tog, 7 sc) 3 times, sc3tog, 3 sc (32)
Round 30 :
3 sc, repeat (sc3tog, 5 sc) 3 times, sc3tog, 2 sc (24)
Round 31 :
2 sc, repeat (sc3tog, 3 sc) 3 times, sc3tog, 1 sc (16)
Round 32 :
1 sc, repeat (sc3tog, 1 sc) 3 times, sc3tog (8)
Info :
Finish with a sl st, cut yarn, and pull the remaining opening closed.
— 2. Steve's Palms :
Info :
Make 2 using beige yarn.
Round 1 :
ch 5, starting in 2nd ch from hook: 1 inc, 2 sc, 3 sc in last ch, rotate to work other side of ch: 3 sc (10)
Round 2-9 :
Work 8 rounds of 10 sc in each (10)
Info :
Do not stuff. Flatten the piece and work 5 sc through both layers to close.
Fingers :
From the last stitch: ch 4, 3 sc back down the ch, 3 sl st along the palm edge, ch 4, 3 sc back down the ch. Sew these finger loops to Round 1 of the palm.
— 3. Steve's Arms :
Info :
Make 2 using beige yarn.
Round 1 :
Create a MR and work 8 sc into it (8)
Round 2 :
Repeat (1 sc, 3in1) 4 times (16)
Round 3 :
Work 16 sc into the BLO (16)
Info :
Sew the palm piece to this end of the arm as shown in the assembly photos.
Round 4-8 :
Work 5 rounds of 16 sc in each (16)
Colour Change :
Switch to turquoise yarn.
Round 9-14 :
Work 6 rounds of 16 sc in each (16)
Info :
Leave a long tail (about 40 cm) for finishing the top of the arm after it is attached to the body.
Round 15 :
After joining to body: repeat (1 sc, sc3tog) 4 times (8)
— 4. Steve's Legs :
Info :
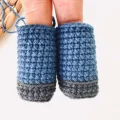
Make 2 starting with dark gray yarn.
Round 1 :
Make a MR and work 8 sc into it (8)
Round 2 :
Repeat (1 sc, 3in1) 4 times (16)
Round 3 :
2 sc, repeat (3in1, 3 sc) 3 times, 3in1, 1 sc (24)
Round 4 :
Work 24 sc into the BLO (24)
Round 5-6 :
Work 2 rounds of 24 sc in each (24)
Info :
Cut a square of plastic and place it inside the sole to keep the foot flat.
Colour Change :
Switch to navy blue yarn.
Round 7 :
Work 24 sc into the BLO (24)
Round 8-15 :
Work 8 rounds of 24 sc in each (24)
Round 16 - Leg 1 :
Work 17 sc, then sl st and fasten off, leaving a long tail for sewing.
Round 16 - Leg 2 :
Work 24 sc. Do not cut the yarn; we will continue to the body from here.
— 5. Steve's Body :
Info :
Position the legs and sew 6 sc together between them to join. Continue in blue.
Round 1 :
4 sc, 2 sc in the join area, 13 sc (blue), 2 sc (turquoise), 3 sc, 2 sc in the join area, 14 sc (blue) (40)
Round 2 :
19 sc in blue, 2 sc in turquoise, 19 sc in blue (40)
Round 3-4 :
17 sc in blue, 6 sc in turquoise, 17 sc in blue (40)
Colour Change :
Switch to turquoise yarn.
Round 5 :
Work in BLO for the blue stitches and both loops for the turquoise stitches: 40 sc (40)
Round 6-14 :
Work 9 rounds of 40 sc in each (40)
Round 15-16 :
24 sc in turquoise, 4 sc in beige, 12 sc in turquoise (40)
Round 17-18 :
22 sc in turquoise, 8 sc in beige, 10 sc in turquoise (40)
Round 19 :
6 sc in turquoise, then move your stitch marker to this position as the new start of the round.
Round 20 :
5 sc, sc3tog, 3 sc, sc3tog, 1 sc (turquoise), 10 sc (beige), 1 sc, sc3tog, 3 sc, sc3tog, 5 sc (turquoise) (32)
Info :
Stuff the legs and body firmly. Continue only in turquoise.
Round 21 :
4 sc, sc3tog, 1 sc, sc3tog, 10 sc, sc3tog, 1 sc, sc3tog, 4 sc (24)
Round 22 :
4 sc, sc3tog, 10 sc, sc3tog, 1 sl st. Fasten off with a long tail for the head.
— 6. The Sword :
Blade - Rnd 1 :
Using light gray, make a MR and work 6 sc into it (6)
Blade - Rnd 2 :
Work 6 sc (6)
Blade - Rnd 3 :
Work 6 inc (12)
Blade - Rnd 4-19 :
Work 16 rounds of 12 sc in each (12)
Blade - Finish :
Flatten and work 6 sc through both layers. Fasten off.
Grip - Rnd 1 :
Using dark gray, make a MR and work 6 sc into it (6)
Grip - Rnd 2-3 :
Work 2 rounds of 6 sc in each (6)
Grip - Rnd 4 :
Switch to brown: 2 sc, 1 dec, 2 sc (5)
Grip - Rnd 5-7 :
Work 3 rounds of 5 sc in each (5)
Grip - Rnd 8 :
Switch to dark gray: 5 inc (10)
Grip - Rnd 9 :
Work 10 inc (20)
Grip - Rnd 10 :
Work 20 sc (20)
Grip - Rnd 11 :
Repeat (1 sc, 1 inc) 10 times (30)
Info :
Finish with a sl st and leave a tail. Insert the blade into the grip and sew together. Add embroidered stripes if you like.
— 7. Zombie's Head :
Round 1-9 :
Work exactly as instructed for Steve's head using dark green yarn.
Round 10 :
Work 64 sc in green (64)
Round 11-12 :
32 sc in dark green, 4 sc in green, 28 sc in dark green (64)
Round 13-14 :
25 sc in dark green, 15 sc in green, 24 sc in dark green (64)
Round 15-16 :
23 sc in dark green, 19 sc in green, 22 sc in dark green (64)
Round 17-18 :
18 sc in dark green, 3 sc in green, 2 sc in dark green, 2 sc in green, 6 sc in black, 3 sc in green, 6 sc in black, 2 sc in green, 2 sc in dark green, 3 sc in green, 17 sc in dark green (64)
Round 19 :
18 sc in dark green, 7 sc in green, 6 sc in black, 3 sc in green, 6 sc in black, 7 sc in green, 17 sc in dark green (64)
Round 20-21 :
18 sc in dark green, 29 sc in green, 17 sc in dark green (64)
Round 22-23 :
18 sc in dark green, 10 sc in green, 2 sc in dark green, 5 sc in green, 2 sc in dark green, 10 sc in green, 17 sc in dark green (64)
Round 24 :
15 sc in dark green, 13 sc in green, 9 sc in dark green, 13 sc in green, 14 sc in dark green (64)
Round 25 :
15 sc in dark green, 13 sc in green, 9 sc in dark green, 27 sc in green (64)
Round 26-32 :
Follow the decrease pattern for Steve's head using green yarn.
— 8. Zombie's Arms :
Info :
Zombie arms are made without separate palms.
Round 1-8 :
Follow Steve's arm pattern using green yarn.
Round 9-13 :
Work 5 rounds of 16 sc in green (16)
Round 14-19 :
Switch to turquoise and work 6 rounds of 16 sc (16)
I'm so excited for you to finish your Steve and Zombie! These two are such a fun project, especially with that clever jointing technique that makes them feel like real action figures. Whether they're destined for a bookshelf or a toy box, they're sure to bring a smile to any fan's face. If you run into any trouble with the square shaping, just remember to keep your tension steady and trust the process. I'd love to see how your blocky buddies turned out, so please share your progress! Happy crafting and enjoy your new pixelated friends! 🧶🧵✨