About This Batman Amigurumi Pattern
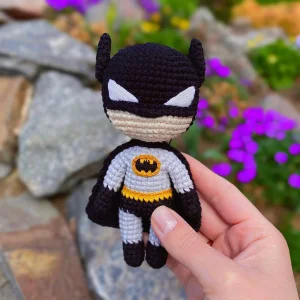
This little hero is the perfect size for a keychain or a desk buddy, making him a fantastic gift for the comic book lover in your life who appreciates a handmade touch.
Ideal for those with basic crocheting experience, featuring slightly more advanced stitches and techniques to expand your skills.
Fits nicely into a free afternoon — 2 to 5 hours of focused, enjoyable crocheting.
A mini friend to carry anywhere, providing comfort and companionship in a perfectly portable size.
This little hero is the perfect size for a keychain or a desk buddy, making him a fantastic gift for the comic book lover in your life who appreciates a handmade touch.
I honestly love how this pattern makes the character so recognizable without being overly complicated. The way the mask is built right into the head rounds is such a clever touch, and there is something really satisfying about embroidering that tiny bat logo onto his chest—it just brings the whole thing to life!
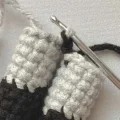
I remember the first time I tried making a superhero. The mask is always the hardest part to get right. This pattern handles it so cleverly by switching colors mid-round on the head. It feels like magic when the face starts peeking through!
I used a slightly different yellow for the belt on my second one, more of a gold, and it really popped. If you're nervous about the embroidery, don't be. Just take it slow and maybe use a few pins to outline the bat shape first. It’s those little details that make him look so tough despite being only 12cm tall.
I love keeping him on my shelf right next to my comics. He’s the perfect weekend project when you want something recognizable but not overly complex. Plus, using the YarnArt Jeans gives him that lovely matte finish that looks so professional. You’re going to have a blast watching this little guy come together, especially when you wrap that tiny cape around his shoulders!
Bring the protector of Gotham to your crochet hook with this detailed amigurumi project. You will love how the iconic mask and utility belt come together to create a tiny but mighty hero. It is a fantastic way to practice mid-round color changes while making something truly special for the superhero fan in your life.
In black: 4 sc in MR
inc x 4 (8)
8 sc
8 sc
8 sc
8 sc
Switch to gray yarn in the final stitch of Round 6.
In gray: 8 sc through blo
8 sc
8 sc
8 sc
8 sc
8 sc, 1 sl st
Fasten off and leave a long tail for sewing. Stuff the arm lightly.
In black: 5 sc in MR
inc x 5 (10)
10 sc
10 sc
10 sc
10 sc
Switch to gray yarn in the final stitch of Round 6.
In gray: 10 sc through blo
10 sc
10 sc
10 sc
10 sc
For the first leg, fasten off. For the second leg, work 1 sl st at the end but do not cut the yarn. Stuff both legs halfway.
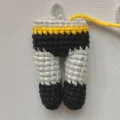
Join the legs. Take the first leg and pull through a loop of black yarn, work 1 sl st and ch 1.
In gray: 10 sc around the leg, in black: 2 sc along ch, in gray: 10 sc around the other leg, in black: 2 sc along other side of ch (24)
In gray: 9 sc, in black: 1 sc around the previous round's stitch, 2 sc, 1 sc around the previous round's stitch at an angle, in gray: 8 sc, in black: 1 sc around previous round's stitch, 2 sc (24)
In black: 24 sc
In black: 24 sc
In black: 24 sc
Stuff the leg sections.
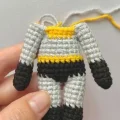
In yellow: 24 sc
In gray: 24 sc through blo
In gray: (4 sc, dec) x 4 (20)
In gray: 20 sc
In gray: 20 sc
In gray: 5 sc, 8 sc through arm, skip 1 sc on body, 1 sc, in yellow: 5 sc, in gray: 2 sc, 8 sc through second arm, skip 1 sc on body, 5 sc (34)
In gray: 4 sc, dec, 5 sc, dec, in yellow: 7 sc, in gray: dec, 5 sc, dec, 5 sc (30)
In gray: 3 sc, dec, 4 sc, dec, 1 sc, in yellow: 1 sc, dec, 2 sc, in gray: 1 sc, dec, 4 sc, dec, 2 sc, dec (24)
In gray: (1 sc, dec) x 8 (16)
In gray: (2 sc, dec) x 4 (12)
In gray: 12 sc, 1 sl st
Fasten off and leave a long tail. Stuff the body firmly, but do not stuff the arms.
In black: 6 sc in MR
inc x 6 (12)
(1 sc, inc) x 6 (18)
(2 sc, inc) x 6 (24)
(3 sc, inc) x 6 (30)
(4 sc, inc) x 6 (36)
(5 sc, inc) x 6 (42)
(6 sc, inc) x 6 (48)
48 sc
48 sc
48 sc
48 sc
48 sc
48 sc
48 sc
48 sc
In black: 18 sc, in beige through blo: 18 sc, in black: 12 sc (48)
In black: 18 sc, in beige: 18 sc, in black: 12 sc (48)
In black: 18 sc, in beige: 18 sc, in black: 12 sc (48)
In black: (6 sc, dec) x 2, 2 sc, in beige: 4 sc, dec, 6 sc, dec, 4 sc, in black: 2 sc, dec, 6 sc, dec (42)
In black: (5 sc, dec) x 2, 2 sc, in beige: 3 sc, dec, 5 sc, dec, 4 sc, in black: 1 sc, dec, 5 sc, dec (36)
In black: (4 sc, dec) x 2, 2 sc, in beige: 2 sc, (dec, 4 sc) x 2, in black: dec, 4 sc, dec (30)
In black: (3 sc, dec) x 2, 2 sc, in beige: 1 sc, (dec, 3 sc) x 2, in black: dec, 3 sc, dec (24)
In black: (2 sc, dec) x 2, 2 sc, in beige: (dec, 2 sc) x 2, in black: dec, 3 sc, dec (18)
In black: (1 sc, dec) x 3, in beige: 1 sc, dec, 1 sc, in black: dec, 1 sc, dec (12), 1 sl st
Stuff the head firmly and fasten off, hiding the ends.
In black: 6 sc in MR
inc x 6 (12)
(1 sc, inc) x 6 (18)
(2 sc, inc) x 6 (24), 1 sl st
Fasten off and leave a tail. Flatten the ear and sew across the bottom using the back loops.
Attach black yarn to the first front loop on the head where the beige section starts. Work: 6 sl st, 1 sc, 2 hdc, 1 sc, 7 sl st
Fasten off and use a needle to hide the yarn tails inside the head.
ch 10 in black. Starting in 2nd ch from hook: inc, 3 sc, inc, 3 sc, inc (12). ch 1, turn.
12 sc. ch 1, turn.
inc, 10 sc, inc (14). ch 1, turn.
14 sc. ch 1, turn.
inc, 12 sc, inc (16). ch 1, turn.
16 sc. ch 1, turn.
16 sc. ch 1, turn.
inc, 14 sc, inc (18). ch 1, turn.
18 sc. ch 1, turn.
18 sc. ch 1, turn.
inc, 16 sc, inc (20). ch 1, turn.
20 sc. ch 1, turn.
20 sc. ch 1, turn.
inc, 18 sc, inc (22). ch 1, turn.
22 sc. ch 1, turn.
22 sc. ch 1, turn.
inc, 20 sc, inc (24). ch 1, turn.
24 sc. ch 1, turn.
24 sc. ch 1, turn.
Fasten off and hide the bottom tail. Keep the top tail for attaching to the body.
I really hope you enjoyed making this little Dark Knight as much as I did! There is something so satisfying about seeing those tiny details like the utility belt and the flowing cape come together. Once you have finished, he is ready to watch over your bookshelf or join your collection of handmade heroes. Don't forget to share your finished photos with the community—I love seeing your unique takes on my designs! Happy stitching, and may your hook always move swiftly! 🧶 ✨
You can, but it will change the size of the final toy. A 2mm hook with DK cotton yarn keeps the stitches tight so the stuffing doesn't show through.
I recommend pinning the triangle shapes with straight pins first. Once you're happy with the placement, embroider over the pins to guide your needle.
In this pattern, the cape is sewn around the neck for stability, but you could easily add a small button or snap if you want it to be removable.
Using the back of your crochet hook or a pair of closed scissors helps push the fiberfill into those small spaces without stretching the stitches.
