🧢 Beautiful ✨ Detailed πŸ’ Adorable

Mini Sitting Kitty Amigurumi Pattern

Mini Sitting Kitty Amigurumi Pattern
4.0β˜…Rating
3-5 HoursTime Needed
2.5KMade This
βœ‚οΈ

Intermediate Level

Ideal for those with basic crocheting experience, featuring slightly more advanced stitches and techniques to expand your skills.

⏱️

Quick Craft

Fits nicely into a free afternoon β€” 2 to 5 hours of focused, enjoyable crocheting.

🐰

Whimsical Buddy

Playful characters full of personality, designed to spark imagination and become cherished playtime favorites.

About This Mini Sitting Kitty Amigurumi Pattern

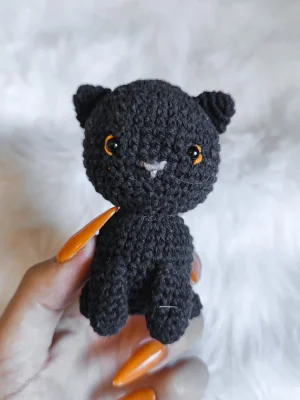
Mini Sitting Kitty Amigurumi Pattern crochet pattern - detailed view

These kittens are incredibly addictive to make! They look wonderful perched on a bookshelf or as a personalized keychain for a friend who misses their pet. It's a thoughtful, handmade gift that fits right in the palm of your hand.

Why You'll Love This Mini Sitting Kitty Amigurumi Pattern

I love how the tail has that little curl to it! It's such a satisfying project because you can finish the whole cat while watching a movie, and the assembly is very straightforward. Plus, seeing that little face come together with just a few embroidery stitches is pure magic.

Mini Sitting Kitty Amigurumi Pattern step 1 Mini Sitting Kitty Amigurumi Pattern step 2 Mini Sitting Kitty Amigurumi Pattern step 3 Mini Sitting Kitty Amigurumi Pattern step 4

Switch Things Up

There is something so therapeutic about making little amigurumi cats, isn't there? I remember the first time I tried to make a black cat like the one in this pattern; I spent half the time squinting at my stitches because black yarn is notoriously tricky to see! But once those little orange safety eyes went in, he just came to life.

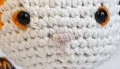
I really recommend using a bright, contrasting color for the nose embroideryβ€”it really helps the face pop against the darker yarn. If you’re feeling adventurous, you could even try making a calico version by switching colors every few rounds. I usually keep a few of these finished kitties in my 'gift bin' because they are the perfect size for a last-minute birthday present or a 'just because' surprise for a coworker.

The best part about this specific design is the tail. That little curl is achieved just by working multiple stitches into a single chain, and it gives the cat so much personality. It’s those tiny details that make a project feel special. I hope you enjoy every stitch of this one as much as I did!

Common Mistakes & How to Fix Them

βœ— The tail uses a specific skip-two-chains start; if you only skip one, the curl won't be as tight and it might look a bit limp.βœ— Placement of the front legs is key for balance β€” if you sew them too high up the body, your kitty might tip over when you try to sit it down.βœ— When embroidering the nose, don't pull the yarn too tight or you'll create a pucker in the face fabric that's hard to smooth out later.βœ— The ears have a round of increases in the middle; missing these will result in tiny pointed nubs instead of the proper triangular cat ear shape.

Mini Sitting Kitty Amigurumi Pattern

This little kitty is the perfect desk companion or a sweet gift for the cat lover in your life. You'll love how quickly it comes together, and since it uses very little yarn, it's a fantastic way to use up those leftover scraps from your stash. It's a small project with a big personality that you can finish in just one sitting.

Intermediate 3-5 Hours

Materials Needed for Mini Sitting Kitty Amigurumi Pattern

β€” Main Fabric

  • 01
    80g of fine cotton yarn (3-ply) in your choice of colors
  • 02
    Small amount of contrasting yarn for the nose and eye embroidery

β€” Tools Required

  • 01
    2.5mm or 3.0mm crochet hook
  • 02
    6mm safety eyes
  • 03
    Tapestry needle for sewing and embroidery
  • 04
    Fiberfill stuffing
  • 05
    Scissors
  • 06
    Stitch markers

Progress Tracker

0% Complete

β€” 1. Head :

Round 1 :

Work 6 sc into a magic ring (6)

Round 2 :

Work 6 inc around the circle (12)

Round 3 :

Repeat (1 sc, 1 inc) 6 times (18)

Round 4 :

Repeat (2 sc, 1 inc) 6 times (24)

Round 5 :

Repeat (3 sc, 1 inc) 6 times (30)

Round 6 :

Repeat (4 sc, 1 inc) 6 times (36)

Round 7 :

Repeat (5 sc, 1 inc) 6 times (42)

Round 8-14 :

Work 1 sc in each stitch around (42)

Round 15 :

Repeat (5 sc, 1 dec) 6 times (36)

Round 16 :

Repeat (4 sc, 1 dec) 6 times (30)

Info :

Insert the safety eyes between Rounds 12 and 13, leaving about 7-8 stitches between them. Embroider the nose and eye details now. Start stuffing the head firmly.

Round 17 :

Repeat (3 sc, 1 dec) 6 times (24)

Round 18 :

Repeat (2 sc, 1 dec) 6 times (18)

Round 19 :

Repeat (1 sc, 1 dec) 6 times (12)

Round 20 :

Work 6 consecutive dec (6)

Info :

Finish with a sl st. Cut the yarn, leaving a long tail. Use a needle to weave through the front loops of the last 6 stitches, pull tight to close, and knot securely.

β€” 2. Ears (Make 2) :

Round 1 :

Work 6 sc into a magic ring (6)

Round 2 :

Work 1 sc in each stitch around (6)

Round 3 :

Work 6 inc around the circle (12)

Round 4 :

Work 1 sc in each stitch around (12)

Info :

Finish with a sl st. Cut the yarn, leaving a long tail for sewing the ears to the head.

β€” 3. Body :

Round 1 :

Work 6 sc into a magic ring (6)

Round 2 :

Work 6 inc around (12)

Round 3 :

Repeat (1 sc, 1 inc) 6 times (18)

Round 4 :

Repeat (2 sc, 1 inc) 6 times (24)

Round 5 :

Repeat (3 sc, 1 inc) 6 times (30)

Round 6 :

Repeat (4 sc, 1 inc) 6 times (36)

Round 7-12 :

Work 1 sc in each stitch around (36)

Round 13 :

Repeat (4 sc, 1 dec) 6 times (30)

Round 14 :

Repeat (3 sc, 1 dec) 6 times (24)

Info :

Stuff the body firmly. Finish with a sl st and leave a long tail for attaching the body to the head.

β€” 4. Front Legs (Make 2) :

Round 1 :

Work 5 sc into a magic ring (5)

Round 2 :

Work 5 inc around (10)

Round 3-8 :

Work 1 sc in each stitch around (10)

Info :

Finish with a sl st. Leave a long tail for sewing. Stuff the lower half of the leg lightly.

β€” 5. Back Legs (Make 2) :

Round 1 :

Work 5 sc into a magic ring (5)

Round 2 :

Work 5 inc around (10)

Round 3-4 :

Work 1 sc in each stitch around (10)

Info :

Finish with a sl st. Leave a long tail for sewing. Stuff the lower half of the leg lightly.

β€” 6. Tail :

Row 1 :

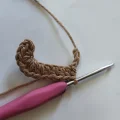
ch 12. Skip the first 2 chains from the hook. In the 3rd ch, work 3 hdc. In the next ch, work 3 hdc. Work 1 hdc in each of the next 6 chains. In each of the remaining 2 chains, work 3 hdc.

Info :

Finish with a sl st and cut the yarn, leaving enough length to sew the tail to the body.

Assembly Instructions

  • Stuff the head firmly and use the yarn tail to weave through the final 6 stitches, pulling tight to close.
  • Position the ears on either side of the head around Rounds 4 to 8 and sew them securely in place.
  • Attach the body to the bottom of the head, ensuring the neck is centered for a stable sitting pose.
  • Sew the longer front legs to the chest area so the paws touch the ground when the cat is seated.
  • Place the shorter back legs on the sides of the lower body, angled slightly forward for a cute sitting look.
  • Attach the curled tail to the back of the body at the base, centered between the back legs.

Important Notes

  • πŸ’‘If you use a thinner yarn, your kitty will turn out smaller; just make sure to use a hook that creates a tight fabric so stuffing doesn't show.
  • πŸ’‘Always mark the first stitch of your rounds with a marker, as the black yarn can make it very difficult to see where you started.
  • πŸ’‘Leave extra long yarn tails on all your pieces to make the assembly process much easier and more secure.
  • πŸ’‘Stuff the limbs lightly at the bottom but leave the tops empty so they lay flatter against the body when sewn.
  • πŸ’‘When embroidering the eyes, use a single strand of contrasting yarn to create a small 'V' or line to add more expression.

I hope you have a blast creating your own little clowder of kittens! Whether you go for a classic black cat or a colorful calico, these little guys are sure to bring a smile to anyone's face. Don't forget to play around with the face embroidery to give each one a different expression β€” a little tilt of the eyebrows goes a long way! It's the perfect project for relaxing after a long day. Happy hooking! 🧢 ✨ 🐾

You ask,

we answer.

FAQs

What kind of yarn works best for the embroidery details?

A single strand of embroidery floss or splitting a strand of your cotton yarn works great for the delicate nose and eye highlights.

My cat won't stay upright, what did I do wrong?

Check the stuffing in the body; it needs to be quite firm at the base. Also, ensure the back legs and tail are positioned to act as a tripod for support.

How do I make a ginger tabby version like in the photos?

You can change colors every two rounds on the body and head, or use a variegated yarn to get that speckled, multi-tonal look automatically.

Can I use safety noses instead of embroidering one?

Absolutely! A small 8mm triangular safety nose would fit perfectly between the eyes around Round 12-13 for a more professional finish.