🧶 Beautiful ✨ Detailed 💝 Adorable

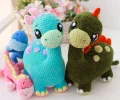
Plush Dino Family Amigurumi Pattern

Plush Dino Family Amigurumi Pattern
4.7★Rating
8-10 HoursTime Needed
3.1KMade This
✂️

Intermediate Level

Ideal for those with basic crocheting experience, featuring slightly more advanced stitches and techniques to expand your skills.

⏱️

All-Day Adventure

Requires 8-10 hours, ideal for a full day of immersive crocheting.

🐰

Whimsical Buddy

Playful characters full of personality, designed to spark imagination and become cherished playtime favorites.

About This Plush Dino Family Amigurumi Pattern

Plush Dino Family Amigurumi Pattern crochet pattern - detailed view

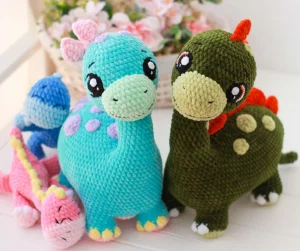
This duo makes an incredible gift for a new big brother or sister, or a standout piece of nursery decor. The plush texture is incredibly soothing, making these dinos the perfect bedtime buddies for little ones.

Why You'll Love This Plush Dino Family Amigurumi Pattern

I absolutely love how the structural parts of this pattern come together. The way the legs are worked directly into the body is a total game-changer for anyone who usually dreads the assembly phase. Plus, the crocheted eyes are so much safer for small children than plastic safety eyes, and they add so much character!

Plush Dino Family Amigurumi Pattern step 1 Plush Dino Family Amigurumi Pattern step 2 Plush Dino Family Amigurumi Pattern step 3 Plush Dino Family Amigurumi Pattern step 4

Switch Things Up

When I first started making amigurumi, I used to avoid long-necked characters because I was so worried about the 'bobblehead' effect. You know the one—where the head just flops over the second you set it down! This pattern totally changed my perspective with the sintepon tube trick. It’s such a simple, low-tech solution that makes the finished toy feel so much more professional and sturdy.

I actually made a set of these in a soft lavender and mint green for a friend's nursery, and they were the hit of the baby shower. The plush yarn is so forgiving; even if your tension isn't 100% perfect, the fuzziness hides a multitude of 'creative' stitches! If you're feeling adventurous, try adding a little bit of blush to the cheeks using an old makeup brush and some pink chalk or pastel. It gives them this instantly bashful, sweet look that just melts your heart. I love how the little baby dino can be posed right next to the mama—it's like they're having a little prehistoric chat on the bookshelf. Enjoy every stitch of this one!

Common Mistakes & How to Fix Them

✗ The sintepon tube for the neck needs to be about 1.5 times the length of the neck—if it is too short, the head will not have enough support and will droop sadly.✗ When working Round 5 of the big dino body, you might see small gaps where the leg joins; work a dec using the last stitch of the body and the first of the leg to close them up tightly.✗ The baby dino's legs need to be folded so the middle PS is perfectly centered; if it is off-center, your little dino will look like it is walking on its tiptoes rather than flat feet.✗ In Round 4 of the big dino, if your stitch marker has shifted even slightly, the legs will be crooked—always pause to check that the 11-stitch gaps are perfectly centered on the sides.

Plush Dino Family Amigurumi Pattern

There is something so special about crafting a whole family of toys, and these long-necked dinosaurs are the perfect project to sink your hook into. Using chunky plush yarn makes the process surprisingly fast while creating the softest, most huggable texture imaginable. You will love how the legs and tail are joined as you go, saving you from a mountain of sewing at the end. Whether you choose earthy greens or bright pastels, this duo is bound to become a favorite in any toy collection.

Intermediate 8-10 Hours

Materials Needed for Plush Dino Family Amigurumi Pattern

— Main Fabric

  • 01
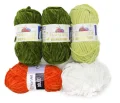
    Approximately 1.5 to 2 skeins of dark green plush yarn for the main body of the large dino
  • 02
    Less than half a skein of light green plush yarn for the muzzle, tummy, and decorative spots
  • 03
    Small amount of orange plush yarn for the back spikes
  • 04
    A few meters of white or ivory plush yarn for the toe claws
  • 05
    Pink plush yarn for the baby dinosaur and the decorative hair bow
  • 06
    Small amounts of cotton or semi-cotton yarn in orange, black, and white for the eyes

— Tools Required

  • 01
    3.5 mm to 4 mm crochet hook for the plush body
  • 02
    2 mm to 2.5 mm crochet hook for the detailed eyes and bow
  • 03
    Synthetic insulation or dense fabric to create a support tube for the neck
  • 04
    Fabric patch or tape to secure the neck support tube
  • 05
    High-quality polyester fiber filling
  • 06
    Large darning needle for sewing details
  • 07
    Stitch markers and pins with large heads
  • 08
    Sharp scissors

Progress Tracker

0% Complete

— 1. Big Dino - Tail :

Round 1 :

6 sc in MR

Round 2-3 :

2 rounds of 6 sc

Round 4 :

2 sc, 2 inc, 2 sc (8)

Round 5 :

dec, 1 sc, 2 inc, 1 sc, dec (8)

Round 6 :

3 sc, 2 inc, 3 sc (10)

Round 7 :

dec, 2 sc, 2 inc, 2 sc, dec (10)

Round 8 :

4 sc, 2 inc, 4 sc (12)

Round 9 :

dec, 3 sc, 2 inc, 3 sc, dec (12)

Round 10 :

3 sc, (1 sc, inc)*3, 3 sc (15)

Round 11 :

15 sc

Round 12 :

3 sc, (2 sc, inc)*3, 3 sc (18)

Round 13 :

18 sc

Info :

If the round start shifts, work a shifting stitch to keep the marker centered.

Round 14 :

3 sc, (3 sc, inc)*3, 3 sc (21)

Round 15 :

21 sc

Round 16 :

3 sc, (4 sc, inc)*3, 3 sc (24)

Info :

Fasten off and cut the yarn.

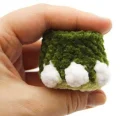
— 2. Big Dino - Legs (Make 4) :

Info :

Start with light green yarn.

Round 1 :

7 sc in MR

Round 2 :

7 inc (14)

Round 3 :

(1 sc, inc)*7 (21)

Colour Change :

Switch to dark green yarn.

Round 4 :

BLO: 7 sc, (switch to white, PS, switch to dark green, 2 sc)*3, 5 sc (21)

Round 5 :

5 sc, (dec, 2 sc)*2, dec, 6 sc (18)

Round 6-8 :

3 rounds of 18 sc

Info :

Fasten off and cut the yarn.

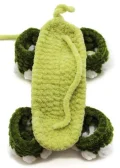
— 3. Big Dino - Body :

Info :

Start with light green yarn. This section creates the tummy oval.

Round 0 :

ch 23

Round 1 :

Starting in 2nd ch from hook: 21 sc, 3 sc in the last ch. Rotate to work on other side of chain: 20 sc, inc (46)

Round 2 :

inc, 20 sc, 3 inc, 20 sc, 2 inc (52)

Round 3 :

1 sc, inc, 20 sc, (1 sc, inc)*3, 20 sc, (1 sc, inc)*2 (58)

Round 4 :

3 sc, 6 sc joining first leg, 11 sc, 6 sc joining second leg, 6 sc, 6 sc joining third leg, 11 sc, 6 sc joining fourth leg, 3 sc (58)

Colour Change :

Switch to dark green yarn.

Round 5 :

3 sc, 12 sc around the outer edge of the first leg, 11 sc, 12 sc around the second leg, 6 sc, 12 sc around the third leg, 11 sc, 12 sc around the fourth leg, 3 sc (82)

Round 6-8 :

3 rounds of 82 sc

Round 9 :

76 sc, 6 sc joining the tail (82)

Round 10 :

76 sc, 18 sc around the outer edge of the tail (94)

Round 11-12 :

2 rounds of 94 sc

Round 13 :

76 sc, (dec, 6 sc)*2, dec (91)

Round 14 :

91 sc

Round 15 :

76 sc, dec, 5 sc, dec, 4 sc, dec (88)

Round 16 :

88 sc

Round 17 :

76 sc, (dec, 3 sc)*2, dec (85)

Round 18 :

85 sc

Round 19 :

76 sc, dec, 2 sc, dec, 1 sc, dec (82)

Round 20 :

6 sc, dec, 24 sc, ch 6, skip 18 st (this creates the neck hole), 22 sc, dec, 6 sc, dec (61 plus 6 ch)

Round 21 :

5 sc, dec, 24 sc, 6 sc along the chain, 21 sc, dec, 5 sc, dec (64)

Round 22 :

5 sc, dec, 11 sc, (5 sc, dec)*3, 11 sc, (5 sc, dec)*2 (58)

Round 23 :

4 sc, dec, 11 sc, (4 sc, dec)*3, 11 sc, (4 sc, dec)*2 (52)

Round 24 :

3 sc, dec, 11 sc, (3 sc, dec)*3, 11 sc, (3 sc, dec)*2 (46)

Round 25 :

2 sc, dec, 11 sc, (2 sc, dec)*3, 11 sc, (2 sc, dec)*2 (40)

Round 26 :

1 sc, dec, 11 sc, (1 sc, dec)*3, 11 sc, (1 sc, dec)*2 (34)

Round 27 :

17 dec (17)

Round 28 :

8 dec, skip the final stitch (9)

Info :

Stuff the body firmly, close the hole, and weave in the end.

— 4. Big Dino - Neck :

Info :

Attach dark green yarn to the left stitch marker of the neck opening from Round 19.

Round 20 :

18 sc on body, 1 sc in transition loop, 6 sc on chain, 1 sc in transition loop (26)

Round 21 :

16 sc, 5 dec (21)

Round 22-33 :

12 rounds of 21 sc

Info :

If making a girl dino, work only 11 rounds for a slightly shorter neck.

— 5. Big Dino - Head :

Round 34 :

4 sc, 12 inc, 5 sc (33)

Round 35 :

4 sc, (1 sc, inc)*12, 5 sc (45)

Round 36 :

17 sc, (2 sc, inc)*3, 19 sc (48)

Round 37-48 :

12 rounds of 48 sc

Round 49 :

(6 sc, dec)*6 (42)

Round 50 :

(5 sc, dec)*6 (36)

Round 51 :

(4 sc, dec)*6 (30)

Round 52 :

(3 sc, dec)*6 (24)

Round 53 :

(2 sc, dec)*6 (18)

Round 54 :

(1 sc, dec)*6 (12)

Round 55 :

6 dec (6)

Info :

Fasten off and hide the yarn tail inside the head.

— 6. Big Dino - Muzzle :

Round 0 :

ch 6

Round 1 :

Starting in 2nd ch: 4 sc, 3 sc in last ch. On other side: 3 sc, inc (12)

Round 2 :

inc, 3 sc, 3 inc, 3 sc, 2 inc (18)

Round 3 :

1 sc, inc, 3 sc, (1 sc, inc)*3, 3 sc, (1 sc, inc)*2 (24)

Round 4 :

2 sc, inc, 3 sc, (2 sc, inc)*3, 3 sc, (2 sc, inc)*2 (30)

Round 5 :

3 sc, inc, 3 sc, (3 sc, inc)*3, 3 sc, (3 sc, inc)*2 (36)

Round 6-7 :

2 rounds of 36 sc

Info :

Fasten off leaving a long tail for sewing.

— 7. Big Dino - Eyes (Make 2) :

Info :

Use black cotton yarn and 2mm hook.

Round 1 :

6 sc in MR

Round 2 :

6 inc (12)

Round 3 :

(1 sc, inc)*6 (18)

Round 4 :

(2 sc, inc)*4, switch to orange, (2 sc, inc)*2 (24)

White Detail :

Attach white yarn to first orange st. Left eye: ch 3, dc in same st, 1 dc, 2 hdc, 4 sc, ss. Right eye: ss, 4 sc, 2 hdc, 2 dc, ch 3, ss in same st.

Border :

Attach black yarn to last black st from R4. sc around the entire eye, working 3 sc in the bottom corners.

Glare :

White yarn: 6 sc in MR. Sew to the eye.

— 8. Big Dino - Spikes & Spots :

Large Spikes :

ch 2, Row 1: 5 sc in 2nd ch. Row 2: 1 sc, inc, 3 sc in 1 st, inc, 1 sc (9). Row 3: 2 sc, inc, 1 sc, 3 sc in 1 st, 1 sc, inc, 2 sc (12).

Small Spot :

6 sc in MR

Medium Spot :

8 sc in MR

Large Spot :

Round 1: 6 sc in MR. Round 2: 6 inc (12).

— 9. Baby Dino - Legs & Tail :

Bottom Legs :

R1: 7 sc in MR. R2: 7 inc (14). Switch to pink. R3: BLO 4 sc, (white PS, pink 1 sc)*3, 4 sc (14). R4: (3 sc, dec)*2, 4 sc (12). R5-10: 12 sc. Fold and sc 6 across.

Upper Legs :

R1: 6 sc in MR. R2: 6 inc (12). Switch to pink. R3: BLO 3 sc, (white PS, pink 1 sc)*3, 3 sc (12). R4: 2 sc, (dec, 3 sc)*2 (10). R5-10: 10 sc. Fold and sc 5 across.

Tail :

R1: 6 sc in MR. R2-3: 6 sc. R4: 3 inc, 3 sc (9). R5: 9 sc. R6: 3 inc, 6 sc (12). R7: (1 sc, inc)*3, 6 sc (15). R8: (2 sc, inc)*3, 6 sc (18). R9: (3 sc, inc)*3, 6 sc (21).

— 10. Baby Dino - Body & Head :

Body Round 1-4 :

R1: 8 sc in MR. R2: 8 inc (16). R3: (1 sc, inc)*8 (24). R4: (2 sc, inc)*8 (32).

Body Round 5 :

5 sc, 6 sc with lower leg, 10 sc, 6 sc with lower leg, 5 sc (32)

Body Round 6-8 :

R6: (6 sc, dec)*4 (28). R7: 28 sc. R8: (5 sc, dec)*4 (24).

Body Round 9 :

5 sc, 5 sc with upper leg, 4 sc, 5 sc with upper leg, 5 sc (24)

Body Round 10-14 :

R10: (4 sc, dec)*4 (20). R11: 20 sc. R12: (3 sc, dec)*4 (16). R13: 16 sc. R14: (2 sc, dec)*4 (12).

Body Round 15-20 :

6 rounds of 12 sc. Fold neck and sc 6 across.

Head Round 1-4 :

ch 6. R1: 4 sc, 3 sc in last ch, 3 sc, inc (12). R2: inc, 3 sc, 3 inc, 3 sc, 2 inc (18). R3: 1 sc, inc, 3 sc, (1 sc, inc)*3, 3 sc, (1 sc, inc)*2 (24). R4: 2 sc, inc, 3 sc, (2 sc, inc)*3, 3 sc, (2 sc, inc)*2 (30).

Head Round 5-14 :

R5-6: 30 sc. Switch to pink. R7: (dec, 13 sc)*2 (28). R8: 28 sc. R9: (dec, 12 sc)*2 (26). R10: 26 sc. R11: (dec, 11 sc)*2 (24). R12: (2 sc, dec)*6 (18). R13: (1 sc, dec)*6 (12). R14: 6 dec (6).

Assembly Instructions

  • Insert the prepared sintepon support tube into the neck of the large dino, ensuring it sits deep into the chest and extends halfway into where the head will be.
  • Sew the muzzle to the front of the head across Rounds 34 to 42, stuffing it firmly before closing the seam.
  • Position the crocheted eyes on the head between Rounds 41 and 45, leaving a 10-stitch gap between them for a sweet, balanced expression.
  • Attach the large spikes along the center of the back and neck, starting from the head and working down to the tip of the tail.
  • Scatter the light green spots across the body and head, securing them with thin cotton thread for a neat finish.
  • For the baby dino, sew the head onto the neck between Rounds 9 and 10, then attach the tail between Rounds 3 and 7.
  • Surface crochet the baby's spikes by attaching yellow yarn to the head and working a repeating sequence of (2 ch, 2 hdc in same st, 3 ss) all the way to the tail.

Important Notes

  • 💡Always maintain a 2:1 ratio between your body yarn and eye yarn to ensure the facial features look proportional and cute.
  • 💡If the magic ring feels like it might snap when using plush yarn, start with 2 chains and work your first round of stitches into the second chain from the hook instead.
  • 💡Stuff the transition area between the neck and the head very densely to prevent the 'wobbly head' effect often seen in long-necked amigurumi.
  • 💡Use a stitch marker religiously; since the body is an oval, even one misplaced stitch can cause the legs to look asymmetrical.
  • 💡When sewing on spots, use the leftover plush yarn tails to anchor them, but do the actual sewing with a matching thin cotton thread for durability.

I hope you have the absolute best time bringing this Dino Family to life! There is something so rewarding about seeing the mama and baby together on your shelf. Don't be afraid to play with the colors—a purple or blue dino family would look just as magical. Once you finish, give them a little squeeze for me! I can't wait to see your finished creations and the unique personalities you give them through their embroidered smiles. Happy hooking, and may your stitches always be cozy! 🧶✨🦕
You ask,

we answer.

FAQs

Can I use safety eyes instead of crocheting them?

You definitely can! If you prefer safety eyes, I recommend using 18mm or 20mm eyes for the large dino to match the scale. Just remember to install them before you finish stuffing and closing the head.

My dino's neck is still a bit floppy, what did I do wrong?

Neck stability is all about the support tube. Make sure your sintepon or fabric tube is rolled very tightly and secured with a patch. It needs to extend down into the body's stuffing to act as an anchor, not just sit in the neck itself.

Does the type of plush yarn matter?

As long as it's a super bulky (weight 6) chenille or velvet style yarn like Himalaya Dolphin Baby or YarnArt Dolce, you'll get that signature chunky look. If you use a thinner yarn, your dino will just be smaller!

How do I make the eyes look identical?

The pattern includes specific 'left' and 'right' instructions for the white highlight part of the eye. Pay close attention to those small stitch changes—they are what give the eyes that mirrored, symmetrical look.