About This Pride Rainbow Gnome Amigurumi Pattern
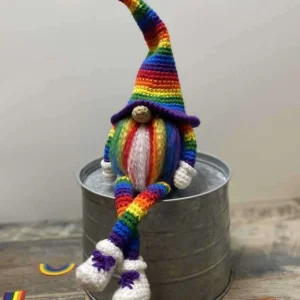
This colorful companion is a wonderful project for gifting to friends, decorating your creative space, or adding a bright pop of pride to your seasonal home decor displays.
Ideal for those with basic crocheting experience, featuring slightly more advanced stitches and techniques to expand your skills.
Takes 5-7 hours, making it an enjoyable project to finish over a couple of days.
Playful characters full of personality, designed to spark imagination and become cherished playtime favorites.
This colorful companion is a wonderful project for gifting to friends, decorating your creative space, or adding a bright pop of pride to your seasonal home decor displays.
I absolutely love how cheerful this project is to make! Watching the rainbow stripes build up on the hat is so satisfying, and combing out the fluffy yarn beard at the end is pure magic—it instantly gives him so much personality!

There is something so incredibly magical about working with a full rainbow palette. Every time I sit down to crochet this gnome, the bright transition from red to purple instantly lifts my mood! If you want to customize your little guy, there are so many fun directions you can go.
For instance, try swapping out the classic white beard for a beautiful heather grey or even a soft cream to give him a rustic, forest-gnome vibe. You can also play around with the boot colors—matching them to the stripes on the legs looks absolutely darling! I once made a version with shiny golden boots and it looked so festive.
If you want to add a bit of extra weight so he sits even more securely on high shelves, toss a small bag of dried beans or plastic poly-pellets into the bottom of the body before you finish stuffing. It gives him a satisfying, heavy bottom that keeps him upright no matter what. I can't wait to see how yours turns out! Happy crafting, my friends!
Bring a burst of color and joy into your home with this adorable rainbow gnome! He sits beautifully on any shelf, showing off his vibrant, striped hat and dangling legs. Crocheting this cheerful fellow is such a happy, therapeutic process as you work through all the colors of the rainbow. He makes the perfect companion for pride celebrations or a lovely gift to brighten anyone's day.
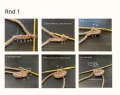
Start with red yarn. sc 6 in magic circle (6)
sc in each st (6)
Switch to orange yarn.
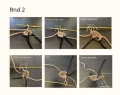
sc in each st (6)
(sc, inc) x 3 (9)
Switch to yellow yarn.
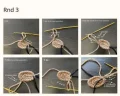
sc in each st (9)
sc in each st (9)
Switch to green yarn.
(2 sc, inc) x 3 (12)
sc in each st (12)
Switch to blue yarn.
sc in each st (12)
(3 sc, inc) x 3 (15)
Switch to purple yarn.
sc in each st (15)
sc in each st (15)
Switch to red yarn.
(4 sc, inc) x 3 (18)
sc in each st (18)
Switch to orange yarn.
sc in each st (18)
(5 sc, inc) x 3 (21)
Switch to yellow yarn.
sc in each st (21)
sc in each st (21)
Switch to green yarn.
(6 sc, inc) x 3 (24)
sc in each st (24)
Switch to blue yarn.
sc in each st (24)
(7 sc, inc) x 3 (27)
Switch to purple yarn.
sc in each st (27)
sc in each st (27)
Switch to red yarn.
(8 sc, inc) x 3 (30)
sc in each st (30)
Switch to orange yarn.
sc in each st (30)
(9 sc, inc) x 3 (33)
Switch to yellow yarn.
sc in each st (33)
(10 sc, inc) x 3 (36)
Switch to green yarn.
(11 sc, inc) x 3 (39)
(12 sc, inc) x 3 (42)
Switch to blue yarn.
(13 sc, inc) x 3 (45)
(14 sc, inc) x 3 (48)
Switch to purple yarn.
FLO (7 sc, inc) x 6 (54)
(8 sc, inc) x 6 (60)
sc in each st around (60)
sc in each st around (60)
crab st in each st around (60) or optional sc in each st around (60)
sl st in next st, fasten off, and cut your yarn.
Start with blue yarn. sc 6 in magic circle (6)
inc x 6 (12)
(1 sc, inc) x 6 (18)
(2 sc, inc) x 6 (24)
(3 sc, inc) x 6 (30)
(4 sc, inc) x 6 (36)
(5 sc, inc) x 6 (42)
(6 sc, inc) x 6 (48)
Cut a cardboard circle matching the size of this base.
BLO sc in each st (48)
sc in each st (48)
sc in each st (48)
sc in each st (48)
sc in each st (48)
sc in each st (48)
sc in each st (48)
sc in each st (48)
sc in each st (48)
sc in each st (48)
sc in each st (48)
sc in each st (48)
sc in each st (48)
sc in each st (48)
sc in each st (48)
sc in each st (48)
Change to beige yarn and insert your cardboard circle into the bottom.
BLO (6 sc, dec) x 6 (42)
(5 sc, dec) x 6 (36)
(4 sc, dec) x 6 (30)
(3 sc, dec) x 6 (24)
(2 sc, dec) x 6 (18) - begin stuffing the body firmly
(1 sc, dec) x 6 (12)
dec x 6 (6)
Fasten off, cut yarn, and weave in the remaining end securely.
Start with beige yarn. sc 6 in magic circle (6)
(sc, inc) x 3 (9)
(2 sc, inc) x 3 (12)
sc in each st around (12)
(2 sc, dec) x 3 (9)
Fasten off, leaving a long tail for sewing the nose onto the body.
Start with white yarn. sc 6 in magic circle (6)
(1 sc, inc) x 3 (9)
(2 sc, inc) x 3 (12)
sc in each st (12)
(2 sc, dec) x 3 (9)
Change to purple yarn. Do not cut the white yarn; leave it hanging on the front of your work.
BLO (1 sc, dec) x 3 (6)
sc in each st (6)
Change to blue yarn.
sc in each st (6)
sc in each st (6)
Change to green yarn.
sc in each st (6)
sc in each st (6)
Change to yellow yarn.
sc in each st (6)
sc in each st (6)
Change to orange yarn.
sc in each st (6)
sc in each st (6)
Change to red yarn.
sc in each st (6)
Fold the opening flat and sc the opposite edges together with 3 sc. Fasten off, leaving a long sewing tail.
To make the cuff, go back to Round 5. Hold the arm upside down and join the white yarn to the first front loop with a ch 1.
sc in the first loop, (inc, 1 sc) x 4, inc, 1 sc (16)
sl st in the next st, fasten off, and weave in your tails.
Start with white yarn. ch 5
sc in 2nd ch from hook, 2 sc, 3 sc in the last ch, turn to work along the opposite side of the chain, 2 sc, 2 sc in the starting ch (10)
3 sc, inc, 3 hdc in the next st, inc, 3 sc, 3 sc in the last st (16)
5 sc, inc, hdc inc, hdc inc, inc, 5 sc, inc x 2 (22)
BLO sc in each st (22)
sc in each st (22)
5 sc, dec x 4, 9 sc (18)
4 sc, dec x 3, 8 sc (15)
4 sc, dec x 2, 5 sc, dec (12)
sc in each st (12)
(sc, dec) x 4 (8)
Stuff the boot firmly. Change to purple yarn. Do not cut the white yarn; leave it hanging in front.
BLO sc in each st (8)
sc in each st (8)
Change to blue yarn.
sc in each st (8)
sc in each st (8)
Change to green yarn.
sc in each st (8)
sc in each st (8)
Change to yellow yarn.
sc in each st (8)
sc in each st (8)
Change to orange yarn.
sc in each st (8)
sc in each st (8)
Change to red yarn.
sc in each st (8)
sc in each st (8)
Change to purple yarn.
sc in each st (8)
sc in each st (8)
Change to blue yarn.
sc in each st (8)
sc in each st (8)
Change to green yarn.
sc in each st (8)
sc in each st (8)
Change to yellow yarn.
sc in each st (8)
sc in each st (8)
Change to orange yarn.
sc in each st (8)
sc in each st (8)
Change to red yarn.
sc in each st (8)
Fold the leg opening flat and sc the opposite edges together with 4 sc. Fasten off, leaving a long sewing tail.
To make the cuff, go back to Round 11. Hold the leg upside down and join the white yarn to the first front loop with a ch 1.
2 sc in first loop, inc x 7 (16)
sl st in the next st, fasten off, and weave in your tails.
I hope you absolutely love making your own cheerful Pride Rainbow Gnome! This little guy is guaranteed to bring a giant smile to anyone who sees him sitting on your shelf. Don't worry if your stitches aren't absolutely perfect—every single gnome has their own unique personality and charm. Keep your hooks busy, enjoy the therapeutic rainbow color changes, and happy crocheting! 🧶✨🌈
Absolutely! While the pattern is designed for medium weight acrylic yarn, you can easily scale him up with bulky yarn or make a miniature version using sport weight. Just remember to adjust your hook size accordingly so your stuffing doesn't show through.
The secret is using 100% acrylic yarn for the beard strands and brushing them out with a wire pet brush or a fine comb. It separates the plies and creates a gorgeous, wool-like texture that you can trim into a perfect shape!
If you plan on washing your gnome, swap the cardboard circle for a flat plastic lid (like from a yogurt container) cut to size. It won't degrade in water and keeps its flat shape perfectly!
Always pull the new color through on the very last loop of the previous stitch. This creates a clean, seamless color change and prevents the old color from bleeding into the next round.
