🧶 Beautiful ✨ Detailed 💝 Adorable

Cuddly Koala Pillow Amigurumi Pattern

Cuddly Koala Pillow Amigurumi Pattern
4.7★Rating
5-7 HoursTime Needed
2.9KMade This
✂️

Intermediate Level

Ideal for those with basic crocheting experience, featuring slightly more advanced stitches and techniques to expand your skills.

⏱️

Weekend Treat

Takes 5-7 hours, making it an enjoyable project to finish over a couple of days.

🐰

Whimsical Buddy

Playful characters full of personality, designed to spark imagination and become cherished playtime favorites.

About This Cuddly Koala Pillow Amigurumi Pattern

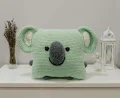
Cuddly Koala Pillow Amigurumi Pattern crochet pattern - detailed view

This pattern is a wonderful choice for anyone looking to create a gift that feels substantial and high-quality. It looks absolutely stunning as a statement piece on a bed or a cozy armchair.

Why You'll Love This Cuddly Koala Pillow Amigurumi Pattern

I honestly couldn't stop squishing this once it was finished! There’s something so rewarding about working with bulky yarn—the progress is fast, and the stitches look like little velvet clouds. Plus, the secret pocket on the back is such a fun, unexpected detail that makes it feel really special and thoughtful.

Cuddly Koala Pillow Amigurumi Pattern step 1 Cuddly Koala Pillow Amigurumi Pattern step 2 Cuddly Koala Pillow Amigurumi Pattern step 3 Cuddly Koala Pillow Amigurumi Pattern step 4

Switch Things Up

I’ve always been a fan of functional amigurumi, and this koala pillow is the perfect example of why. It’s not just sitting on a shelf gathering dust; it’s actually part of the room! When I first saw this design, I knew the secret pocket was the real winner. It’s the perfect size for a tablet or a secret diary, making it a hit with kids who love having a hiding spot for their things.

If you want to change the vibe, try a soft grey for the main body and a charcoal for the nose. I used a light minty green because it felt so fresh and modern, but a classic koala grey is always a win. One tip for the plush yarn: don't pull too tight when sewing the pieces together, or the yarn might snap or shed its fluff. Use a gentle but firm hand. I also recommend using a slightly smaller hook than the yarn label suggests to keep the stuffing from peeking through. This little guy is such a joy to have around, and I hope you enjoy every stitch of his velvet fur! It truly is a weekend treat that brings so much personality to your space.

Common Mistakes & How to Fix Them

✗ When working the nose, it's easy to lose track of the oval turns; use a marker at the start of each round to keep the increases symmetrical.✗ The plush yarn can hide your stitches, so if you miss a decrease on the ears, the shape will look lopsided—count every round carefully.✗ If you don't stuff the corners of the main pillow body firmly enough, the koala will look a bit deflated once the ears are attached.✗ Sewing the white ear inserts requires even spacing; if they aren't centered, the koala might end up looking a bit startled or off-balance.

Cuddly Koala Pillow Amigurumi Pattern

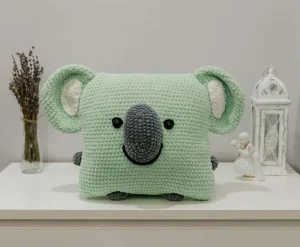
Imagine sinking into your sofa with this incredibly soft, oversized koala friend. This project transforms plush yarn into a functional piece of decor that's just as much a toy as it is a comfy cushion. You'll love the chunky texture and the clever little secret pocket hidden on the back for stashing treasures or a favorite book. It's a satisfying make that results in a huge, huggable companion for your home.

Intermediate 5-7 Hours

Materials Needed for Cuddly Koala Pillow Amigurumi Pattern

— Main Fabric

  • 01
    Approximately 300g of light green plush chenille yarn (Himalaya Dolphin Baby or similar)
  • 02
    Small amount of grey plush yarn for the nose and limbs
  • 03
    Small amount of white plush yarn for the inner ear details
  • 04
    A few meters of black yarn for the embroidered facial features

— Tools Required

  • 01
    3.5 mm crochet hook (or size needed to match yarn weight)
  • 02
    Two 22 mm black safety eyes or large buttons
  • 03
    High-quality polyester fiberfill stuffing
  • 04
    Large-eyed tapestry needle for assembly
  • 05
    Stitch markers or scrap yarn to track rounds
  • 06
    One medium button for the secret pocket

Progress Tracker

0% Complete

— 1. Main Pillow Body :

Round 1 :

Work 90 ch and join to the first chain with a sl st to create a large ring.

Round 2-39 :

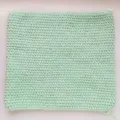
Work 1 sc into every st around for the next 38 rounds (90).

Info :

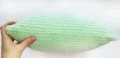
Cut the yarn, leaving a very long tail. Flatten the piece and sew the top edge closed. Stuff the body firmly and evenly, paying extra attention to the corners, then sew the bottom edge shut.

— 2. Outer Ears (Make 2) :

Round 1 :

Start with 6 sc into a mr (6).

Round 2 :

Work 6 inc around (12).

Round 3 :

Work (1 sc, 1 inc) 6 times (18).

Round 4 :

Work (2 sc, 1 inc) 6 times (24).

Round 5 :

Work (3 sc, 1 inc) 6 times (30).

Round 6 :

Work (4 sc, 1 inc) 6 times (36).

Round 7 :

Work (5 sc, 1 inc) 6 times (42).

Round 8 :

Work (6 sc, 1 inc) 6 times (48).

Round 9 :

Work (7 sc, 1 inc) 6 times (54).

Round 10-14 :

Work 1 sc in each st around for 5 rounds (54).

Round 15 :

Work (7 sc, 1 dec) 6 times (48).

Round 16 :

Work (6 sc, 1 dec) 6 times (42).

Round 17 :

Work 1 sc in each st around (42).

Info :

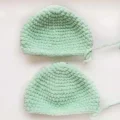
Fasten off and leave a long tail for attaching to the pillow.

— 3. Inner Ear Details (Make 2) :

Row 1 :

Work 5 sc into a mr, then turn your work (5).

Row 2 :

Work 5 inc, then turn (10).

Row 3 :

Work 10 sc, then turn (10).

Row 4 :

Work (2 sc, 1 inc) 3 times, then 1 sc and turn (13).

Row 5 :

Work (3 sc, 1 inc) 3 times, then 1 sc and turn (16).

Row 6 :

Work 16 sc across the top, then continue along the flat bottom edge by working 1 inc followed by 10 sc.

Info :

Fasten off and leave a tail to sew this piece onto the green ear.

— 4. Large Nose :

Round 1 :

Work 11 ch.

Round 2 :

Starting in the second ch from hook, work 9 sc, then 3 sc into the last ch. Continue on the other side of the chain with 8 sc and 1 inc (22).

Round 3 :

Work 2 inc, 9 sc, 3 sc into the next st, and 11 sc (27).

Round 4 :

Work 3 inc, 11 sc, 3 inc, and 10 sc (33).

Round 5 :

Work (1 inc, 1 sc) 3 times, 12 sc, (1 inc, 1 sc) 3 times, and 11 sc (39).

Round 6 :

Work (2 sc, 1 inc) 3 times, 12 sc, (2 sc, 1 inc) 3 times, and 11 sc (45).

Round 7 :

Work 1 sc in every st around (45).

Info :

Fasten off, leaving a tail for sewing and stuffing.

— 5. Legs (Make 2) :

Round 1 :

Start with 6 sc into a mr (6).

Round 2 :

Work 6 inc around (12).

Round 3 :

Work (1 sc, 1 inc) 6 times (18).

Round 4 :

Work 1 sc in every st around (18).

Info :

Fasten off and leave a tail for assembly.

— 6. Arms (Make 2) :

Round 1 :

Start with 6 sc into a mr (6).

Round 2 :

Work 6 inc around (12).

Round 3 :

Work 1 sc in every st around (12).

Info :

Fasten off and leave a tail for assembly.

— 7. Secret Pocket :

Row 1 :

Work 35 ch.

Row 2-31 :

Beginning in the second ch from the hook, work 34 sc, then turn your work at the end of every row (34).

Row 32 :

Work 16 sc, then 4 ch and skip 2 stitches of the previous row. Finish with 16 sc to create the button loop.

Info :

Fasten off and leave a tail to attach the pocket to the back of the pillow.

Assembly Instructions

  • First, stitch the top edge of the pillow body closed, then fill the entire rectangle with stuffing before sewing the bottom edge shut.
  • Place the white inner ear pieces onto the green outer ears and sew them down securely before attaching the ears to the top corners of the pillow.
  • Position the grey nose between Rounds 12 and 27 on the front of the pillow; sew it in place, adding a bit of stuffing inside before closing.
  • Install the safety eyes or sew on buttons between Rounds 22 and 23, spacing them evenly on either side of the nose.
  • Using black yarn, embroider eyelids above the eyes and a large, friendly smile spanning between Rounds 11 and 18.
  • Attach the arms and legs to the sides and bottom of the pillow body, making sure they are symmetrical.
  • Finish by sewing the secret pocket onto the back of the pillow and adding a button that aligns with the crocheted loop.

Important Notes

  • 💡Plush yarn can be slippery; ensure you pull your magic rings tight and knot your ends securely to prevent unraveling.
  • 💡If your stitches feel too loose, try dropping down a hook size so the stuffing doesn't show through the fabric.
  • 💡When stuffing the nose, don't overfill it, or it may become too heavy and pull the fabric of the face downward.
  • 💡Use a strong sewing thread or a strand of the plush yarn to attach the pieces, but be careful not to pull too hard on the plush yarn or it might break.
  • 💡The secret pocket can be customized; feel free to add more chains in Row 32 if you are using a larger button.
  • 💡Pin all your pieces in place before sewing to ensure the koala's expression is perfectly centered.

I hope you have as much fun making this koala as I did! There’s nothing quite like the feeling of finishing a big, plush project and realizing you’ve made something both beautiful and useful. Whether he’s guarding a secret diary in his back pocket or just offering a soft place to rest your head after a long day, this koala is sure to become a household favorite. Don't forget to share your finished photos with the community—I can't wait to see what colors you choose for your new cuddly friend! Happy stitching! 🧶✨
You ask,

we answer.

FAQs

Can I use a different yarn weight for this pillow?

Yes, but it will significantly change the size. If you use a standard worsted weight yarn, the koala will turn out much smaller—more like a mini plushie than a pillow.

How do I clean the pillow once it's finished?

Since it's made with plush yarn and stuffing, I recommend spot cleaning with a damp cloth. If you must machine wash, use a delicate cycle and place it inside a pillowcase first.

Is the secret pocket big enough for a book?

The pocket is roughly 34 stitches wide, which fits most small tablets, notebooks, or thin paperbacks perfectly. You can easily increase the starting chain if you want a wider pocket.

What size safety eyes are best?

The pattern recommends 22 mm eyes to match the large scale of the pillow. If you use smaller eyes, the koala might lose its 'kawaii' look.

I'm struggling to see my stitches with the fuzzy yarn. Any tips?

Plush yarn is notorious for hiding stitches! Try working in a very well-lit area and use your fingers to feel for the 'dips' between stitches rather than relying only on your eyes.