🧢 Beautiful ✨ Detailed πŸ’ Adorable

Woof the Dog Stretchy Amigurumi Pattern

Woof the Dog Stretchy Amigurumi Pattern
4.3β˜…Rating
5-7 HoursTime Needed
1.6KMade This
βœ‚οΈ

Intermediate Level

Ideal for those with basic crocheting experience, featuring slightly more advanced stitches and techniques to expand your skills.

⏱️

Weekend Treat

Takes 5-7 hours, making it an enjoyable project to finish over a couple of days.

🐰

Whimsical Buddy

Playful characters full of personality, designed to spark imagination and become cherished playtime favorites.

About This Woof the Dog Stretchy Amigurumi Pattern

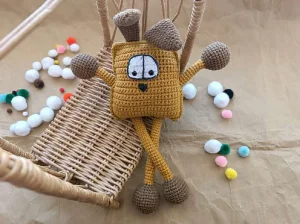
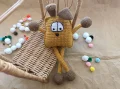
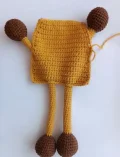
Woof the Dog Stretchy Amigurumi Pattern crochet pattern - detailed view

It is a wonderful gift for toddlers who love tactile toys. The combination of the mustard gold body and the dark accents makes it look modern enough to sit on a nursery shelf as decor too.

Why You'll Love This Woof the Dog Stretchy Amigurumi Pattern

I honestly had so much fun with the sliding limb concept. It's one of those projects where you're slightly confused about how it works until it all clicks during assembly, and then you just want to keep pulling the legs up and down! It's so satisfying to see the engineering come together.

Woof the Dog Stretchy Amigurumi Pattern step 1 Woof the Dog Stretchy Amigurumi Pattern step 2 Woof the Dog Stretchy Amigurumi Pattern step 3 Woof the Dog Stretchy Amigurumi Pattern step 4

Switch Things Up

I remember the first time I saw a pattern with sliding limbsβ€”I was so fascinated by the mechanics of it! Woof is such a great example of how simple shapes can become really interactive toys. When I was making mine, I found that using a slightly stiffer cotton yarn helped the body keep its rectangular shape better than a soft acrylic would.

One little tip for the assembly: when you're joining those body panels, use plenty of stitch markers to pin the limbs in place while you crochet around them. It can feel a bit like wrestling an octopus otherwise! If you want to customize him, you could easily turn him into a cat by changing the ear shape to triangles or adding a long tail. I also think he'd look adorable in a variegated yarn for a 'scruffy' look. The best part is definitely that moment when you finish the last stitch and realize you've made a toy that's actually a little bit of engineering too!

I really hope this pattern brings a smile to your face. It's a relatively quick project despite all the rounds in the limbs, and the result is just so stinking cute.

Common Mistakes & How to Fix Them

βœ— When you get to the sliding limb gaps on the body, it's easy to accidentally crochet through both layers when you're supposed to only work the front layer; this will seal the hole shut and prevent the legs from moving.βœ— The limb pieces are quite long, so make sure you don't over-stuff the gold middle section, or they won't be flexible enough to slide through the body channels easily.βœ— If your safety eyes are slightly larger than 8mm, they might feel crowded on the small white eye patches, so try to keep your tension tight on those specific rows to maintain the shape.βœ— When joining the two body panels, if you don't align the corner stitches perfectly, your dog might end up looking a bit lopsided or skewed once you add the stuffing.

Woof the Dog Stretchy Amigurumi Pattern

You're going to love making this quirky little pup! Woof isn't just a regular plushie; his limbs actually slide through his body, making him a fantastic sensory toy for little ones. He has such a unique, boxy shape that's really fun to work up, and those floppy ears give him so much personality. It's the kind of project that keeps you engaged from the first stitch to the very last detail.

Intermediate 5-7 Hours

Materials Needed for Woof the Dog Stretchy Amigurumi Pattern

β€” Main Fabric

  • 01
    Sport weight cotton-acrylic blend yarn (like YarnArt Jeans) in Mustard Gold for the body
  • 02
    Small amount of Sport weight cotton-acrylic blend in Dark Brown for the ears and paws
  • 03
    Sport weight cotton-acrylic blend in Black for the second set of paws and face details
  • 04
    Sport weight cotton-acrylic blend in White for the eye patches

β€” Tools Required

  • 01
    2.0 mm crochet hook for limbs and details
  • 02
    3.0 mm crochet hook for the body panels
  • 03
    8 mm safety eyes
  • 04
    Soft fiber filling
  • 05
    Tapestry needle with a large eye
  • 06
    Sharp scissors
  • 07
    Stitch markers

Progress Tracker

0% Complete

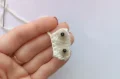
β€” 1. Eye Patches (Make 2) :

Info :

Use your white yarn and the 2.0 mm hook. Remember to ch 1 and turn at the end of every row.

Row 1 :

ch 10, then starting in the 2nd ch from the hook, work sc 9 (9)

Row 2-3 :

sc 9 (9)

Row 4 :

sc 1, dec, sc 3, dec, sc 1 (7)

Row 5 :

sc 1, dec, sc 1, dec, sc 1 (5)

Finishing :

Place the safety eyes between Row 2 and Row 3, leaving a gap of 1 sc from each side. Leave a long tail for sewing.

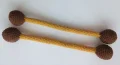
β€” 2. Sliding Limbs (Make 2) :

Info :

These are worked as one long continuous piece using the 2.0 mm hook. Start with brown yarn.

Round 1 :

sc 6 into a MR (6)

Round 2 :

inc 6 times (12)

Round 3 :

(sc 1, inc) repeat 6 times (18)

Round 4 :

(sc 2, inc) repeat 6 times (24)

Round 5 :

(sc 3, inc) repeat 6 times (30)

Round 6-9 :

sc 30 (30)

Round 10 :

(dec, sc 3) repeat 6 times (24)

Round 11 :

(dec, sc 2) repeat 6 times (18)

Round 12 :

(dec, sc 1) repeat 6 times (12)

Info :

Stuff this first paw section firmly.

Round 13 :

(dec, sc 4) repeat 2 times (10)

Colour Change :

Switch to your gold yarn.

Round 14-65 :

sc 10 (10)

Info :

Do not add stuffing to this gold section; it needs to stay flat to slide.

Colour Change :

Switch to your black yarn.

Round 66 :

(inc, sc 4) repeat 2 times (12)

Round 67 :

(sc 1, inc) repeat 6 times (18)

Round 68 :

(sc 2, inc) repeat 6 times (24)

Round 69 :

(sc 3, inc) repeat 6 times (30)

Round 70-73 :

sc 30 (30)

Round 74 :

(dec, sc 3) repeat 6 times (24)

Round 75 :

(dec, sc 2) repeat 6 times (18)

Round 76 :

(dec, sc 1) repeat 6 times (12)

Info :

Stuff this second paw section firmly.

Round 77 :

dec 6 times (6)

Finishing :

Fasten off and hide your yarn tail.

β€” 3. Floppy Ears (Make 2) :

Info :

Use brown yarn and the 2.0 mm hook. Do not stuff these pieces.

Round 1 :

sc 6 into a MR (6)

Round 2 :

(sc 1, inc) repeat 3 times (9)

Round 3 :

sc 9 (9)

Round 4 :

(sc 2, inc) repeat 3 times (12)

Round 5 :

(sc 3, inc) repeat 3 times (15)

Round 6-11 :

sc 15 (15)

Round 12 :

(sc 4, inc) repeat 3 times (18)

Round 13-20 :

sc 18 (18)

Round 21 :

(dec, sc 4) repeat 3 times (15)

Round 22-24 :

sc 15 (15)

Round 25 :

(dec, sc 3) repeat 3 times (12)

Round 26-28 :

sc 12 (12)

Finishing :

Flatten the ear and work sc 6 through both sides to close the opening. Leave a tail for sewing.

β€” 4. Body Panels (Make 2) :

Info :

Use gold yarn and the 3.0 mm hook. ch 1 and turn at the end of each row.

Row 1 :

ch 25, then starting in the 2nd ch from the hook, work sc 24 (24)

Row 2-19 :

sc 24 (24)

Row 20 :

sc 1, dec, sc 18, dec, sc 1 (22)

Row 21 :

sc 22 (22)

Row 22 :

sc 1, dec, sc 16, dec, sc 1 (20)

Row 23-25 :

sc 20 (20)

Finishing :

Fasten off and cut the yarn.

Assembly Instructions

  • Start at the top right corner and join the two body panels using a 2mm hook, working sc 19 through both layers followed by sc 2 into the corner.
  • On the first side, work sc 10 through both layers, then create the arm gap by working sc 3 only on the front panel while skipping 3 on the back.
  • Insert the first long limb piece through the gap, then continue joining the panels with sc 11 and sc 2 in the next corner.
  • Across the bottom, work sc 5 through both layers, then create two more gaps for the legs by working sc 3 on the front layer only for each, separated by sc 6 through both layers.
  • Slide the second limb piece into these bottom gaps and finish the edge with sc 5 and sc 2 in the corner.
  • Stuff the body firmly before closing the final side, ensuring the limbs can still move freely in their channels.
  • Finish the last side by working sc 11 through both layers, another sc 3 front-only gap for the other arm, and a final sc 10 to close.

Important Notes

  • πŸ’‘The limbs are made in one continuous long piece that threads through the body, so don't finish them off until you've checked the length.
  • πŸ’‘Use a smaller hook for the limbs than the body to ensure the fabric is dense enough to hold the stuffing without gaps.
  • πŸ’‘When working the front only stitches during assembly, make sure you are skipping the corresponding stitches on the back panel so the counts stay even.
  • πŸ’‘Wait until the very end to embroider the facial features so you can center them perfectly relative to the attached ears.

I hope you have a blast making your new little friend! There’s something so satisfying about finishing a project that actually 'does' something, and watching kids play with the sliding limbs is the best reward. Don't forget to take your time with the embroidery at the endβ€”it's what really brings his sweet little face to life. Feel free to experiment with different colors too; a blue or pink dog would look just as cute! Happy stitching, and I can't wait to see your finished Woof. 🧢✨

You ask,

we answer.

FAQs

My limbs aren't sliding easily, what did I do wrong?

You might have stuffed the gold connector part of the limb. The pattern recommends leaving that middle section unstuffed so it remains flat and flexible enough to slide through the body gaps.

Can I use worsted weight yarn instead of sport weight?

Yes, but you'll need to increase your hook sizes accordingly. Just keep in mind that the finished dog will be significantly larger than the 30cm mentioned in the pattern.

Why do I need two different hook sizes?

The 2mm hook creates a tight, sturdy fabric for the limbs and ears, while the 3mm hook gives the body a bit more give and makes it easier to work the joining rounds.

How do I make sure the eyes are secure on the crochet patches?

Since the patches are small, I recommend using a bit of felt on the back of the safety eye before snapping the washer on to prevent it from pulling through the stitches.