About This Bumble Blossom Flower Amigurumi Pattern
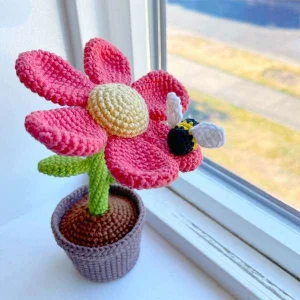
Brighten up a windowsill or surprise a teacher with this handmade treasure—it's the kind of gift that never wilts and always brings a smile to whoever sees it.
Ideal for those with basic crocheting experience, featuring slightly more advanced stitches and techniques to expand your skills.
Takes 5-7 hours, making it an enjoyable project to finish over a couple of days.
Playful characters full of personality, designed to spark imagination and become cherished playtime favorites.
Brighten up a windowsill or surprise a teacher with this handmade treasure—it's the kind of gift that never wilts and always brings a smile to whoever sees it.
I honestly can't get over how cute the little bee is! The construction of the pot and dirt is so clever—it actually feels like you're planting your crochet flower. Plus, using sport weight yarn gives it such a delicate, professional finish that makes all the little details really pop. It’s one of those projects where every piece you finish makes you more excited to see the final result.
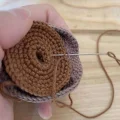
I remember the first time I tried making a potted plant; I was so worried it would just flop over! That's why I love this design—the combination of the cardboard base and the reinforced stem makes it so sturdy. I actually made a version of this using a soft lavender for the petals instead of pink, and it looked like a completely different flower!
One little tip from my craft desk: when you're sewing the petals on, use pins to map out their placement first. It saves so much time and frustration. I usually put on a good podcast and just enjoy the process of the assembly. There's something really therapeutic about the repetitive nature of the petals.
If you're feeling adventurous, you could even add a little scent! I sometimes tuck a tiny sachet of dried lavender inside the stuffing of the flower center. It makes the whole room smell like a garden every time you walk by. It’s those little personal touches that make handmade items so special, don't you think?
You're going to love bringing this cheerful little blossom to life! It's such a joyful project, featuring a bright pink flower tucked into a cozy pot with the cutest tiny bumblebee friend. I designed the instructions to be easy to follow so you can focus on the fun of watching your little garden grow. It makes the perfect desk companion or a sweet handmade gift for anyone who needs a bit of sunshine in their home.
Using pink yarn, 6 sc in mr (6)
6 inc (12)
(1 sc, 1 inc) x 6 (18)
(2 sc, 1 inc) x 6 (24)
24 sc (24)
(2 sc, 1 dec) x 6 (18)
18 sc (18)
(1 sc, 1 dec) x 6 (12)
12 sc (12)
Fasten off and leave a long tail for sewing. Do not stuff the petals.
Using green yarn, 8 sc in mr (8)
8 sc (8)
Stuff the stem very firmly as you work. You can add wire here for extra stability.
BLO (1 sc, 1 inc) x 4 (12)
12 inc (24)
(3 sc, 1 inc) x 6 (30)
(9 sc, 1 inc) x 3 (33)
33 sc (33)
Fasten off with an invisible join. Now, hold the stem with the top facing up to add the sepal details.
Attach green yarn to the remaining loops of Round 31. Work ch 4, 3-ch picot, ch 1, then slst into the next loop. Repeat this 7 more times for a total of 8 sepal points.
Using light yellow yarn, 6 sc in mr (6)
6 inc (12)
(1 sc, 1 inc) x 6 (18)
(2 sc, 1 inc) x 6 (24)
(3 sc, 1 inc) x 6 (30)
(9 sc, 1 inc) x 3 (33)
33 sc (33)
Fasten off and leave a long tail for assembly.
Using green yarn, 5 sc in mr (5)
(1 sc, 1 inc) x 2, 1 sc (7)
(2 sc, 1 inc) x 2, 1 sc (9)
(2 sc, 1 inc) x 3 (12)
12 sc (12)
(2 sc, 1 dec) x 3 (9)
(1 sc, 1 dec) x 3 (6)
Fasten off and leave a tail. Do not stuff the leaves.
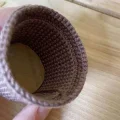
Using light brown yarn, 6 sc in mr (6)
6 inc (12)
(1 sc, 1 inc) x 6 (18)
(2 sc, 1 inc) x 6 (24)
(3 sc, 1 inc) x 6 (30)
(4 sc, 1 inc) x 6 (36)
(5 sc, 1 inc) x 6 (42)
BLO 42 sc (42)
42 sc (42)
(13 sc, 1 inc) x 3 (45)
45 sc (45)
(14 sc, 1 inc) x 3 (48)
48 sc (48)
FLO (7 dc, 1 dcinc) x 6 (54)
54 sc (54)
Fasten off with an invisible join.
Using brown yarn, 6 sc in mr (6)
6 inc (12)
12 sc (12)
Fasten off. This creates the hole for the stem. Now, re-attach yarn to the top of the hole to create the dirt surface.
(1 sc, 1 inc) x 6 (18)
(2 sc, 1 inc) x 6 (24)
(3 sc, 1 inc) x 6 (30)
(4 sc, 1 inc) x 6 (36)
(5 sc, 1 inc) x 6 (42)
(6 sc, 1 inc) x 6 (48)
Fasten off and leave a long tail. The wrong side of the dirt should face the bottom of the pot.
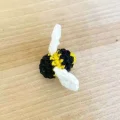
Using black yarn, 6 sc in mr (6)
6 inc (12)
12 sc (12)
Switch to yellow, 12 sc (12)
Switch to black, 12 sc (12)
Switch to yellow, 6 dec (6)
Stuff lightly as you go. Fasten off and close the hole.
Using white yarn, ch 4. In the 2nd ch from hook, work: 1 sc, 1 hdc, 5 dc in the same stitch, 1 hdc, 1 sc (9). Make two.
I hope you enjoy every stitch of this Bumble Blossom! There’s something so satisfying about seeing all the separate pieces—the petals, the pot, the tiny bee—finally come together into one beautiful display. Whether you keep it for yourself or give it away, it’s a project that truly captures the magic of handmade crafting. It's a wonderful way to practice your amigurumi skills while creating something that brings a little bit of nature indoors. Happy crocheting, and may your stitches be as bright as a summer garden! 🧶 🌸 ✨
Yes, but your flower will turn out significantly larger. Make sure to use a hook size that matches your yarn choice to keep the stitches tight.
It's optional! If you crochet tightly and stuff the stem very firmly, it should stand on its own, but wire adds extra stability for long-term display.
Instead of wrapping the yarn over the hook, bring the hook over the yarn and pull it through. This creates a tighter, X-shaped stitch perfect for amigurumi.
Double-check your round counts for both the pot and the dirt. The dirt should fit snugly; if it's too loose, try using a slightly smaller hook for that section.
