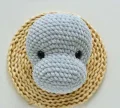
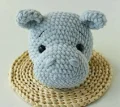
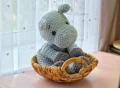
🧶 Beautiful ✨ Detailed 💝 Adorable

Soft Hippo Lovey Amigurumi Pattern

Soft Hippo Lovey Amigurumi Pattern
4.3★Rating
3-5 HoursTime Needed
3.9KMade This
✂️

Intermediate Level

Ideal for those with basic crocheting experience, featuring slightly more advanced stitches and techniques to expand your skills.

⏱️

Quick Craft

Fits nicely into a free afternoon — 2 to 5 hours of focused, enjoyable crocheting.

🐰

Whimsical Buddy

Playful characters full of personality, designed to spark imagination and become cherished playtime favorites.

About This Soft Hippo Lovey Amigurumi Pattern

Soft Hippo Lovey Amigurumi Pattern crochet pattern - detailed view

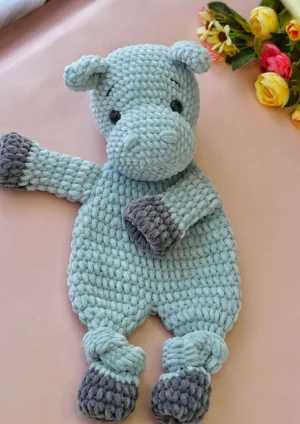
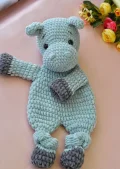
This hippo makes a wonderful nursery gift or a comforting companion for toddlers. Its flat body design makes it easy for tiny hands to grasp and carry everywhere, and it looks absolutely darling sitting on a shelf.

Why You'll Love This Soft Hippo Lovey Amigurumi Pattern

I'm a huge fan of how quickly this works up thanks to the chunky yarn. There's something so satisfying about seeing the legs join together to form the body—it feels like magic every time! Plus, the velvet texture is just a dream to work with.

Soft Hippo Lovey Amigurumi Pattern step 1 Soft Hippo Lovey Amigurumi Pattern step 2 Soft Hippo Lovey Amigurumi Pattern step 3 Soft Hippo Lovey Amigurumi Pattern step 4

Switch Things Up

I have a real soft spot for loveys. There's just something about that combination of a stuffed head and a floppy, unstuffed body that makes them so much more "huggable" than a standard amigurumi. When I first sat down to work on this hippo, I wanted to make sure the snout had that classic, wide hippo look without being too heavy. Using the velvet yarn makes a huge difference—it hides any little gaps in the stitches and gives the whole piece a professional, store-bought finish.

My favorite part of the process is definitely the assembly. I know, I know—most people dread sewing! But once you add those tiny nostrils and the sleepy eyebrows, the hippo's personality just shines through. If you're nervous about joining the legs, just take it slow. I like to use plenty of pins to make sure the body stays centered. If you end up with a tiny gap between the legs after joining, don't sweat it! A quick stitch with your yarn tail will close it right up and no one will ever know. Happy hooking!

Common Mistakes & How to Fix Them

✗ When connecting the legs at Round 23, if your stitches don't line up perfectly, the hippo might look twisted; use a stitch marker to find the exact center before joining.✗ If you stuff the head too firmly, the safety eyes won't have that cute sunken look mentioned in the pattern—keep the filling light and squishy.✗ Missing the color change at Round 6 of the arms and legs will result in a solid-colored hippo without those adorable dark gray hooves.✗ If you don't pull the final 6 stitches of the head tight enough, you'll be left with a small hole that stuffing can peek through later.

Soft Hippo Lovey Amigurumi Pattern

This sweet hippo is the ultimate snuggle buddy for little ones. Using super soft chenille yarn, you'll create a floppy, cuddly friend that's part toy and part blanket. I love how the chunky texture makes the stitches just melt together for that perfect velvet feel. It's a wonderful project for when you want to make something deeply comforting and impressive in just a single afternoon.

Intermediate 3-5 Hours

Materials Needed for Soft Hippo Lovey Amigurumi Pattern

— Main Fabric

  • 01
    Himalaya Dolphin Baby velvet yarn (100% micropolyester, 120m/100g)
  • 02
    Gray yarn (color code #80325) for the main body
  • 03
    Dark Gray yarn (color code #80320) for the hooves

— Tools Required

  • 01
    5 mm crochet hook
  • 02
    16 mm black safety eyes
  • 03
    Polyester fiberfill for the head
  • 04
    Black embroidery thread for the facial details
  • 05
    Sewing pins for positioning
  • 06
    Darning needle
  • 07
    Scissors

Progress Tracker

0% Complete

— 1. Head :

Info :

Start with a foundation chain using Gray yarn.

Round 1 :

ch 6. Starting in the 2nd ch from the hook: 4 sc, 3 sc in the last ch, turn to work on the other side of the chain: 3 sc, 2 sc in the last loop (12)

Round 2 :

inc, 3 sc, 3 x inc, 3 sc, 2 x inc (18)

Round 3 :

1 sc, inc, 3 sc, 3 x (1 sc, inc), 3 sc, 2 x (1 sc, inc) (24)

Round 4 :

2 sc, inc, 3 sc, 3 x (2 sc, inc), 3 sc, 2 x (2 sc, inc) (30)

Round 5 :

3 sc, inc, 3 sc, 3 x (3 sc, inc), 3 sc, 2 x (3 sc, inc) (36)

Round 6-7 :

36 sc (36)

Round 8 :

3 sc, dec, 3 sc, 3 x (3 sc, dec), 3 sc, 2 x (3 sc, dec) (30)

Round 9 :

30 sc (30)

Round 10 :

5 sc, 5 x inc, 20 sc (35)

Round 11 :

inc, 3 sc, inc, 2 sc, inc, 4 sc, inc, 2 sc, inc, 3 sc, inc, 15 sc (41)

Round 12 :

7 sc, inc, 2 sc, inc, 4 sc, inc, 2 sc, inc, 22 sc (45)

Round 13-18 :

45 sc (45)

Info :

Place safety eyes between Rounds 10 and 11, leaving 12 stitches between them. Stuff the head lightly with fiberfill, adding small amounts at a time to keep the shape soft.

Round 19 :

3 x (13 sc, dec) (42)

Round 20 :

42 sc (42)

Round 21 :

6 x (5 sc, dec) (36)

Round 22 :

6 x (4 sc, dec) (30)

Round 23 :

6 x (3 sc, dec) (24)

Round 24 :

6 x (2 sc, dec) (18)

Round 25 :

6 x (1 sc, dec) (12)

Round 26 :

6 x dec (6)

Info :

Fasten off, leave a tail, and use a needle to weave through the front loops to close the hole. Use your thumbs to gently press the eyes inward to create a slightly sunken look.

— 2. Ears (Make 2) :

Round 1 :

5 sc in MR (5)

Round 2 :

5 x inc (10)

Round 3 :

5 x (1 sc, inc) (15)

Round 4-5 :

15 sc (15)

Info :

Flatten the ear and work 7 sc through both layers to close. Fasten off and leave a long tail for sewing.

— 3. Arms (Make 2) :

Info :

Begin with Dark Gray yarn. Do not stuff the arms.

Round 1 :

6 hdc in MR (6)

Round 2 :

6 x inc using hdc (12)

Round 3 :

6 x (1 hdc, inc) (18)

Round 4-5 :

18 hdc (18)

Colour Change :

Switch to Gray yarn.

Round 6 :

6 x (1 hdc, dec) (12)

Round 7-11 :

12 hdc (12)

Info :

Flatten the arm and work 6 sc through both layers to close. Fasten off and leave a tail for sewing.

— 4. Legs (Make 2) :

Info :

Begin with Dark Gray yarn. These legs are not stuffed.

Round 1 :

6 hdc in MR (6)

Round 2 :

6 x inc using hdc (12)

Round 3 :

6 x (1 hdc, inc) (18)

Round 4-5 :

18 hdc (18)

Colour Change :

Switch to Gray yarn.

Round 6 :

6 x (1 hdc, dec) (12)

Round 7 :

3 x (2 hdc, dec) (9)

Round 8-19 :

9 hdc (9)

Round 20 :

3 x (2 hdc, inc) (12)

Round 21 :

6 x (1 hdc, inc) (18)

Round 22 :

6 x (2 hdc, inc) (24)

Info :

Fasten off the first leg. Repeat for the second leg, but do not cut the yarn on the second leg as you will continue into the body.

— 5. Body :

Round 23 :

Join the legs together: 1 hdc to connect, then 23 hdc around the first leg and 24 hdc around the second leg (48)

Round 24-25 :

48 hdc (48)

Info :

If there is a gap between the legs, sew it closed later. Tie a loose knot in each leg for a decorative look.

Round 26-29 :

48 hdc (48)

Round 30 :

6 x (6 hdc, dec) (42)

Round 31 :

42 hdc (42)

Round 32 :

6 x (5 hdc, dec) (36)

Round 33 :

36 hdc (36)

Round 34 :

6 x (4 hdc, dec) (30)

Round 35 :

30 hdc (30)

Round 36 :

6 x (3 hdc, dec) (24)

Round 37 :

6 x (2 hdc, dec) (18)

Info :

Work extra stitches to reach the side if needed. Flatten the body and work 9 sc through both layers to close. Fasten off and leave a tail for sewing.

Assembly Instructions

  • Sew the ears to the head between Rounds 16 and 17, spacing them about 8 stitches apart.
  • Embroider the nostrils on the snout between Rounds 4 and 5, using a few straight stitches and keeping them 3 stitches apart.
  • Using black thread, embroider thin eyebrows between Rounds 13 and 14 with an 8-stitch gap between them.
  • Attach the head to the body at the flattened edge, positioning it between Rounds 13 and 14 of the body.
  • Sew the arms to the sides of the body between Rounds 31 and 35, ensuring they are level with the head.

Important Notes

  • 💡This pattern is worked in continuous spirals, so use a stitch marker to keep track of the start of each round.
  • 💡The body and limbs are left unstuffed to maintain a floppy 'lovey' feel, but the head should be stuffed firmly enough to hold its shape.
  • 💡If you notice a small hole when joining the legs, don't worry—you can easily sew it shut with a scrap of yarn once the piece is finished.
  • 💡To achieve the character's expression, use your fingers to push the safety eyes into the stuffing before securing the head closure.

I hope you enjoy every stitch of this project! There's nothing quite like the feeling of finishing a handmade lovey and knowing it's going to be someone's favorite toy. This hippo has such a gentle soul, and I can't wait to see yours come to life. Whether you're making this for a baby shower or just to add to your collection, it's sure to be a hit. Happy crafting, and don't forget to give your new hippo a big squeeze when you're done! 🧶 ✨
You ask,

we answer.

FAQs

Can I use a different yarn for this hippo lovey?

Yes, you can substitute the chenille yarn for cotton or acrylic, but keep in mind that the finished size will be significantly smaller and the texture won't be as plush.

How do I fix the gap between the legs after joining them?

It's very common to have a small hole at the join point. Simply use the yarn tail from the first leg and a darning needle to sew a few stitches across the gap from the inside.

Are safety eyes safe for infants?

While safety eyes are very secure, they can still be a choking hazard for children under three. For a baby-safe version, I recommend embroidering the eyes with black yarn instead.

Why is my lovey body not lying flat?

The body is designed to be floppy, but if it looks bunched, ensure you aren't stuffing it. Also, check that your hdc stitches aren't too tight, as this yarn needs a bit of 'give' to drape nicely.