About This Rustic Crochet Pendant Lamp Shade Pattern
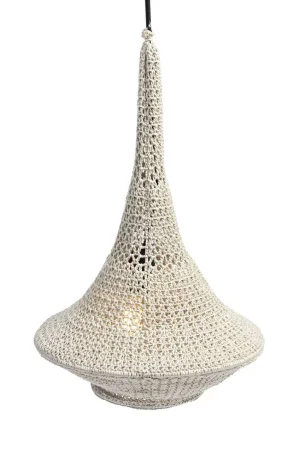
Make one for yourself and another as a housewarming gift — this lamp shade photographs beautifully and looks far more expensive than it actually is to make.
Ideal for those with basic crocheting experience, featuring slightly more advanced stitches and techniques to expand your skills.
Takes 5-7 hours, making it an enjoyable project to finish over a couple of days.
A comforting piece for home or gifts that brings handmade warmth to everyday moments and special occasions.
Make one for yourself and another as a housewarming gift — this lamp shade photographs beautifully and looks far more expensive than it actually is to make.
I genuinely wasn't expecting to fall this hard for a lamp pattern, but here we are. What got me was the moment I attached the big metal ring in Round 42 and suddenly the whole shape clicked into place — it went from a floppy crocheted tube to an actual lamp shade right in front of my eyes. That moment is SO good. I also love that the rope stitch looks fancy but is actually pretty meditative once you get the rhythm. I made mine in the sand color and it glows the warmest, coziest amber at night. Honestly it changed the whole vibe of my living room.
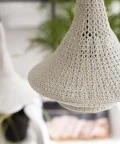
I remember the exact moment I decided I needed this lamp in my life. I was scrolling through images of sunroom makeovers and kept seeing these gorgeous crocheted pendant shades — the kind that glow like little lanterns and make a whole room feel like somewhere you actually want to be. I'd never crocheted anything structural before, but I figured: metal rings, some cotton yarn, how complicated can it really get?
Fairly complicated, as it turns out — but in the best possible way. The rope stitch took me maybe half a round to really internalize, and then something clicked and I just couldn't stop. There's this almost hypnotic quality to working the same dc-ch-dc cluster over and over as the piece slowly spirals downward and outward. I put on a podcast and barely noticed three hours go by.
The moment I worked Round 42 and locked that 30 cm ring into the fabric, though — that was the real payoff. Suddenly it wasn't a crocheted tube anymore. It was a lamp shade. An actual, real, beautiful lamp shade that I made with a stick and some string, basically.
One tip I'd pass along: don't rush the weaving-in as you go. I was impatient on my first attempt and skipped a few tails thinking I'd get them at the end. Spoiler: I could not get them at the end. The second time, I wove in every tail immediately and the finish was so much cleaner.
If you want to mix things up, try making two or three shades in slightly different neutral tones — warm sand, soft ecru, and a pale stone grey look incredible hung together at staggered heights. The cluster effect is genuinely jaw-dropping and the whole thing comes together faster than you'd think.
There's something so satisfying about making something that actually lights up your home — literally. This crocheted lamp shade is one of those projects that turns heads every single time someone walks into the room. You work in the round using a beautiful rope stitch that creates an open, airy texture, and the whole thing gets structured around two metal rings that give it that gorgeous conical silhouette. The sandy neutral tone keeps it versatile enough to work in almost any space, and the warm glow that filters through the lace-like fabric at night is just stunning. If you've been looking for a crochet home decor project that feels genuinely special, this is it.
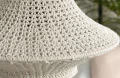
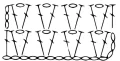
The main stitch used throughout is the rope stitch: work 1 dc, 1 ch, 1 dc all into the same ch-sp from the previous round. This 3-stitch cluster is your base unit. Each round ends with 1 sl st into the first stitch of that round unless otherwise stated. Weave in ends as you go — accessing the inside becomes very difficult once the metal rings are attached.
Ch 40, then join with 1 sl st into the very first ch to form a ring.
Ch 1, work 40 sc evenly around the ring, join with 1 sl st into the first sc.
Ch 3, work 1 dc into the first sc, ch 1, then 1 dc into that same first sc to complete the first rope stitch cluster. Rep (1 dc, 1 ch, 1 dc all into every 4th sc) around. Join with 1 sl st.
Rep Round 3, but this time work each rope stitch cluster into the ch-sp from the previous round rather than into a sc. Join with 1 sl st.
Rep Round 4 — rope stitch into each ch-sp from previous round. Join with 1 sl st.
Rep Round 4. Join with 1 sl st.
Rep Round 4. Join with 1 sl st.
Rep Round 4. Join with 1 sl st.
Rep Round 4. Join with 1 sl st.
Rep Round 4. Join with 1 sl st.
Rep Round 4. Join with 1 sl st.
Rep Round 4. Join with 1 sl st.
Work as Round 4, but use 2 ch between the two dc of each rope stitch cluster instead of 1 ch. Join with 1 sl st.
Rep Round 13 — rope stitch with 2 ch spacing into each ch-sp from previous round. Join with 1 sl st.
Ch 3, rep (1 dc, 3 ch, 1 dc worked around the 2-ch sp from previous round) around. Join with 1 sl st.
Ch 3, rep (1 dc, 1 ch, 1 dc, 1 ch, 1 dc all worked around each 3-ch sp from previous round) around. Join with 1 sl st.
Ch 3, then work 1 dc, 1 ch, 1 dc around each ch-sp from the previous round all the way around. Join with 1 sl st.
Rep Round 17. Join with 1 sl st.
Rep Round 17. Join with 1 sl st.
Rep Round 17. Join with 1 sl st.
Rep Round 13 — rope stitch with 2 ch between the dc pair, into each ch-sp from previous round. Join with 1 sl st.
Rep Round 21. Join with 1 sl st.
Rep Round 21. Join with 1 sl st.
Rep Round 21. Join with 1 sl st.
Work as Round 21, but use 3 ch between the two dc of each rope stitch cluster instead of 2 ch. Join with 1 sl st.
Rep Round 16 — work (1 dc, 1 ch, 1 dc, 1 ch, 1 dc) into each 3-ch sp from the previous round. Join with 1 sl st.
Rep Round 17. Join with 1 sl st.
Rep Round 17. Join with 1 sl st.
Rep Round 17. Join with 1 sl st.
Rep Round 17. Join with 1 sl st.
Rep Round 17. Join with 1 sl st.
Rep Round 17. Join with 1 sl st.
Rep Round 17. Join with 1 sl st.
Ch 3, rep (1 dc, 1 ch, 1 dc into a ch-sp, then work into the next ch-sp: 1 dc, 1 ch, 1 dc, 1 ch) around. End with 1 sl st. This round increases the stitch count.
Rep Round 17. Join with 1 sl st.
Rep Round 17. Join with 1 sl st.
Rep Round 17. Join with 1 sl st.
Rep Round 34 — increase round as described. Join with 1 sl st.
Rep Round 35. Join with 1 sl st.
Rep Round 36. Join with 1 sl st.
Rep Round 37. Join with 1 sl st.
Hold the 30 cm diameter metal ring against your work at this round. Ch 1, then work 1 sc into each stitch of the previous round, catching the metal ring inside each stitch as you go: insert the hook into the stitch, bring the yarn over the top of the ring, and pull through as you would a normal sc. Work the full pattern: 1 sc into each dc, 1 sc around each ch-sp, 1 sc into the next dc. Join with 1 sl st into the first ch. The ring is now fully enclosed in the crocheted fabric.
Rep Round 3 — work rope stitch clusters into the sc stitches from the previous round. Join with 1 sl st.
Rep Round 17. Join with 1 sl st.
Rep Round 17. Join with 1 sl st.
Rep Round 17. Join with 1 sl st.
Rep Round 17. Join with 1 sl st.
Rep Round 17. Join with 1 sl st.
Rep Round 17. Join with 1 sl st.
Rep Round 17. Join with 1 sl st. Decreases begin from this point onward.
Ch 3, rep (1 dc, 1 ch, 1 dc into a ch-sp, then into the very next ch-sp: 1 dc, 1 ch, 1 dc, followed by 1 dc into the ch after that) around. Join with 1 sl st. This begins the decrease shaping toward the neck.
Ch 3, rep (1 dc, 1 ch, 1 dc into a ch-sp, then into the next ch-sp: 1 dc, 1 ch, 1 dc, skip the following dc) around. Join with 1 sl st. The neck continues to narrow.
Rep Round 17. Join with 1 sl st.
Rep Round 17. Join with 1 sl st.
Rep Round 17. Join with 1 sl st.
Hold the 15 cm diameter metal ring against your work at this round and work exactly as Round 42 — enclose the ring by working sc stitches over it all the way around. Join with 1 sl st.
Ch 1, work 1 sc into each sc from the previous round, join with 1 sl st. Fasten off. Thread the tail onto the wool needle and weave it carefully through several stitches on the inside of the work. Trim yarn.
There's a real sense of pride that comes with hanging something you made yourself — and this lamp delivers that feeling in a big way. Every time the light comes on, that warm glow filtering through your rope stitch fabric is a little reminder of all those rounds you worked. Whether this is hanging in your kitchen, your living room, or strung up outside on a summer evening, it's the kind of handmade piece that quietly elevates everything around it. Make one, love it, then make another — because trust me, once people see it, they're going to ask you for one too. 🧶✨
The rope stitch is just a repeating cluster of 1 dc, 1 ch, 1 dc worked into the same chain space — so it's really just double crochets with a little spacing. If you can work a dc and a ch confidently, you'll pick this up within the first two rounds. The rhythm becomes very automatic quite quickly.
The pattern calls for Katia Capri, which is a smooth cotton blend that holds its shape well and doesn't stretch excessively — important for a lamp shade that needs to keep its silhouette. If you substitute, stick to a smooth DK or sport weight cotton. Avoid anything fuzzy or stretchy, as it will obscure the rope stitch detail and may not hold up around the metal rings cleanly.
It's listed as optional and the lamp will hang fine without it, but stiffener does make a real difference to how crisp the cone shape looks — especially at the brim. If your yarn is quite soft, I'd recommend it. A light, even coat on the outside while the shade is stretched over the rings works well.
The wide brim is structured around a 30 cm diameter metal ring, so the shade spans 30 cm at its widest point. The neck sits on a 15 cm diameter ring. The height depends slightly on your individual tension across 57 rounds, but expect roughly 35–40 cm from neck to brim.
Yes, with the right bulb. The pattern specifies an E27 at 600 lumens — use an LED bulb at that specification rather than an incandescent, as LED bulbs run much cooler. Never leave the lamp unattended when first testing it, and make sure the fitting and electrical components are properly assembled.
The electrical assembly is straightforward if you take it slowly. You're essentially connecting a plug to one end of the cord and a lamp fitting with strain relief to the other — the strain relief clamps the cord so it doesn't pull at the connection point. If you're at all unsure, ask someone with basic DIY experience to help with that part.
