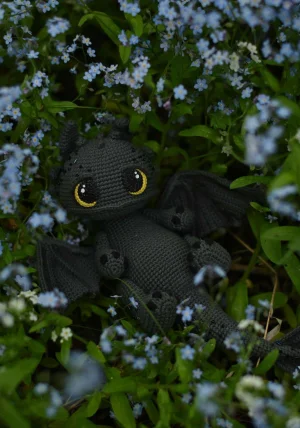
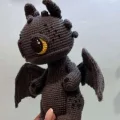
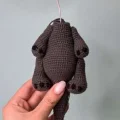
Bring the magic of the Night Fury to your crochet hook with this incredibly detailed dragon. You're going to love how the wire frame makes him fully posable, allowing you to recreate those iconic curious poses from the movies. It’s a project that requires patience, but seeing those big yellow eyes stare back at you makes every single stitch worth it. This isn't just a toy; it's a true collector's piece you'll be proud to display.
Progress Tracker
0% Complete
— 1. Head :
Info :
Using the 2mm hook and dark gray yarn. Keep the round marker centered at the back of the head. Stuff the piece as you work.
Round 1 :
6 sc into a MR (6)
Round 3 :
Repeat (1 sc, 1 inc) 6 times (18)
Round 4 :
1 sc, 1 inc, repeat (2 sc, 1 inc) 5 times, 1 sc (24)
Round 5 :
Repeat (3 sc, 1 inc) 6 times (30)
Round 6 :
2 sc, 1 inc, repeat (4 sc, 1 inc) 5 times, 2 sc (36)
Round 7 :
Repeat (5 sc, 1 inc) 6 times (42)
Round 8 :
3 sc, 1 inc, repeat (6 sc, 1 inc) 5 times, 3 sc (48)
Round 9 :
Repeat (7 sc, 1 inc) 6 times (54)
Round 10 :
4 sc, 1 inc, repeat (8 sc, 1 inc) 5 times, 4 sc (60)
Round 11 :
Repeat (9 sc, 1 inc) 6 times (66)
Round 12 :
66 sc around (66)
Round 13 :
5 sc, 1 inc, repeat (10 sc, 1 inc) 5 times, 5 sc (72)
Round 14-21 :
72 sc around for 8 rounds (72)
Round 22 :
18 sc, work 36 sc into the BLO, 18 sc (72)
Round 23 :
5 sc, 1 dec, repeat (10 sc, 1 dec) 5 times, 5 sc (66)
Round 24 :
Repeat (9 sc, 1 dec) 6 times (60)
Round 25 :
4 sc, 1 dec, repeat (8 sc, 1 dec) 5 times, 4 sc (54)
Round 26 :
Repeat (7 sc, 1 dec) 6 times (48)
Round 27 :
2 sc, 1 dec, repeat (4 sc, 1 dec) 7 times, then ch 3
Round 28 :
Skip 2 stitches before the marker and 2 after it. Work 1 sc, 1 dec, repeat (3 sc, 1 dec) 6 times, 3 sc, then 1 sc into the ch (32)
Round 29 :
2 sc into the ch, 1 dec, repeat (2 sc, 1 dec) 7 times (24)
Round 30 :
Repeat (2 sc, 1 dec) 6 times (18)
Round 31 :
Repeat (1 sc, 1 dec) 6 times (12)
Info :
Fasten off and pull the hole closed. The opening created at Round 27-28 is for the neck wire. To finish the head edge, join yarn to the first front loop from Round 21 and work: 17 sc, 2 hdcinc, 17 sc. Fasten off.
— 2. Eyes :
Info :
Make two using the 1.25mm hook and yellow lace yarn.
Round 1 :
6 sc into a MR (6)
Round 3 :
Repeat (1 sc, 1 inc) 6 times (18)
Round 4 :
Repeat (1 inc, 2 sc) 6 times (24)
Round 5 :
3 sc, 2 hdcinc, 2 sc (short round)
Info :
Fasten off and pull tails to the front. The wrong side will face out when attached. Use paint to add pupils and highlights.
— 3. Eyelids :
Info :
Make two with dark gray yarn and 2mm hook.
Row 1 :
ch 9, start in 2nd ch from hook: 1 sl st, 6 sc, 1 sl st. Fasten off with a long tail.
— 4. Ears :
Info :
Make two with dark gray yarn. Do not stuff. Keep marker on the side.
Round 1 :
6 sc into a MR (6)
Round 2 :
Repeat (1 sc, 1 inc) 3 times (9)
Round 3 :
4 sc, 1 inc, 4 sc (10)
Round 4 :
4 sc, 1 inc, 5 sc (11)
Round 5 :
5 sc, 1 inc, 5 sc (12)
Round 6 :
Repeat (1 inc, 5 sc) 2 times (14)
Round 7-8 :
14 sc around for 2 rounds (14)
Round 9 :
6 sc, 1 dec, 6 sc (13)
Round 10 :
5 sc, 1 dec, 6 sc (12)
Info :
Flatten and work 6 sc through both thicknesses to close. Leave a tail for sewing.
— 5. Head Spines :
Spines 1 :
Make two: Round 1: 6 sc in MR. Round 2: 6 sc. Leave tail.
Spines 2 :
Make two: Round 1: 6 sc in MR. Round 2: (2 sc, inc) twice (8). Round 3: 8 sc. Close with 4 sc through both sides.
Spines 3 :
Make two: Round 1: 6 sc in MR. Round 2: 6 sc. Round 3: (1 sc, dec) twice (4). Leave tail.
— 6. Hind Legs :
Round 1 :
ch 8, start in 2nd ch: 6 sc, 4 sc in last ch, turn to other side: 5 sc, 1 inc (17)
Round 2 :
1 inc, 5 sc, 4 inc, 5 sc, 2 inc (24)
Round 3 :
1 sc, 1 inc, 5 sc, repeat (1 hdc, 1 hdcinc) 4 times, 5 sc, repeat (1 sc, 1 inc) 2 times (31)
Round 4 :
9 sc, repeat (1 Bobble st in black, 2 sc in gray) 4 times, 9 sc. Adjust marker to center of heel.
Round 5 :
31 sc around (31)
Round 6 :
Repeat (4 sc, 1 dec) 2 times, 7 sc, repeat (1 dec, 4 sc) 2 times (27)
Round 7 :
6 sc, 1 dec, 5 sc, 1 dec, 4 sc, 1 dec, 6 sc (24)
Round 8 :
6 sc, 6 dec, 6 sc (18)
Round 9-13 :
18 sc around for 5 rounds (18)
Round 14 :
Repeat (5 sc, 1 inc) 3 times (21)
Round 15-16 :
21 sc around for 2 rounds (21)
Round 17 (Left) :
For plastic joints: 13 sc, ch 2, skip 2 sc, 6 sc (21)
Round 18 (Left) :
13 sc, 2 sc into the ch, 6 sc (21)
Round 17 (Right) :
For plastic joints: 6 sc, ch 2, skip 2 sc, 13 sc (21)
Round 18 (Right) :
6 sc, 2 sc into the ch, 13 sc (21)
Round 19 :
21 sc around (21)
Info :
If using cotter pins, ignore the ch-2 holes and work Rounds 17-19 as 21 sc each. Insert hardware before finishing.
Round 20 :
Repeat (5 sc, 1 dec) 3 times (18)
Round 21 :
Repeat (1 sc, 1 dec) 6 times (12)
Round 22 :
Work 6 dec (6). Close and hide tail.
— 7. Forelegs :
Round 1 :
6 sc into a MR (6)
Round 3 :
Repeat (1 sc, 1 inc) 6 times (18)
Round 4 :
5 sc, repeat (1 Bobble st in black, 2 sc in gray) 3 times, 4 sc (18)
Round 5-7 :
18 sc around for 3 rounds (18)
Round 8 :
8 sc, 1 dec, 8 sc (17)
Round 9 :
17 sc around (17)
Round 10 :
5 sc, 1 dec, 3 sc, 1 dec, 5 sc (15)
Round 11 :
15 sc around (15)
Round 12 :
6 sc, 1 dec, 7 sc (14)
Round 13 :
6 sc, 2 inc, 6 sc (16)
Round 14 :
1 dec, 12 sc, 1 dec (14)
Round 15 :
6 sc, 2 inc, 6 sc (16)
Round 16 :
1 dec, 12 sc, 1 dec (14)
Round 17 (Left) :
For plastic joints: 6 sc, 2 inc, 1 sc, ch 2, skip 2 sc, 3 sc (16)
Round 18 (Left) :
1 dec, 9 sc, 2 sc in ch, 1 sc, 1 dec (14)
Round 17 (Right) :
For plastic joints: 3 sc, ch 2, skip 2 sc, 1 sc, 2 inc, 6 sc (16)
Round 18 (Right) :
1 dec, 1 sc, 2 sc in ch, 9 sc, 1 dec (14)
Round 19 :
Repeat (5 sc, 1 dec) 2 times (12)
Round 20 :
Work 6 dec (6). Close and hide tail.
— 8. Wings :
Info :
Work in rows using 2mm hook. Use the 23cm wire for the first section.
Row 1 :
ch 28, start in 2nd ch, work 27 sc around the wire, turn (27)
Row 2 :
Start in 2nd stitch: 8 sc, 1 dec, 12 sc, 1 dec, turn (22)
Row 3 :
Start in 2nd stitch: 11 sc, 1 dec, 6 sc, turn (18)
Row 4 :
Start in 2nd stitch: 16 sc, turn (16)
Row 5 :
Start in 2nd stitch: 13 sc, turn (13)
Row 6 :
Start in 2nd stitch: 12 sc, turn (12)
Row 7 :
Start in 2nd stitch: 9 sc, turn (9)
Row 8 :
Start in 2nd stitch: 8 sc, turn (8)
Row 9 :
Start in 2nd stitch: 4 sc, turn (4)
Row 10 :
Start in 2nd stitch: 3 sc, ch 3, turn (3)
Info :
Attach 19cm wire for the next section.
Row 11 :
From 2nd ch: 2 sc, 3 sc, 1 sc in corner, 3 sc along previous row, 1 sc in corner, 2 sc along previous row, 1 sc in corner, 2 sc along previous row, 1 sc in corner, 2 sc along previous row (18), turn
Row 12 :
From 2nd stitch: 15 sc, 1 dec, turn (16)
Row 13 :
From 2nd stitch: 7 sc, turn (7)
Row 14 :
From 2nd stitch: 6 sc, turn (6)
Row 15 :
From 2nd stitch: 5 sc, 1 sc in corner, 4 sc along previous row (10), turn
Row 16 :
From 2nd stitch: 9 sc, 1 t-ch, turn (9)
Row 17 :
From 2nd stitch: 9 sc, 1 sc in corner, 3 sc along previous row (13), turn
Row 18 :
From 2nd stitch: 12 sc, 1 t-ch, turn (12)
Row 19 :
From 2nd stitch: 9 sc, turn (9)
Row 20 :
From 2nd stitch: 8 sc, 1 t-ch, turn (8)
Row 21 :
From 2nd stitch: 5 sc, turn (5)
Row 22 :
From 2nd stitch: 3 sc, 1 inc, 3 ch, turn (5)
Row 23 :
Add another 19cm wire. From 2nd ch: 2 sc, 5 sc, 1 sc in corner, 3 sc along previous row, 1 sc in corner, 3 sc along previous row, 1 sc in corner, 1 sc along previous row, 2 sc into corners (19), turn
Row 24-27 :
Work 4 decreasing rows starting from 2nd stitch: 18 sc, 17 sc, 16 sc, 14 sc
Row 28 :
From 2nd stitch: 13 sc, 1 t-ch, turn (13)
Row 29 :
From 2nd stitch: 11 sc, turn (11)
Row 30 :
From 2nd stitch: 9 sc, 1 inc, 1 t-ch, turn (11)
Row 31 :
From 2nd stitch: 9 sc, turn (9)
Row 32 :
From 2nd stitch: 7 sc, 1 inc, 3 ch, turn (9)
Info :
Attach final 13cm wire.
Row 33-35 :
From 2nd ch: 2 sc, 8 sc (8), turn. Next row: 4 sc. Next row: 3 sc.
Row 36 :
From 2nd stitch: 2 sc, 1 sc in corner, 4 sc along previous row (7), turn
Row 37-39 :
Work final shaping: 4 sc, 1 dec (5), then 5 sc for two rows.
Info :
Finish by crocheting sc along the top wire edge for a clean finish.
— 9. Tail :
Round 1 :
4 sc into a MR (4)
Round 2-4 :
4 sc around for 3 rounds (4)
Round 5 :
Repeat (1 sc, 1 inc) 2 times (6)
Round 6-8 :
6 sc around for 3 rounds (6)
Round 9 :
Repeat (2 sc, 1 inc) 2 times (8)
Round 10-11 :
8 sc around for 2 rounds (8)
Round 12 :
Repeat (3 sc, 1 inc) 2 times (10)
Round 13 :
10 sc around (10)
Round 14 :
2 sc, 1 inc, 4 sc, 1 inc, 2 sc (12)
Round 15 :
12 sc around (12)
Round 16 :
Repeat (5 sc, 1 inc) 2 times (14)
Round 17 :
14 sc around (14)
Round 18 :
3 sc, 1 inc, 6 sc, 1 inc, 3 sc (16)
Round 19 :
16 sc around (16)
Round 20 :
Repeat (7 sc, 1 inc) 2 times (18)
Round 21-22 :
18 sc around for 2 rounds (18)
Round 23 :
4 sc, 1 inc, 8 sc, 1 inc, 4 sc (20)
Round 24-26 :
20 sc around for 3 rounds (20)
Round 27 :
Repeat (9 sc, 1 inc) 2 times (22)
Round 28-30 :
22 sc around for 3 rounds (22)
Round 31 :
5 sc, 1 inc, 10 sc, 1 inc, 5 sc (24)
Round 32-33 :
24 sc around for 2 rounds (24)
Round 34 :
Repeat (11 sc, 1 inc) 2 times (26)
Round 35-36 :
26 sc around for 2 rounds (26)
Round 37 :
6 sc, 1 inc, 12 sc, 1 inc, 6 sc (28)
Round 38 :
28 sc around (28)
Round 39 :
Repeat (13 sc, 1 inc) 2 times (30)
Info :
Do not cut yarn. Insert 45cm wire and stuff the tail.
— 10. Body :
Round 1 :
11 sc, 1 inc, 1 sc, 4 inc, 1 sc, 1 inc, 11 sc (36)
Round 2 :
6 sc, 1 inc, 22 sc, 1 inc, 6 sc (38)
Round 3 :
14 sc, 1 inc, 8 sc, 1 inc, 14 sc (40)
Round 4 :
10 sc, 1 inc, 18 sc, 1 inc, 10 sc (42)
Round 5 :
3 sc, 1 inc, repeat (6 sc, 1 inc) 5 times, 3 sc (48)
Round 6 :
48 sc around (48)
Round 7 :
Repeat (7 sc, 1 inc) 6 times (54)
Round 8-9 :
54 sc around for 2 rounds (54)
Round 10 :
For plastic joints: 13 sc, ch 2, skip 2 sc, 24 sc, ch 2, skip 2 sc, 13 sc (54)
Round 11 :
13 sc, 2 sc in ch, 24 sc, 2 sc in ch, 13 sc (54)
Round 12-16 :
54 sc around for 5 rounds (54)
Round 17 :
8 sc, 1 dec, repeat (16 sc, 1 dec) 2 times, 8 sc (51)
Round 18 :
20 sc, 1 dec, 7 sc, 1 dec, 20 sc (49)
Round 19 :
49 sc around (49)
Round 20 :
20 sc, 1 dec, 5 sc, 1 dec, 20 sc (47)
Round 21 :
47 sc around (47)
Round 22 :
21 sc, 1 dec, 1 sc, 1 dec, 21 sc (45)
Round 23 :
Repeat (13 sc, 1 dec) 3 times (42)
Round 24 :
42 sc around (42)
Round 25 :
6 sc, 1 dec, repeat (12 sc, 1 dec) 2 times, 6 sc (39)
Round 26 :
39 sc around (39)
Round 27 :
Repeat (11 sc, 1 dec) 3 times (36)
Round 28 :
3 sc, ch 1, skip 1 sc, 4 sc, ch 2, skip 2 sc, 16 sc, ch 2, skip 2 sc, 4 sc, ch 1, skip 1 sc, 3 sc (36)
Round 29 :
3 sc, 1 sc in ch, 4 sc, 2 sc in ch, 16 sc, 2 sc in ch, 4 sc, 1 sc in ch, 3 sc (36)
Round 30 :
8 sc, 1 dec, 16 sc, 1 dec, 8 sc (34)
Round 31 :
34 sc around (34)
Round 32 :
Repeat (15 sc, 1 dec) 2 times (32)
Round 33 :
32 sc around (32)
Round 34 :
7 sc, 1 dec, 14 sc, 1 dec, 7 sc (30)
Round 35 :
4 sc, 1 dec, repeat (8 sc, 1 dec) 2 times, 4 sc (27)
Round 36 :
Repeat (7 sc, 1 dec) 3 times (24)
Round 37 :
24 sc around (24)
Info :
Fasten off with a long tail. Stuff the body around the wire frame.
— 11. Tail Fin :
Info :
Make two with dark gray yarn working in BLO.
Row 1 :
ch 13, start in 2nd ch: 12 sc, ch 3, turn (12)
Row 2 :
From 2nd ch: 2 sc, 11 sc, turn (13)
Row 3 :
From 2nd stitch: 12 sc, ch 3, turn (12)
Row 4 :
From 2nd ch: 2 sc, 11 sc, turn (13)
Row 5 :
From 2nd stitch: 12 sc, ch 3, turn (12)
Row 6 :
From 2nd ch: 2 sc, 11 sc (13). Fasten off.
— 12. Small Spines :
Info :
Make 16 spines using dark gray yarn.
Round 1 :
4 sc into a MR. Fasten off and leave a tail for sewing.
You've done it! You've brought a legendary Night Fury to life. There is something so rewarding about finishing a complex project like this—from the intricate wire work in the wings to those tiny hand-painted details in the eyes. I hope you enjoy finding the perfect spot to display your new dragon friend. He looks especially cute perched on a bookshelf or guarding a desk. Don't forget to share your finished photos with the community; we all love seeing how different expressions can change his whole vibe! Happy crafting! 🧶 ✨ 🐉