🧢 Beautiful ✨ Detailed πŸ’ Adorable

Sharkito the Polite Shark Amigurumi Pattern

Sharkito the Polite Shark Amigurumi Pattern
4.8β˜…Rating
3-5 HoursTime Needed
1.4KMade This
βœ‚οΈ

Intermediate Level

Ideal for those with basic crocheting experience, featuring slightly more advanced stitches and techniques to expand your skills.

⏱️

Quick Craft

Fits nicely into a free afternoon β€” 2 to 5 hours of focused, enjoyable crocheting.

🧸

Cute Companion

An adorable friend to cherish, handcrafted with love to bring comfort and joy for years to come.

About This Sharkito the Polite Shark Amigurumi Pattern

Sharkito the Polite Shark Amigurumi Pattern crochet pattern - detailed view

This pattern makes a beautiful handmade gift β€” thoughtful enough for someone special, but quick enough to make a few before the holidays. He looks absolutely precious sitting on a desk or as a whimsical nursery accent.

Why You'll Love This Sharkito the Polite Shark Amigurumi Pattern

I honestly adore how the color-coding in this pattern takes the guesswork out of those belly increases! There is something so satisfying about watching his round little shape take form, and the moment you attach his tiny tea cup, he just comes to life. It is a really fun way to practice your mid-round color changes while making something totally unique.

Sharkito the Polite Shark Amigurumi Pattern step 1 Sharkito the Polite Shark Amigurumi Pattern step 2 Sharkito the Polite Shark Amigurumi Pattern step 3 Sharkito the Polite Shark Amigurumi Pattern step 4

Switch Things Up

I remember the first time I sat down to design Sharkito. I wanted a shark that didn't look scary, something that felt more like a cozy friend you'd find in a storybook. The idea for the tea cup came later, almost as an afterthought, but it really finished his personality!

When you're working through the body, you'll notice the color-coded sections. I find it easiest to carry the yarn I'm not using (tapestry style) for short stretches, but for the larger white belly, you might prefer to drop and pick up the yarn to keep the fabric from getting too stiff.

If you want to customize your shark, try playing with the colors! A soft blue or even a mint green shark looks just as sweet. And don't feel limited to green tea β€” maybe your shark is a coffee lover or prefers a spot of Earl Grey. The beauty of handmade is making it your own. I can't wait to see the little families you create! I've even seen some crafters add a tiny top hat for extra politeness!

Common Mistakes & How to Fix Them

βœ— When working the color changes in the body, avoid pulling the carried yarn too tightly or the shark will pucker and lose its smooth shape.βœ— The eye placement is vital for his polite expression; if they are too high or too low, he might look startled rather than friendly.βœ— In the tail section, it is very easy to skip a stitch when joining the two small pieces together β€” keep a close eye on your count during that first joined round.βœ— If you stuff the tea cup too firmly, the bottom will round out and it won't sit flush against his belly when you sew it on.

Sharkito the Polite Shark Amigurumi Pattern

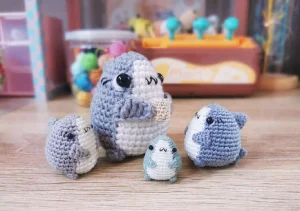
Meet Sharkito! He is quite possibly the most well-mannered shark you will ever encounter in the crochet world. This little guy is designed with a unique personality, often seen holding a tiny cup of tea while he greets your guests. I have put together this color-coded guide to help you navigate the belly transitions perfectly. Whether he is sitting on your shelf or joining your amigurumi collection, he is sure to bring a bit of polite charm to your day.

Intermediate 3-5 Hours

Materials Needed for Sharkito the Polite Shark Amigurumi Pattern

β€” Main Fabric

  • 01
    Approx 50g of Medium worsted weight acrylic yarn in soft grey for the main body
  • 02
    Small amount of white worsted weight acrylic yarn for the belly section
  • 03
    Mercerized cotton thread in grey and white if making the miniature version
  • 04
    Scraps of ecru or tan yarn for the tea cup base
  • 05
    A small length of green yarn for the tea detail
  • 06
    Black embroidery thread for the facial features

β€” Tools Required

  • 01
    2.25mm crochet hook for the larger shark
  • 02
    1.10mm crochet hook for the mini thread version
  • 03
    Two 8mm safety eyes for the standard size
  • 04
    Two 3mm safety eyes for the mini size
  • 05
    Polyester fiberfill for stuffing
  • 06
    Tapestry needle for assembly
  • 07
    Stitch markers to track rounds
  • 08
    Small piece of white felt for eye highlights
  • 09
    Craft glue for felt details

Progress Tracker

0% Complete

β€” 1. Head and Body :

Round 1 :

Using grey yarn, work 6 sc into a MR (6)

Round 2 :

6 x inc (12)

Info :

Note: In the following rounds, the text indicates switches between grey and white yarn. Ensure your tension is even during these transitions.

Round 3 :

2 x (inc, 2 sc), inc, 2 sc, inc, 2 sc (16)

Round 4 :

2 x (inc, 3 sc), 1 sc, inc, 4 sc, inc, 3 sc (20)

Round 5 :

3 sc, inc, 4 sc, inc, 2 sc (grey), 2 sc, inc, 2 sc, 2 sc, inc, 1 sc (white) (24)

Round 6 :

1 sc, 2 x (inc, 5 sc), 1 sc, inc, 6 sc, inc, 4 sc (28)

Round 7 :

16 sc (grey), 7 sc (white), 5 sc (grey) (28)

Round 8 :

2 sc, 2 x (inc, 6 sc), inc, 6 sc, inc, 4 sc (32)

Round 9 :

2 sc, 2 x (inc, 7 sc), 1 sc, inc, 8 sc, inc, 5 sc (36)

Round 10 :

21 sc (grey), 9 sc (white), 6 sc (grey) (36)

Round 11 :

inc, 12 sc, inc, 7 sc (grey), 9 sc (white), 6 sc (grey) (38)

Round 12 :

8 sc, inc, 9 sc, inc, 4 sc (grey), 4 sc, inc, 4 sc (white), 5 sc, inc (grey) (42)

Info :

Note: If the stitch count in Round 12 feels off, ensure you have exactly 42 stitches before proceeding.

Round 13 :

25 sc (grey), 10 sc (white), 7 sc (grey) (42)

Round 14 :

inc, 19 sc, inc, 4 sc (grey), 10 sc (white), 7 sc (grey) (44)

Info :

Place safety eyes between Rounds 6 & 7, positioning them about 2 stitches away from the white belly area.

Round 15 :

27 sc (grey), 10 sc (white), 7 sc (grey) (44)

Round 16 :

dec, 19 sc, dec, 4 sc (grey), 10 sc (white), 7 sc (grey) (42)

Round 17 :

3 x (dec, 5 sc), dec, 2 sc (grey), 3 sc, dec, 5 sc, dec, 5 sc (white/grey). Cut the white yarn here. (36)

Round 18 :

6 x (dec, 4 sc) (30)

Round 19 :

6 x (dec, 3 sc) (24)

Round 20 :

6 x (dec, 2 sc) (18)

Info :

Firmly stuff the body, ensuring the bottom is flat enough to stand.

Round 21 :

6 x (dec, 1 sc) (12)

Round 22 :

6 x dec (6)

Info :

Fasten off and sew the remaining hole closed.

β€” 2. Dorsal Fin :

Round 1 :

Using grey yarn, work 4 sc into a MR (4)

Round 2 :

2 x (inc, 1 sc) (6)

Round 3 :

2 x (inc, 2 sc) (8)

Round 4 :

2 x (inc, 3 sc) (10)

Round 5 :

2 x (inc, 4 sc) (12)

Info :

Cut yarn and leave a long tail for attaching to the back.

β€” 3. Pectoral Fins (Make 2) :

Row 1 :

Leave a long starting tail, ch 7, sk the first 2 ch from hook, 1 hdc, 2 dc, 2 tc

Info :

Fasten off and leave a long tail for assembly.

β€” 4. Feet (Make 2) :

Round 1 :

Using grey yarn, work 8 sc into a MR (8)

Info :

Fasten off and leave a tail for sewing.

β€” 5. Tail :

1st Piece Round 1 :

ch 2, work 4 sc into the second ch from hook (4)

1st Piece Round 2 :

2 x (inc, 1 sc) (6)

Info :

Fasten off the first piece and set aside.

2nd Piece Round 1 :

ch 2, work 4 sc into the second ch from hook (4)

Joined Round :

Join the current piece to the first piece: 2 x (inc, 2 sc) on the first piece, then 2 x (inc, 1 sc) on the second piece (14)

Info :

Leave a long tail for sewing. Do not stuff the tail.

β€” 6. Bonus: Green Tea Cup :

Round 1 :

Using ecru or tan yarn, work 6 sc into a MR (6)

Round 2 :

6 x inc (12)

Round 3 :

BLO 12 sc around (12)

Round 4-6 :

12 sc around for three full rounds (12)

Info :

Add a small amount of stuffing to the cup.

Round 7 :

Switch to green yarn, BLO 12 sc around (12)

Round 8 :

6 x dec (6)

Info :

Sew the top closed, pull the yarn through the center to the bottom to create a slight indentation, and leave a tail for sewing to the belly.

Assembly Instructions

  • Start by sewing the pectoral fins to the body between Rounds 9 and 11, angling them slightly downward toward the belly center.
  • Pin the dorsal fin to the center of the back between Rounds 5 and 9, ensuring it is perfectly straight before stitching in place.
  • Attach the tail to the lower back where the body curves; the larger section of the tail should sit above the smaller section.
  • Position the feet at the very bottom junction where the grey and white yarn met on Round 17 and sew them securely.
  • If using the tea cup, sew it to the middle of the white belly first, then tack the ends of the pectoral fins to the cup sides.
  • Embroider a small 'w' shaped mouth on Round 6 of the white belly, centering it between the eyes.
  • Finish by embroidering two slanted black lines on Round 7 next to each eye to represent the gills.

Important Notes

  • πŸ’‘Use a hook slightly smaller than your yarn recommends to ensure the stuffing doesn't peek through the stitches.
  • πŸ’‘When switching colors, carry the unused yarn behind your work to keep the transitions clean and professional.
  • πŸ’‘I highly recommend pinning all parts in place before sewing to ensure you are happy with his polite posture.
  • πŸ’‘The 'sc in same st' instruction in the body rounds acts as an increase to create the specific chubby shark shape.
  • πŸ’‘For the miniature version, use a very fine thread and a steady hand as the stitches will be quite small.

I hope you enjoyed bringing Sharkito to life! There is something so rewarding about finishing a project with this much personality. Whether he is a gift or a new friend for your own shelf, he is sure to be a conversation starter. I would love to see your finished polite sharks, so feel free to share your progress! Remember, every stitch adds to his character, so take your time and enjoy the process. Happy crafting, and may your tea always be warm! 🧢✨🦈

You ask,

we answer.

FAQs

How do I make the color changes look so seamless?

The secret is to pull through the very last loop of the stitch before the change with your new color. This makes the transition sharp and prevents the colors from bleeding into the next stitch.

Can I use a different yarn weight for this pattern?

You certainly can! Just remember that using a heavier yarn like bulky will result in a much larger shark. Be sure to adjust your hook and safety eye sizes to match the new scale.

My shark won't stand up on its own, what should I do?

This usually happens if the bottom isn't stuffed flat. Try adding a bit more stuffing near the feet area to create a flatter base, or you can even add a few plastic pellets at the very bottom for weight.

Is the tea cup accessory mandatory?

Not at all, but it is what makes him Sharkito the Polite Shark! Without it, he's just a regular cute shark. You could also try making him hold a tiny heart or a flower instead.