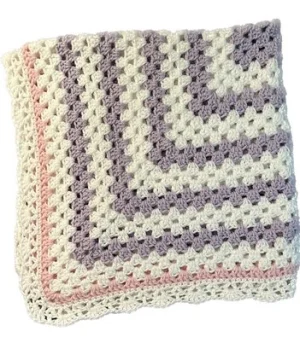
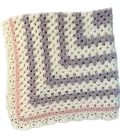
About This Soft Pastel Granny Square Baby Blanket Pattern
This blanket makes an incredible heirloom gift for a new arrival, or a beautiful nursery accent that parents will actually use and cherish for many years to come.
Perfect for those just starting their crocheting journey, with clear instructions and simple techniques
A 10-12 hour project—great for savoring the process over several sessions.
A warm touch for your space that transforms ordinary corners into inviting nooks filled with handmade charm.
This blanket makes an incredible heirloom gift for a new arrival, or a beautiful nursery accent that parents will actually use and cherish for many years to come.
I’m a sucker for a project where I can just zone out and let my hands do the work. The color changes keep things interesting without being stressful, and that shell border is just the absolute icing on the cake for me.
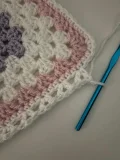
I remember when I first started crocheting, the granny square was the very first thing I mastered. There’s something so comforting about that familiar cluster of stitches, isn't there? For this blanket, I wanted to take that nostalgia and give it a bit of a "glow up" with the shell border.
When I was making the sample for this pattern, I found myself really looking forward to the white rounds. They act as such a lovely palate cleanser between the rose sections. If you're feeling adventurous, this design is actually a fantastic stash-buster. You could do every stripe in a different scrap color from your basket and it would look like a beautiful stained-glass window!
One little tip from my hook to yours: when you get to the border, don't rush the v-stitch round. It's the foundation for those pretty shells, and getting the spacing right makes all the difference in how the blanket drapes. I usually put on a good podcast and just enjoy the slow progress. It’s not a race; it’s about the love we put into every loop. I hope this blanket brings as much warmth to your home as it did to mine while I was designing it.
This sweet blanket is such a joy to work up! I love how the classic granny square gets a modern makeover with a delicate shell edge. You'll find the rhythm of the stitches so relaxing, making it the perfect project for a cozy evening on the couch. Your finished piece will be a soft, snuggly treasure for any nursery, with a texture that's as comforting as it is beautiful.
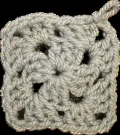
Using the dusty rose yarn, create a slip knot and ch3. ss into the very first ch to create your center ring.
ch3 (this is your first dc), work 2dc into the ring, then ch2. Work [3dc into the ring, ch2] three times. ss into the 3rd ch of your starting ch3. You should have 4 clusters and 4 corner spaces.
ch3 (counts as dc), work 2dc into the first chsp. In the next chsp, work [3dc, ch2, 3dc] to create your first corner. Repeat this corner in the next two chsps. To finish, work 3dc into the very first chsp, ch2, and ss into the 3rd ch of the start.
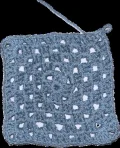
ch3 (counts as dc), work 2dc into the chsp. Work 3dc into the next side chsp. In the corner chsp, work [3dc, ch2, 3dc]. Continue this pattern around, placing 3dc in side spaces and the corner cluster in corners. Finish with 3dc in the first chsp, ch2, and ss to join.
ch3 (counts as dc), work 2dc into the chsp. Work 3dc into each of the next 2 side chsps. Work [3dc, ch2, 3dc] into the corner chsp. Repeat this sequence around. Finish with 3dc in the first chsp, ch2, and ss to join.
ch3 (counts as dc), work 2dc into the chsp. Work 3dc into the next 4 side chsps. In the corner chsp, work [3dc, ch2, 3dc]. Repeat around. Finish with 3dc in the first chsp, ch2, ss to join, and then fasten off your rose yarn.
Attach your white yarn to any corner. For all following rounds, start with ch3 and 2dc in the gap, work 3dc in every side chsp, and work [3dc, ch2, 3dc] in every corner chsp. Join each round with 3dc in the start gap, ch2, and a ss into the 3rd ch.
Work a standard granny round using white yarn.
Continue with a standard granny round in white.
Work the final white round of this stripe and fasten off.
Attach dusty rose yarn and work a standard granny round.
Work a second rose round and fasten off.
Attach white yarn and work a standard granny round.
Continue with white yarn for this round.
Complete the white stripe and fasten off.
Attach dusty rose and work one standard round.
Work the second rose round and fasten off.
Attach white yarn and work a standard round.
Continue with white for this round.
Complete the white stripe and fasten off.
Attach dusty rose and work one standard round.
Work the second rose round and fasten off.
Attach white yarn and work a standard round.
Continue with white for this round.
Complete the white stripe and fasten off.
Attach dusty rose and work one standard round.
Work the second rose round and fasten off.
Attach white yarn and work a standard granny round.
Continue with white for this round.
Complete the final white body round and fasten off.
Attach the pink yarn and work one complete standard granny round. Fasten off.
Attach white yarn to a corner. ch1, then work 1sc into every single stitch and chsp around the blanket. In each of the four corners, work 3sc. ss into the first ch1 to join.
ch2 and skip the first st. In the next st, work a v-stitch (1dc, ch1, 1dc). *skip 2 stitches, work a v-stitch in the next st. Repeat this along the sides. When you reach a corner, only skip 1 stitch between your v-stitches to ensure the border stays flat.
At the first corner, dc into the same stitch as your starting ch3, ch1, and ss into the 3rd ch. Now, ch3. *Work 5dc into the next v-stitch gap, then 1dc into the following v-stitch gap. Repeat this shell pattern all the way around the blanket.
Once you have worked back to the beginning ch3, ss into the 3rd ch. Fasten off your yarn.
I really hope you enjoyed every stitch of this blanket! There’s something so special about making a baby gift by hand—it’s like you’re stitching in all those good wishes for the little one. Once you’ve woven in that last end, give it a gentle steam block to really let those shells shine. I can't wait to see the colors you chose for yours. It's projects like these that remind me why I fell in love with crochet in the first place. Happy crafting, and I'll see you in the next pattern! 🧶✨
Absolutely! Just keep in mind that a thicker yarn will make the blanket much larger and you'll need a bigger hook, likely a 6mm or 6.5mm.
I like to finish the last pull-through of the final slip stitch with the new color; it makes the transition between stripes almost invisible.
Check that you are putting exactly two chains between your dc clusters in the corners—those chains are vital for keeping that sharp square shape.
That depends on your yarn! Paintbox Aran is usually acrylic and fine for a gentle wash, but always check your specific yarn label first.
