About This Spa Day Capybara Amigurumi Pattern
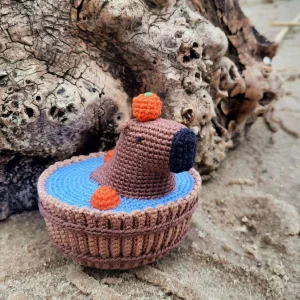
It makes the most charming desk companion or a unique gift for that one friend who is obsessed with capybaras. The finished piece is sturdy enough to sit perfectly on a shelf.
Ideal for those with basic crocheting experience, featuring slightly more advanced stitches and techniques to expand your skills.
Takes 5-7 hours, making it an enjoyable project to finish over a couple of days.
Playful characters full of personality, designed to spark imagination and become cherished playtime favorites.
It makes the most charming desk companion or a unique gift for that one friend who is obsessed with capybaras. The finished piece is sturdy enough to sit perfectly on a shelf.
I honestly couldn't stop smiling while making the little tub hoops. It's those small, clever details that make a project feel special. Plus, the way the capybara's head shapes up is just so satisfying to watch.
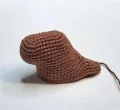
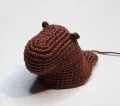
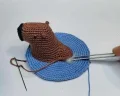
I have to tell you, there is something incredibly meditative about working on this capybara. When I first sat down to design the tub, I really wanted it to feel like real wood, which is why we use that back-loop-only technique for the main body. It creates these lovely vertical ridges that look just like slats! \n\nOne thing I found really helpful while making mine was being quite generous with the glue for the cardboard base. It sounds like a small thing, but having that perfectly flat bottom makes the whole piece feel so much more professional and high-end when it's sitting on a desk. \n\nIf you're feeling adventurous, you could even play around with the 'water' color. I used a classic bright blue, but a soft teal or even a 'soapy' white would look adorable too. The little orange on the head is definitely my favorite part—it's that tiny pop of color that just brings the whole character to life. I can't wait to see your little guys soaking away! It's the perfect project to tuck into over a rainy weekend.
You're going to love making this little guy! There's something so peaceful about a capybara soaking in a tub, especially with that tiny orange perched on its head. It’s a wonderful project for when you want to create something with a bit of character and a lot of heart.
ch 8. Starting in the second ch from hook, work an inc into the back loop only. Continue in back loops: 5 sc, then 4 sc in the final ch. Turn to work along the other side of the ch: 5 sc, inc (18)
(inc x 2, 5 sc, inc x 2) repeat twice (26)
(1 sc, inc x 2, 7 sc, inc x 2, 1 sc) repeat twice (34)
34 sc (34)
2 sc, inc, 28 sc, inc, 2 sc (36)
36 sc (36)
2 sc, inc x 2, 28 sc, inc x 2, 2 sc (40)
40 sc (40)
16 sc, invdec x 4, 16 sc (36)
1 sc, inc, 14 sc, invdec x 2, 14 sc, inc, 1 sc (36)
3 sc, inc, 12 sc, invdec x 2, 12 sc, inc, 3 sc (36)
Work 1 ex st to shift your starting point.
ch 4. In the second ch from hook, work an inc in the back loop. Work 2 sc along the back loops of the ch. Continue onto the body: 2 sc, inc, 30 sc, inc, 2 sc. Work along the other side of the ch: 2 sc, inc (46)
Adjust your stitch marker to the next stitch.
inc, 3 sc, invdec, 34 sc, invdec, 3 sc, inc (46)
inc x 2, 2 sc, invdec x 2, 30 sc, invdec x 2, 2 sc, inc x 2 (46)
(1 sc, inc) repeat twice, 2 sc, invdec, 30 sc, invdec, 2 sc, (inc, 1 sc) repeat twice (48)
2 sc, inc, 42 sc, inc, 2 sc, 1 sl st
Fasten off, leaving a long tail for sewing.
Using black, ch 6. In second ch from hook, work an inc in back loop. Continue in back loops: 3 sc, then inc x 2 in the last ch. Work other side of ch: (3 sc, inc) (14)
(1 sc, inc, 3 sc, inc, 1 sc) repeat twice (18)
1 sl st, inc, 5 hdc, inc, 2 sc, inc, 5 hdc, inc, 1 sl st (22)
Cut yarn and leave a long end for attachment.
Join brown yarn between Rows 4 and 5 of the head. In a single stitch, work: 1 ch, 1 hdc, 1 ch, 1 sl st. Fasten off and hide the tail. Repeat for the second ear.
6 sc into a MR (6)
inc x 6 (12)
(1 sc, inc) repeat 6 times (18)
(1 sc, inc, 1 sc) repeat 6 times (24)
(3 sc, inc) repeat 6 times (30)
(2 sc, inc, 2 sc) repeat 6 times (36)
(5 sc, inc) repeat 6 times (42)
(3 sc, inc, 3 sc) repeat 6 times (48)
(7 sc, inc) repeat 6 times (54)
(4 sc, inc, 4 sc) repeat 6 times (60)
(9 sc, inc) repeat 6 times (66)
(5 sc, inc, 5 sc) repeat 6 times (72)
(11 sc, inc) repeat 6 times (78)
(6 sc, inc, 6 sc) repeat 6 times (84)
(13 sc, inc) repeat 6 times (90)
(7 sc, inc, 7 sc) repeat 6 times (96)
Fasten off and leave a length of yarn for sewing.
ch 15 using beige. 1 sc in 2nd ch from hook, then 13 sc (14)
Working in back loops only: ch 1, turn, 14 sc (14)
Shift to the long side of the piece. ch 1, (4 sc, invdec, 4 sc) repeat 9 times. Finish with 1 sl st in the first stitch.
In back loops only: (7 sc, invdec) repeat 9 times (72)
(3 sc, invdec, 3 sc) repeat 9 times (63)
(5 sc, invdec) repeat 9 times (54)
(7 sc, invdec) repeat 6 times (48)
(3 sc, invdec, 3 sc) repeat 6 times (42)
(5 sc, invdec) repeat 6 times (36)
(2 sc, invdec, 2 sc) repeat 6 times (30)
(4 sc, invdec, 4 sc) repeat 3 times (27)
(7 sc, invdec) repeat 3 times (24)
(1 sc, invdec, 1 sc) repeat 6 times (18)
invdec x 9 (9)
Close the remaining gap. Fasten off and hide the yarn. Sew the open side seams of the tub strip together.
ch 2. 1 sc in 2nd ch from hook.
Work 1 sc into the bottom part of the sc from the row before. (Insert hook at the base, pull up a loop, yarn over and pull through both loops).
ch 2. 1 sc in 2nd ch from hook.
Work 1 sc into the bottom part of the sc from the previous row as done for the upper hoop.
Fasten off both hoops and leave tails for sewing.
6 sc in MR (6)
inc x 6 (12)
12 sc (12)
invdec x 6 (6)
Stuff before closing. Embroider a small green leaf on top.
6 sc in MR (6)
inc x 6 (12)
12 sc (12)
6 sc in MR (6)
(1 sc, inc) repeat 3 times (9)
9 sc (9)
I hope you enjoy every stitch of this spa-day friend! There’s something so therapeutic about working on these tiny details, from the texture of the tub to the little green leaf on the orange. Once he’s all finished and sitting in his tub, he’s sure to bring a bit of calm to your workspace. Don't forget to share your finished photos—I'd love to see the colors you choose for your tub! Happy crafting! 🧶✨
Yes, 4mm or 5mm safety eyes would work perfectly, just remember to install them before you finish and stuff the head!
This usually happens if the cardboard circle is too small or if the bottom is overstuffed; try trimming a slightly larger, stiffer piece of card.
The trick is inserting the hook into the base of the stitch from the row below rather than the top loops—it creates a thicker, cord-like appearance.
It's recommended for this specific yarn weight to keep the stitches tight, but if you use thicker yarn, just size up your hook accordingly.
