🧢 Beautiful ✨ Detailed πŸ’ Adorable

Space Ranger Hero Amigurumi Pattern

Space Ranger Hero Amigurumi Pattern
4.4β˜…Rating
5-7 HoursTime Needed
2.6KMade This
βœ‚οΈ

Intermediate Level

Ideal for those with basic crocheting experience, featuring slightly more advanced stitches and techniques to expand your skills.

⏱️

Weekend Treat

Takes 5-7 hours, making it an enjoyable project to finish over a couple of days.

🐰

Whimsical Buddy

Playful characters full of personality, designed to spark imagination and become cherished playtime favorites.

About This Space Ranger Hero Amigurumi Pattern

Space Ranger Hero Amigurumi Pattern crochet pattern - detailed view

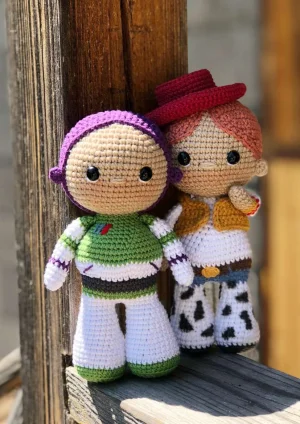
This little hero makes a stellar gift for movie fans or a charming addition to a nursery shelf. His compact size and detailed suit make him a standout piece in any amigurumi collection.

Why You'll Love This Space Ranger Hero Amigurumi Pattern

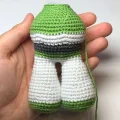
I absolutely love how the color changes in this pattern make the suit look so authentic without being overly complicated. There is something so satisfying about joining the legs and watching the body take shapeβ€”it feels like you're building a tiny action figure out of yarn. Plus, the way the purple hood frames the face is just too cute to resist!

Space Ranger Hero Amigurumi Pattern step 1 Space Ranger Hero Amigurumi Pattern step 2 Space Ranger Hero Amigurumi Pattern step 3 Space Ranger Hero Amigurumi Pattern step 4

Switch Things Up

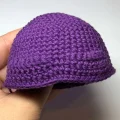
I remember the first time I tried to crochet a character with this much detail; I was so nervous about the color changes! But honestly, that is where the soul of this project lives. When you switch from that crisp white to the vibrant green of the space suit, you really start to see the personality emerge. My biggest tip for this specific pattern is to be really mindful of your tension when you are working on the purple hood. If it is too tight, it will squash the head, and if it is too loose, it will look a bit floppy. I like to check the fit every couple of rounds just to be sure.

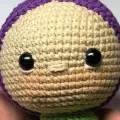
Another thing I adore is the embroidery. Don't feel like the chest emblem has to be perfectβ€”those little red and blue stitches are what give him that 'handmade with love' vibe. I actually used a slightly thinner thread for the face details to keep them looking delicate. If you are feeling extra creative, you could even add a little 'ANDY' or your own name to the bottom of one of the green boots. It is those tiny, thoughtful touches that turn a crochet project into a family heirloom. Happy stitching, friends!

Common Mistakes & How to Fix Them

βœ— If you don't align the start of the purple hood with the back of the head, the shaped face opening might sit crookedly over the safety eyes.βœ— When joining the legs with the 3 chains, failing to keep your tension consistent can create a large gap at the crotch where stuffing might leak out.βœ— The chest emblem is quite small, so using full-weight yarn for embroidery can look bulky; try splitting your yarn plies for a cleaner finish.βœ— Forgetting to work Round 8 of the body in the back loops only will lose the structural ridge that defines his waist from his upper armor.

Space Ranger Hero Amigurumi Pattern

Get ready to take your crochet skills to infinity and beyond with this adorable Space Ranger! This project is such a joy to work on because you get to see all those iconic suit details come together round by round. You'll love how the clever construction creates a layered look that really captures his heroic personality. It's the perfect project for adding a touch of intergalactic adventure to your handmade collection.

Intermediate 5-7 Hours

Materials Needed for Space Ranger Hero Amigurumi Pattern

β€” Main Fabric

  • 01
    Sport weight cotton blend yarn in a soft beige for the face and hands
  • 02
    Vibrant green sport weight yarn for the boots and upper torso armor
  • 03
    Crisp white sport weight yarn for the legs, arms, and midsection
  • 04
    Deep purple sport weight yarn for the hood and arm accents
  • 05
    Small amount of grey yarn for the utility belt detail
  • 06
    Scraps of red and blue thread for the chest emblem embroidery

β€” Tools Required

  • 01
    2.0mm crochet hook
  • 02
    7mm or 8mm black safety eyes
  • 03
    Polyester fiberfill stuffing
  • 04
    Tapestry needle for assembly and embroidery
  • 05
    Sharp scissors
  • 06
    Stitch markers to track your rounds

Progress Tracker

0% Complete

β€” 1. Head :

Round 1 :

Start with 6 sc into a mr (6)

Round 2 :

Work 1 inc in every stitch around (12)

Round 3 :

Repeat a sequence of 1 sc and 1 inc 6 times (18)

Round 4 :

Repeat a sequence of 2 sc and 1 inc 6 times (24)

Round 5 :

Repeat a sequence of 3 sc and 1 inc 6 times (30)

Round 6 :

Repeat a sequence of 4 sc and 1 inc 6 times (36)

Round 7 :

Repeat a sequence of 5 sc and 1 inc 6 times (42)

Round 8 :

Repeat a sequence of 6 sc and 1 inc 6 times (48)

Round 9 :

Repeat a sequence of 7 sc and 1 inc 6 times (54)

Round 10-19 :

Work 1 sc in each stitch around (54)

Info :

Place the safety eyes between rounds 15 and 16, leaving a gap of 9 stitches between them.

Round 20 :

Repeat a sequence of 7 sc and 1 dec 6 times (48)

Round 21 :

Repeat a sequence of 6 sc and 1 dec 6 times (42)

Info :

Begin stuffing the head firmly.

Round 22 :

Repeat a sequence of 5 sc and 1 dec 6 times (36)

Round 23 :

Repeat a sequence of 4 sc and 1 dec 6 times (30)

Round 24 :

Repeat a sequence of 3 sc and 1 dec 6 times (24)

Round 25 :

Repeat a sequence of 2 sc and 1 dec 6 times (18)

Round 26 :

Repeat a sequence of 1 sc and 1 dec 6 times (12)

Info :

Finish stuffing and fasten off.

β€” 2. Space Hood :

Round 1 :

Using purple yarn, create a mr and work 6 sc into it (6)

Round 2 :

Work 2 sc into every stitch around (12)

Round 3 :

Repeat 1 sc and 1 inc 6 times (18)

Round 4 :

Repeat 2 sc and 1 inc 6 times (24)

Round 5 :

Repeat 3 sc and 1 inc 6 times (30)

Round 6 :

Repeat 4 sc and 1 inc 6 times (36)

Round 7 :

Repeat 5 sc and 1 inc 6 times (42)

Round 8 :

Repeat 6 sc and 1 inc 6 times (48)

Round 9 :

Repeat 7 sc and 1 inc 6 times (54)

Round 10-16 :

Work 1 sc in every stitch around (54)

Round 17 :

Repeat the following sequence twice: 1 hdc, 2 dc, 2 dc inc, 2 dc, 1 hdc, 2 sc. Finish the round with 34 sc (58)

Round 18 :

Repeat the following sequence twice: 1 hdc, 8 dc, 1 hdc, 2 sc. Finish the round with 34 sc (58)

Round 19 :

Work 22 hdc followed by 36 sc (58)

Round 20 :

Work 1 sc in every stitch around (58)

Info :

Fasten off, leaving a long tail for attaching to the head.

β€” 3. Ears :

Round 1 :

Using purple yarn, work 6 sc into a mr and fasten off, leaving a tail for sewing (6)

β€” 4. Legs :

Round 1 :

With green yarn, work 6 sc into a mr (6)

Round 2 :

Increase in each stitch around (12)

Round 3 :

Repeat 1 sc and 1 inc 6 times (18)

Round 4 :

Repeat 2 sc and 1 inc 6 times (24)

Round 5 :

Repeat 3 sc and 1 inc 6 times (30)

Round 6 :

Work 1 sc in the blo of each stitch around (30)

Round 7 :

Work 1 sc in every stitch (30)

Round 8 :

Switch to white yarn and work 30 sc (30)

Round 9 :

Repeat 8 sc and 1 dec 3 times (27)

Round 10-11 :

Work 1 sc in each stitch around (27)

Round 12 :

Repeat 7 sc and 1 dec 3 times (24)

Round 13 :

Work 1 sc in each stitch around (24)

Round 14 :

Repeat 6 sc and 1 dec 3 times (21)

Round 15-16 :

Work 1 sc in each stitch around (21)

Round 17 :

Repeat 5 sc and 1 dec 3 times (18)

Round 18 :

Work 1 sc in each stitch around (18)

Round 19 :

Repeat 4 sc and 1 dec 3 times (15)

Info :

Stuff the leg firmly. Repeat these steps for the second leg, but do not cut the yarn on the second one.

β€” 5. Body :

Round 1 :

From the second leg, ch 3. Work 15 sc around the first leg, 3 sc along the ch, 15 sc around the second leg, and 3 sc along the other side of the ch (36)

Round 2 :

Work 1 sc in every stitch around (36)

Round 3 :

Change to green yarn and work 36 sc (36)

Round 4 :

Work 1 sc in every stitch around (36)

Round 5 :

Change to grey yarn and work 36 sc (36)

Round 6-7 :

Work 1 sc in every stitch around (36)

Round 8 :

Change to white yarn. Working in blo, repeat 5 sc and 1 inc 6 times (42)

Round 9 :

Repeat 6 sc and 1 inc 6 times (48)

Round 10 :

Repeat 7 sc and 1 inc 6 times (54)

Round 11 :

Change to green yarn and work 54 sc (54)

Round 12-13 :

Work 1 sc in each stitch around (54)

Round 14 :

Repeat 7 sc and 1 dec 6 times (48)

Round 15 :

Repeat 6 sc and 1 dec 6 times (42)

Round 16 :

Repeat 5 sc and 1 dec 6 times (36)

Round 17 :

Repeat 4 sc and 1 dec 6 times (30)

Round 18 :

Work 1 sc in each stitch around (30)

Round 19 :

Repeat 3 sc and 1 dec 6 times (24)

Round 20-21 :

Work 1 sc in each stitch around (24)

Info :

Stuff the body firmly and leave a long tail for sewing.

β€” 6. Hands :

Round 1 :

Using white yarn, work 6 sc into a mr (6)

Round 2 :

Repeat 1 sc and 1 inc 3 times (9)

Round 3-5 :

Work 1 sc in each stitch around (9)

Round 6 :

Change to purple yarn and work 9 sc (9)

Round 7 :

Change to white yarn and work 9 sc (9)

Round 8-9 :

Work 1 sc in each stitch around (9)

Round 10 :

Change to green yarn and work 9 sc (9)

Round 11 :

Work 1 sc in each stitch around (9)

Round 12 :

Change to white yarn and work 9 sc (9)

Round 13-14 :

Work 1 sc in each stitch around (9)

Round 15 :

Change to green yarn and work 9 sc (9)

Round 16-17 :

Work 1 sc in each stitch around (9)

Info :

Lightly stuff the hand and arm, then fasten off.

Assembly Instructions

  • Slide the purple hood over the head and secure it by sewing around the edge where it meets the face.
  • Place the purple ears between rounds 16 and 17 of the head, ensuring they are about 5 to 6 stitches away from the eyes on either side.
  • Use a bit of white thread to embroider small highlights at the bottom of each safety eye for a more expressive look.
  • Embroider a small horizontal line for the nose using beige yarn and add a touch of pink or peach blush to the cheeks.
  • Sew the head onto the open neck of the body, making sure it is centered and secure.
  • On the upper green section of the chest, embroider the small rectangular emblem using red and blue thread.
  • Attach the arms to the sides of the body at the shoulder level, ensuring the color-stripes align nicely with the torso.

Important Notes

  • πŸ’‘Stuff the neck area very firmly as you join the head to prevent it from wobbling later on.
  • πŸ’‘When working the color changes on the arms and body, always pull the new color through the final two loops of the previous stitch.
  • πŸ’‘Use pins to hold the hood and ears in place before you start sewing to ensure everything stays symmetrical.
  • πŸ’‘The 3-chain gap between the legs is crucial for the doll's ability to stand, so don't skip those stitches when joining.
  • πŸ’‘If you want a more seamless look, try using the invisible decrease method throughout the head and body shaping.

I really hope you enjoy every single stitch of this Space Ranger project! Seeing him all finished and ready for his next mission is such a rewarding feeling. Don't forget to take your time with the assemblyβ€”pinning those ears and the hood in place before you sew makes all the difference in his final expression. I can't wait to see your versions of this brave little guy. If you run into any trouble, just take a breath and remember that every master crafter started with a single loop. You've got this, and he's going to look absolutely stellar on your shelf! 🧢 ✨

You ask,

we answer.

FAQs

Can I use safety eyes larger than 8mm?

You certainly can, though it will give him a much more 'big-eyed' kawaii look. For the proportions shown in the photos, 7-8mm is the sweet spot.

How do I make sure the legs are even?

The key is the 3-chain bridge. Make sure your first stitch into the first leg after the chain is exactly opposite the last stitch of the second leg to keep him from twisting.

My purple hood is too small for the head, what should I do?

Amigurumi tension can vary! If the hood is too tight, try using a 2.25mm or 2.5mm hook just for that piece while keeping the 2.0mm for the head.

What is the best way to embroider the chest emblem?

Use a sharp embroidery needle rather than a blunt tapestry needle. This allows you to pierce the stitches for more precise placement of those tiny red and blue bars.