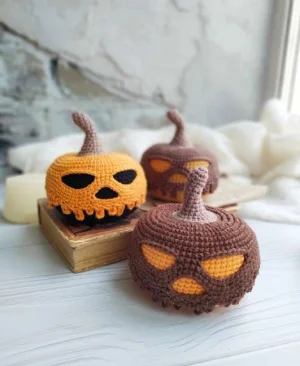
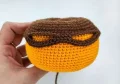
Get ready to bring some festive spookiness to your home with this unique Jack-O-Lantern! You'll love the clever way the face is built directly into the 'melting' overlay rather than just being embroidered on. It gives the finished piece such a professional, multi-dimensional look that really pops. Whether you're decorating your own space or making a special gift for a Halloween lover, this project is as fun to assemble as it is to look at.
Progress Tracker
0% Complete
— 1. Main Pumpkin Body :
Info :
Start your work using the dark brown yarn.
Round 1 :
Begin by making 8 sc into a MR (8)
Round 2 :
Work 1 inc into every stitch around (16)
Round 3 :
Repeat a pattern of 1 sc followed by an inc a total of 8 times (24)
Round 4 :
Work 1 sc, then an inc, followed by a sequence of (2 sc, inc) repeated 7 times, finishing with 1 sc (32)
Round 5 :
Repeat a pattern of 3 sc and an inc 8 times (40)
Round 6 :
Work 2 sc, then an inc, followed by a sequence of (4 sc, inc) repeated 7 times, finishing with 2 sc (48)
Round 7 :
Repeat a pattern of 5 sc and an inc 8 times (56)
Round 8 :
Work 3 sc, then an inc, followed by a sequence of (6 sc, inc) repeated 7 times, finishing with 3 sc (64)
Round 9 :
Repeat a pattern of 7 sc and an inc 8 times (72)
Round 10 :
Work sc in every stitch around (72)
Round 11 :
Complete another round of 72 sc (72)
Round 12 :
Perform one more round of 72 sc (72)
Colour Change :
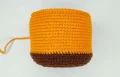
Switch your yarn to the orange color.
Round 13 :
Working in the BLO only, work 72 sc around (72)
Round 14 :
sc in each of the 72 stitches around (72)
Round 15 :
Work 72 sc for this round (72)
Round 16 :
Complete another 72 sc around (72)
Round 17 :
Work 72 sc (72)
Round 18 :
Work 72 sc (72)
Round 19 :
Work 72 sc (72)
Round 20 :
Work 72 sc (72)
Round 21 :
Work 72 sc (72)
Round 22 :
Work 72 sc (72)
Round 23 :
Work 72 sc (72)
Round 24 :
Work 72 sc (72)
Round 25 :
Work 72 sc (72)
Round 26 :
Work 72 sc (72)
Round 27 :
Perform the final round of 72 sc for this section (72)
Round 28 :
Repeat a pattern of 7 sc followed by a dec 8 times (64)
Round 29 :
Work 3 sc, then a dec, followed by a sequence of (6 sc, dec) repeated 7 times, finishing with 3 sc (56)
Round 30 :
Repeat a pattern of 5 sc followed by a dec 8 times (48)
Round 31 :
Work 2 sc, then a dec, followed by a sequence of (4 sc, dec) repeated 7 times, finishing with 2 sc (40)
Round 32 :
Repeat a pattern of 3 sc followed by a dec 8 times (32)
Info :
Begin stuffing the pumpkin firmly, pushing the fiberfill from the center toward the sides to create a rounded shape.
Round 33 :
Work 1 sc, then a dec, followed by a sequence of (2 sc, dec) repeated 7 times, ending the round with 1 sc (24)
Round 34 :
Repeat a pattern of 1 sc followed by a dec 8 times (16)
Round 35 :
Perform 8 dec around (8)
Info :
Fasten off but leave a very long tail. You will use this to thread through the center to create the indented 'squashed' pumpkin look.
— 2. Face Overlay :
Info :
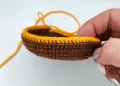
Return to the FLO of Round 12. Attach your brown yarn so the hook points downward toward the orange section.
Round 1 :
Work 72 sc into the FLO of Round 12 (72)
Round 2 :
Work 26 sc, ch 12, skip 8 stitches, 4 sc, ch 12, skip 8 stitches, and finish with 26 sc (80)
Round 3 :
Work 26 sc, then 12 sc across the chain, 4 sc, 12 sc across the second chain, and 26 sc (80)
Round 4 :
Work sc in every stitch around (80)
Round 5 :
Work 37 sc, ch 7, skip 8 stitches, and finish with 35 sc (79)
Round 6 :
Work 37 sc, then 7 sc across the chain, and finish with 35 sc (79)
Info :
Do not cut the yarn. We will now create the dripping effect around the edge.
Drip 1 :
ch 5, starting in the 2nd ch from hook work 4 hdc down the chain, sl st into the next stitch on the body, then work 2 sc.
Drip 2 :
ch 6, starting in the 2nd ch from hook work 5 hdc down the chain, sl st into the next stitch on the body, then work 2 sc.
Drips Continued :
Continue this process all the way around the pumpkin, varying your chain lengths between 3 and 7 to create a random dripping effect. Fasten off with a long sewing tail.
— 3. Pumpkin Stalk :
Info :
Use your light brown yarn for this piece.
Round 1 :
Create a MR and work 6 sc into it (6)
Round 2 :
Repeat a pattern of 1 sc and an inc 3 times (9)
Round 3 :
sc in each stitch around (9)
Round 4 :
Continue with another round of sc (9)
Round 5 :
Work one more round of sc (9)
Round 6 :
Complete the final 9 sc for this section (9)
Round 7 :
Work 4 sl st followed by 5 sc (9)
Round 8 :
sc in every stitch around (9)
Round 9 :
Work 4 sl st followed by 5 sc (9)
Round 10 :
sc in every stitch around (9)
Round 11 :
Repeat a pattern of 2 sc and an inc 3 times (12)
Round 12 :
Work 12 sc around (12)
Round 13 :
Repeat a pattern of 1 sc and an inc 6 times (18)
Round 14 :
Work 18 sc around (18)
Round 15 :
Repeat a pattern of 2 sc and an inc 6 times (24)
Round 16 :
Work 24 sc around (24)
Info :
Stuff the stalk with fiberfill and fasten off, leaving a long tail for sewing.
I really hope you enjoy bringing this little pumpkin to life as much as I did! It’s such a rewarding project because of those clever layers and the way the character really starts to peek through once you add the stalk. Whether you’re making a whole patch of them for your porch or gifting one to a fellow Halloween lover, they’re sure to be a hit. Don't forget to play around with the 'drip' lengths to give each one its own unique personality. Happy hooking, and may your October be filled with plenty of cozy yarn and spooky creativity! 🧶✨