๐Ÿงถ Beautiful โœจ Detailed ๐Ÿ’ Adorable

Spooky Kitty Amigurumi Pattern

Spooky Kitty Amigurumi Pattern
4.4โ˜…Rating
3-5 HoursTime Needed
2.9KMade This
โœ‚๏ธ

Intermediate Level

Ideal for those with basic crocheting experience, featuring slightly more advanced stitches and techniques to expand your skills.

โฑ๏ธ

Quick Craft

Fits nicely into a free afternoon โ€” 2 to 5 hours of focused, enjoyable crocheting.

๐ŸŽ„

Holiday Cheer

Festive fun for the season, bringing handmade magic to celebrations and creating new family traditions.

About This Spooky Kitty Amigurumi Pattern

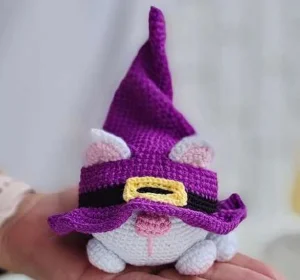
Spooky Kitty Amigurumi Pattern crochet pattern - detailed view

This pattern makes a wonderful handmade gift for any cat lover who also happens to be obsessed with the spooky season. It's a great way to use up those leftover purple and black scraps in your stash!

Why You'll Love This Spooky Kitty Amigurumi Pattern

I honestly can't get over how the hat fits over the earsโ€”it's such a clever little detail that makes the finished toy look so professional. Plus, the round body is just so satisfying to stuff and hold in your hands.

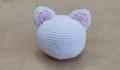
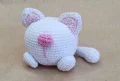
Spooky Kitty Amigurumi Pattern step 1 Spooky Kitty Amigurumi Pattern step 2 Spooky Kitty Amigurumi Pattern step 3 Spooky Kitty Amigurumi Pattern step 4

Switch Things Up

I have always felt that Halloween is the absolute best time for amigurumi. There is just so much room for playfulness and whimsical details! When I first came up with these little cats, I spent way too much time trying to figure out how to make the hat look like it actually belonged on the cat's head. That is when I realized that skipping stitches to create ear holes was the way to go. It is a simple trick, but it totally changes the silhouette of the finished toy.

I really recommend playing around with your yarn choices here. While the pattern calls for specific brands, these kitties look amazing in any sport weight cotton blend. I once made a version using a dark charcoal grey instead of black, and it gave the cat such a soft, vintage feel. If you are feeling extra festive, you could even add a little bit of sparkle thread to the purple yarn when making the hat. Just take your time with the assemblyโ€”pinning the ears correctly is the secret to making sure that hat fits perfectly every time!

Common Mistakes & How to Fix Them

โœ— When you're working on the hat holes in Round 33, make sure you don't twist your chains, or the ears won't sit flat when you try to pull them through later.โœ— If you stuff the paws too firmly, they'll stick out awkwardly; keep the fiberfill light so they sit flush against the bottom of the body.โœ— Pay close attention to the ear placement between Rounds 3 and 10โ€”if they are too wide apart, the hat holes won't line up correctly when you dress your cat.โœ— The buckle is made with slip stitches, which can get very tight; keep your tension loose so you can easily work back into those stitches without struggling.

Spooky Kitty Amigurumi Pattern

You're going to love making these little festive felines! They're the perfect mix of chubby, cute, and just a tiny bit witchy with their oversized hats. I've designed this so you can whip up a whole clowder of them in different colors for your mantel or to give away as treats to your favorite people this October.

Intermediate 3-5 Hours

Materials Needed for Spooky Kitty Amigurumi Pattern

โ€” Main Fabric

  • 01
    Sport weight yarn in purple for the witch hat
  • 02
    Sport weight yarn in black for the hat band and optional black kitty version
  • 03
    Sport weight yarn in white for the main cat body and tail
  • 04
    Small amount of yellow sport weight yarn for the hat buckle
  • 05
    Pink and light pink sport weight yarn for the nose and ear details

โ€” Tools Required

  • 01
    1.75 mm crochet hook
  • 02
    Polyester fiberfill stuffing
  • 03
    Sharp scissors
  • 04
    Yarn needle for sewing and embroidery
  • 05
    Straight pins for positioning pieces
  • 06
    Stitch markers to keep track of rounds

Progress Tracker

0% Complete

โ€” 1. Body :

Info :

Begin with your white yarn. Remember to stuff the body with fiberfill as you work through the rounds.

Round 1 :

8 sc in MR (8)

Round 2 :

8 x inc (16)

Round 3 :

(1 sc, inc) * 8 (24)

Round 4 :

1 sc, inc, (2 sc, inc) * 7, 1 sc (32)

Round 5 :

(3 sc, inc) * 8 (40)

Round 6 :

2 sc, inc, (4 sc, inc) * 7, 2 sc (48)

Round 7 :

(5 sc, inc) * 8 (56)

Round 8 :

3 sc, inc, (6 sc, inc) * 7, 3 sc (64)

Round 9-21 :

64 sc (64)

Round 22 :

3 sc, dec, (6 sc, dec) * 7, 3 sc (56)

Round 23 :

(5 sc, dec) * 8 (48)

Round 24 :

2 sc, dec, (4 sc, dec) * 7, 2 sc (40)

Round 25 :

(3 sc, dec) * 8 (32)

Round 26 :

1 sc, dec, (2 sc, dec) * 7, 1 sc (24)

Round 27 :

(1 sc, dec) * 8 (16)

Round 28 :

8 x dec (8)

Info :

Fasten off, sew the remaining gap closed, and weave in your tail.

โ€” 2. Ears โ€” Inner Part :

Info :

Make two of these using the light pink yarn. These are worked in rows.

Row 1 :

4 sc in MR, ch 1 and turn (4)

Row 2 :

4 x inc, ch 1 and turn (8)

Row 3 :

1 sc, inc, 1 sc, (hdc, dc, hdc in 1), (1 sc, inc) * 2 (13)

Colour Change :

Switch to white yarn.

Row 4 :

ch 1, turn, 2 sc, inc, 3 sc, (hdc, dc, hdc in 1), 2 sc, inc, 3 sc (17)

Info :

Fasten off and cut the yarn.

โ€” 3. Ears โ€” Outer Part :

Info :

Make two of these using white yarn. Work in rows.

Row 1 :

4 sc in MR, ch 1 and turn (4)

Row 2 :

4 x inc, ch 1 and turn (8)

Row 3 :

1 sc, inc, 1 sc, (hdc, dc, hdc in 1), (1 sc, inc) * 2, ch 1 and turn (13)

Row 4 :

2 sc, inc, 3 sc, (hdc, dc, hdc in 1), 2 sc, inc, 3 sc (17)

Info :

Keep the yarn attached for joining.

โ€” 4. Ear Assembly :

Info :

Place one pink part and one white part together and join them by working sl st around the edges. Leave a long tail for sewing.

โ€” 5. Nose :

Info :

Use pink yarn. Start with a foundation chain.

Round 1 :

ch 6, starting in second chain from hook: 4 sc, 3 sc in the final loop, turn to work on the other side: 3 sc, inc (12)

Round 2 :

12 sc (12)

Round 3 :

6 x dec (6)

Info :

Add a little bit of stuffing, sew the hole shut, and leave a long tail for assembly.

โ€” 6. Paws :

Info :

Make two. Start with light pink yarn.

Round 1 :

ch 4, starting in second chain from hook: 2 sc, 3 sc in the final loop, turn to work on the other side: 1 sc, inc (8)

Colour Change :

Switch to white yarn.

Round 2 :

inc, 1 sc, 3 x inc, 1 sc, 2 x inc (14)

Round 3 :

1 sc, inc, 1 sc, (1 sc, inc) * 3, 1 sc, (1 sc, inc) * 2 (20)

Round 4-5 :

20 sc (20)

Round 6 :

(3 sc, dec) * 4 (16)

Round 7 :

8 x dec (8)

Info :

Stuff lightly, fasten off, and leave a long tail for sewing.

โ€” 7. Tail :

Info :

Use white yarn and stuff lightly as you go.

Round 1 :

6 sc in MR (6)

Round 2 :

6 x inc (12)

Round 3 :

(1 sc, inc) * 6 (18)

Round 4-6 :

18 sc (18)

Round 7 :

(1 sc, dec) * 6 (12)

Round 8-10 :

12 sc (12)

Round 11 :

(2 sc, dec) * 3 (9)

Round 12-18 :

9 sc (9)

Info :

Flatten the end and close the opening by working 4 sc across both sides.

โ€” 8. Witch Hat :

Info :

Start with purple yarn.

Round 1 :

6 sc in MR (6)

Round 2 :

6 sc (6)

Round 3 :

6 x inc (12)

Round 4-7 :

12 sc (12)

Round 8 :

(3 sc, inc) * 3 (15)

Round 9-11 :

15 sc (15)

Round 12 :

(2 sc, inc) * 5 (20)

Round 13-14 :

20 sc (20)

Round 15 :

(1 sc, inc) * 10 (30)

Round 16 :

30 sc (30)

Round 17 :

inc, 29 sc (31)

Round 18 :

inc, 30 sc (32)

Round 19 :

32 sc (32)

Round 20 :

(3 sc, inc) * 8 (40)

Round 21 :

(3 sc, dec) * 8 (32)

Round 22 :

(inc, 15 sc) * 2 (34)

Round 23 :

(inc, 16 sc) * 2 (36)

Round 24 :

(inc, 17 sc) * 2 (38)

Round 25 :

(inc, 18 sc) * 2 (40)

Round 26 :

(inc, 19 sc) * 2 (42)

Round 27 :

(inc, 6 sc) * 6 (48)

Round 28 :

(inc, 7 sc) * 6 (54)

Round 29-30 :

54 sc (54)

Round 31 :

(inc, 8 sc) * 6 (60)

Round 32 :

(inc, 9 sc) * 6 (66)

Round 33 :

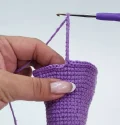
20 sc, ch 10, skip 10 stitches, 5 sc, ch 10, skip 10 stitches, 21 sc (66)

Round 34 :

66 sc (66)

Round 35 :

(inc, 10 sc) * 6 (72)

Round 36-37 :

72 sc (72)

Colour Change :

Switch to black yarn.

Round 38-41 :

72 sc (72)

Colour Change :

Switch back to purple yarn.

Round 42 :

In FLO: (2 sc, inc) * 24 (96)

Round 43 :

(3 sc, inc) * 24 (120)

Round 44-46 :

120 sc (120)

Info :

Fasten off and weave in all loose ends.

โ€” 9. Buckle :

Info :

Use yellow yarn.

Round 1 :

ch 22, sl st into first chain to form a ring. (7 sl st, 3 sl st in 1, 2 sl st, 3 sl st in 1) * 2

Info :

Fasten off and leave a tail for sewing.

Assembly Instructions

  • Position the ears on the body between Rounds 3 and 10, leaving about 5 stitches between them, and sew firmly.
  • Center the pink nose between Rounds 10 and 11 and stitch it into place.
  • Attach the paws symmetrically on the lower sides of the body between Rounds 21 and 22.
  • Sew the tail to the side of the body, positioning it between Rounds 19 and 22.
  • Stitch the yellow buckle onto the black band section of the hat.
  • Slide the finished hat onto the cat, carefully pulling the ears through the designated openings.

Important Notes

  • ๐Ÿ’กStuffing the body firmly is key to getting that perfect round shape that makes these cats so cute.
  • ๐Ÿ’กWhen working the hat, use a stitch marker to ensure you don't lose your place during the repeated increase rounds.
  • ๐Ÿ’กIf you want to make a black cat instead, just swap the white yarn for black and use light pink or white for the embroidery details.
  • ๐Ÿ’กThe ear holes in the hat are designed for the specific ear size in this patternโ€”check the fit as you go.
  • ๐Ÿ’กUse pins to hold the paws and tail in place before sewing to ensure everything is perfectly symmetrical.

I am so happy you decided to bring these little Halloween cats to life! There is nothing quite like the feeling of finishing that last stitch and seeing a character staring back at you. I hope you enjoyed every round, from the chubby body to those tiny paws. Don't forget to share your finished kitties with the communityโ€”seeing your color choices always makes my day. Keep those hooks moving and stay cozy! ๐Ÿงถ โœจ

You ask,

we answer.

FAQs

Can I use a different yarn weight for this pattern?

Absolutely! Just keep in mind that if you go up to a worsted weight yarn, your cat will be significantly larger, and you'll need to increase your hook size accordingly.

The hat seems too tight for the ears, what should I do?

Check your tension on the chains in Round 33. If those chains are too tight, the holes won't stretch enough. Try using a slightly larger hook just for that one round.

Do I have to sew the hat onto the cat?

It's optional! The hat should stay on fairly well because of the ear holes, but a few small stitches will keep it perfectly in place if it's for a child.

How do I make the tail stand up like in the photos?

The light stuffing helps, but you can also insert a small piece of pipe cleaner or wire if you want it to be fully posable.