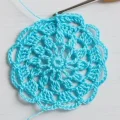
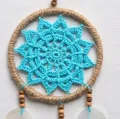
🧶 Beautiful ✨ Detailed 💝 Adorable

Star Mandala Dreamcatcher Pattern

Star Mandala Dreamcatcher Pattern
4.0★Rating
2-3 HoursTime Needed
2.7KMade This
✂️

Intermediate Level

Ideal for those with basic crocheting experience, featuring slightly more advanced stitches and techniques to expand your skills.

⏱️

Quick Craft

Fits nicely into a free afternoon — 2 to 5 hours of focused, enjoyable crocheting.

🏡

Cozy Accent

A warm touch for your space that transforms ordinary corners into inviting nooks filled with handmade charm.

About This Star Mandala Dreamcatcher Pattern
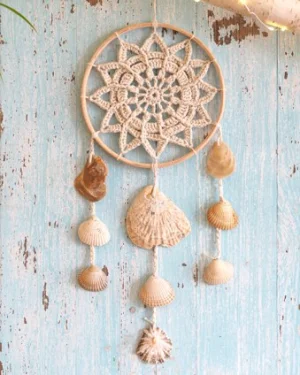
Star Mandala Dreamcatcher Pattern crochet pattern - detailed view

This project is the ultimate thoughtful gift—it looks intricate and expensive but only takes an afternoon. It’s a lovely way to use up those special beads you've been saving for the right piece.

Why You'll Love This Star Mandala Dreamcatcher Pattern

I honestly love how this pattern plays with dimension. Most mandalas are one-dimensional, but the way we work on the wrong side for a round creates a 3D effect that really makes the star points pop. It’s one of those projects where you can just zone out and enjoy the rhythm of the stitches.

Star Mandala Dreamcatcher Pattern step 1 Star Mandala Dreamcatcher Pattern step 2 Star Mandala Dreamcatcher Pattern step 3 Star Mandala Dreamcatcher Pattern step 4

Switch Things Up

I’ve always found that dreamcatchers bring such a peaceful energy to a room, but finding the right crochet pattern that doesn't look too 'cluttered' can be a challenge. That’s why I fell in love with this star mandala. It’s got that perfect balance of geometric precision and organic flow.

One thing I discovered while making my first few versions is how much the yarn choice changes the vibe. If you go with a crisp white cotton, it looks very classic and 'shabby chic.' But try it with a rustic linen or a variegated thread, and suddenly it feels like something you’d find in a boutique in Bali.

Don’t be intimidated by the post stitches or the part where we work on the wrong side. It’s actually quite clever—it creates a 3D effect that you just can't get with standard flat rounds. When you get to the decorating stage, don't feel like you have to follow the 'rules.' I once made one using tiny pieces of driftwood I found at the beach instead of feathers, and it’s still my favorite piece hanging in my hallway. Just let your intuition guide you as you tie on those final flourishes!

Common Mistakes & How to Fix Them

✗ In Round 7, you have to turn your work to the wrong side; if you skip this, the texture won't pop the way it's supposed to on the finished piece.✗ Choosing a hoop that is too small for your finished mandala will cause the center to bunch up rather than stretching out into that crisp star shape.✗ When working the fptr in Round 6, make sure you're reaching back to the cluster in Round 3 or the petal won't have the right depth.✗ If your slip stitches are too tight when joining the mandala to the hoop, the edges might pucker—keep your tension loose and even during assembly.
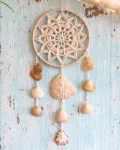
Star Mandala Dreamcatcher Pattern

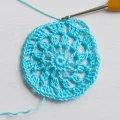
There’s something so meditative about working on a mandala, isn't there? This star-shaped beauty is one of my favorites because it isn't just flat—it has this wonderful double-sided texture that makes it look professional from every angle. You'll love how quickly it comes together, and once you've finished the crochet part, the real fun begins with adding your own personal touches like sea shells or wooden beads.

Intermediate 2-3 Hours

Materials Needed for Star Mandala Dreamcatcher Pattern

— Main Fabric

  • 01
    Scheepjes Maxi Sweet Treat (25g/140m) for a 10cm hoop version
  • 02
    Scheepjes Linnen Soft or Catona (50g/135m-125m) for a 15cm hoop version
  • 03
    Huisje van katoen Barbante M (250g/100m) for a 20cm hoop version
  • 04
    Scrap yarn in a matching or contrasting color for mounting to the hoop
  • 05
    Selection of decorative ribbons or fabric strips for the tails
  • 06
    Assorted wooden or gemstone beads and sea shells for embellishment
  • 07
    A few craft feathers to hang from the bottom

— Tools Required

  • 01
    Crochet hook sized 1.75mm to 4mm depending on your chosen yarn weight
  • 02
    Wooden or wire craft ring (10cm, 15cm, or 20cm diameter)
  • 03
    Sharp scissors for trimming yarn and ribbons
  • 04
    Tapestry needle for weaving in your ends
  • 05
    Spray bottle with water for blocking the finished mandala
  • 06
    Blocking board and rust-proof pins

Progress Tracker

0% Complete

— 1. Mandala Center :

Info :

You can start your mandala using either a magic ring or a chain ring as described in Round 1.

Round 1 :

Begin by making a ch 6 and joining with a sl st to create a ring. Work a ch 1 (this doesn't count as a stitch), then place 12 sc into the center of the ring. Finish by joining with a sl st to the first ch 1.

Round 2 :

Perform a sl st into the first sc, then ch 5 (this counts as your first dc plus a ch 2). Work [1 dc, ch 2] into every sc around. Join with a sl st into the 3rd ch of your starting ch 5.

Round 3 :

Sl st into the first ch 2-sp, then ch 2 and work a 2dc cl (together these count as your first 3dc cl). Ch 3, then work [3dc cl, ch 3] into every ch 2-sp around. Join with a sl st to the top of the very first cluster.

Round 4 :

Sl st into the first ch 3-sp and ch 3 (counts as a dc). Work 3 dc into that same space, then skip over the next cluster. Repeat the pattern of [ch 1, 4 dc in the next ch 3-sp, skip the cluster] 11 more times. To finish the round, join with a hdc into the 3rd ch of your initial ch 3.

Round 5 :

Make a ch 1 (this counts as your first sc) and then ch 6. Work [1 sc in the next ch 1-sp, ch 6] 11 times. Join with a sl st to the very first ch 1.

Round 6 :

Make a ch 1 (not counted as a stitch), then work 5 hdc into the ch 6-sp. Next, work a fptr around the 3dc cl from Round 3. Repeat the pattern of [5 hdc in the next space, fptr around the next R3 cluster] 11 more times. Join the round with a sl st to the first hdc.

Round 7 :

Flip your work to the Wrong Side. Sl st into the gap between the fptr and the first hdc. Ch 8, then sl st into the gap between the 5th hdc and the fptr. Work a fptr around the 3dc cl from Round 3, then sl st between the fptr and the next hdc. Repeat this sequence 11 times. Do not join; simply turn your work back to the Right Side.

Round 8 :

Working on the Right Side again, ch 1 (not counted as a stitch). In each ch 8-sp, work [5 hdc, ch 2, 5 hdc]. After each shell, work a fphdc around the fptr from Round 6. Repeat this 11 times and join with a sl st to the first hdc to finish.

Assembly Instructions

  • Pin your finished mandala onto a blocking board, stretching the points out from the center, and mist it with water. Let it dry completely to set the star shape.
  • If you want to hide a wire ring, wrap it tightly with matching yarn or twine before you begin mounting the crochet piece.
  • Cut several lengths of yarn about 20cm long. Fold one in half to create a loop, slide the loop under a ch-2 point of the mandala, and pull the tails through to secure it.
  • Position the mandala in the center of your hoop and tie it at the top, bottom, and both sides first to ensure it stays centered.
  • Continue tying every star point to the hoop, keeping the tension even so the mandala is stretched tight like a drum.
  • Weave in all remaining yarn tails on the back of the mandala using a tapestry needle.
  • Attach your ribbons, beads, and feathers to the bottom of the hoop by looping them through or tying them with small knots.

Important Notes

  • 💡The mandala must be smaller than your hoop diameter to achieve the proper 'stretched' look once mounted.
  • 💡Pay close attention to Round 7; it is the only round worked on the wrong side of the project.
  • 💡When working post stitches, ensure you are wrapping the hook around the post of the stitch from the indicated previous round.
  • 💡Using a hdc to join Round 4 is a specific technique to position your hook in the center of the space for the next round.
  • 💡If you prefer a more rustic look, use a wooden embroidery hoop instead of a metal wire ring.

I hope you had as much fun making this star mandala as I did! There is something so satisfying about seeing those points stretch out perfectly once it's mounted in the hoop. Whether you're hanging this in a nursery, a bedroom, or giving it to a friend, it's a piece of handmade art that carries so much love in every stitch. Don't forget to experiment with different colors and textures for your tassels and ribbons—that's where your unique style really gets to shine. Happy crafting, and may your dreams always be sweet! 🧶✨

You ask,

we answer.

FAQs

What happens if my mandala is the same size as my hoop?

You really want the mandala to be a bit smaller than the hoop so it stays taut. If they are the same size, the crochet fabric will sag rather than showing off that beautiful star shape.

Can I use a thicker yarn like T-shirt yarn?

Definitely! Just remember to size up your hook and your hoop accordingly. A thicker yarn will result in a much larger wall hanging, which can look stunning as a statement piece.

I'm struggling with Round 7, why do we turn the work?

Turning to the wrong side for Round 7 is the secret to this pattern's 3D texture. It allows the post stitches to pop out on the opposite side, making the mandala look great from both front and back.

Do I have to block the mandala before putting it in the ring?

It’s highly recommended. Spray blocking helps open up the stitches and defines the star points, making it much easier to center and tie onto your hoop evenly.