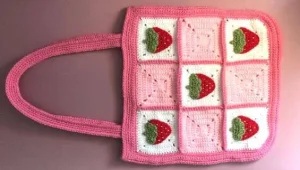
Get ready to carry a little bit of sunshine and sweetness wherever you go! This darling duo features a spacious, sturdy tote and a matching mini pouch, both adorned with the most charming crochet strawberries. You'll love the mix of classic granny squares and playful appliques that make this set feel like a fresh garden stroll. It is the perfect project for anyone looking to add a touch of cottagecore whimsy to their accessory collection while practicing some really satisfying joining techniques.
Progress Tracker
0% Complete
— 1. The Classic Granny Square :
Info :
For the Pouch, make 2 squares. For the Tote Bag, make 18 squares total (9 in dark pink, 4 in light pink, and 5 in white).
Round 1 :
Start with a MR. ch 3, 3 dc, ch 2, 4 dc, ch 2, 4 dc, ch 2, 4 dc, ch 2, then sc into the top of your starting ch 3 to close (16 st & 4 ch-2 spaces).
Round 2 :
ch 2, dc in the ch 3 space from the previous round, dc into the sc st, 3 dc, 2 dc in the corner ch-2 space, ch 2, 2 dc in the same corner. Continue around the square: 4 dc, (2 dc, ch 2, 2 dc) in corner, 4 dc, (2 dc, ch 2, 2 dc) in corner, 4 dc, 2 dc in the last corner, ch 2, sc into the starting ch-2 space (32 st & 4 ch-2 spaces).
Round 3 :
ch 2, dc in the ch-2 space, dc into the sc st, 7 dc, 2 dc in the corner, ch 2, 2 dc in the same corner. Continue around: 8 dc, (2 dc, ch 2, 2 dc) in corner, 8 dc, (2 dc, ch 2, 2 dc) in corner, 8 dc, 2 dc in last corner, ch 2, sc into the starting ch-2 space (48 st & 4 ch-2 spaces).
Round 4 :
ch 2, dc in the ch-2 space, dc into the sc st, 11 dc, 2 dc in the corner, ch 2, 2 dc in the same corner. Continue around: 12 dc, (2 dc, ch 2, 2 dc) in corner, 12 dc, (2 dc, ch 2, 2 dc) in corner, 12 dc, 2 dc in last corner, ch 2, sl st into the starting ch-2 space (64 st & 4 ch-2 spaces).
Info :
Fasten off and leave a 5-10 inch tail for finishing.
— 2. Strawberry Applique Base :
Info :
For the Pouch, make 1 base. For the Tote Bag, make 5 bases using red yarn.
Row 2 :
Working into the 2nd ch from your hook, sc in each of the next 8 ch (8 sc).
Row 3 :
ch 1, turn, sc in each of the 8 st (8 sc).
Row 4 :
ch 1, turn, dec over the first two st, sc in the next 4 st, dec over the final two st (6 sc).
Row 5 :
ch 1, turn, sc in every st across (6 sc).
Row 6 :
ch 1, turn, dec over the first two st, sc in the next 2 st, dec over the final two st (4 sc).
Row 7 :
ch 1, turn, sc in every st across (4 sc).
Row 8 :
ch 1, turn, dec twice across the row (2 sc).
Row 9 :
ch 1, turn, dec once (1 sc).
Border :
sc evenly around the entire strawberry shape, making sure to work 2 sc in the top corners and the bottom point to keep the shape crisp.
— 3. Strawberry Stem :
Info :
Make the same number of stems as you did bases using green yarn.
Row 2 :
Starting in the 3rd ch from the hook, * (1 dc, 1 tr, 1 dc) all in the same ch, then sc in the next ch. * Repeat from * to * until you reach the end of the row (4 leaves and 3 sc).
Underside :
Rotate the piece to work along the bottom of the foundation ch. sc in the next 4 ch, ch 4, then starting in the 2nd ch from hook, sl st 3 back down the ch. sc in the remaining 4 ch and finish with a sl st (8 sc total on this side).
— 4. Drawstring Pouch Construction :
Info :
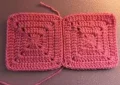
After sewing your applique to one square, place a plain square behind it with wrong sides touching.
Step 1 :
Join your yarn in the top left corner ch-2 space of both squares. sc through both layers down the left side, across the bottom, and up the right side. Work 2 sc in the bottom corner ch-2 spaces to prevent gaps. Stop at the top right corner.
Round 2 :
Now work around the top opening only. ch 2, dc in the top right corner space of the front square. dc in every st across the front top edge, then continue dc in every st across the back top edge. Include a dc in each of the corner spaces (34 st).
Round 3 :
ch 2, hdc in the same st as your sl st. * ch 2, skip 1 st, hdc in the next st. * Repeat from * to * around the top to create eyelets for the strings. sl st to close (18 hdc and 17 ch-2 spaces).
Round 4 :
ch 2, dc in the same st as your sl st. dc in every hdc st and every ch-2 space around. sl st to finish (35 st).
— 5. Pouch Drawstrings :
Step 1 :
Using your chosen string color, make a slip knot and ch 80. Fasten off and repeat to make a second identical string.
Step 2 :
Weave the first string in and out of the eyelet spaces, starting from the left side, going all the way around, and ending back at the left.
Step 3 :
Weave the second string in the same manner, but start and end on the right side of the pouch.
— 6. Tote Bag - Joining Panels :
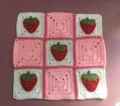
Front Panel :
Arrange your 9 squares (4 light pink, 5 white with strawberries). Join them vertically using sc through both layers with dark pink yarn, then repeat for the horizontal joins.
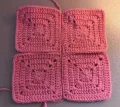
Back Panel :
Arrange your 9 dark pink squares. Join them using a flat seam: sew through the front loop of the square closest to you and the back loop of the square behind it for a smooth finish.
— 7. Tote Bag - Edging & Bottom :
Panel Border :
sc around the entire perimeter of each finished panel. Work 1 sc in side spaces and 2 sc in corner spaces. You should have 56 st per side.
Top Extension :
At the top edge of each panel, work 3 rows of 54 sc to create a sturdy top border.
Side/Bottom Strip :
ch 169 with dark pink yarn.
Row 2 :
sc in the 2nd ch from hook and in each ch across (168 sc).
Row 3 :
ch 1, turn, sc in each st across (168 sc).
Row 4 :
ch 1, turn, sc in each st across (168 sc).
Row 5 :
ch 1, turn, sc in each st across (168 sc).
Row 6 :
ch 1, turn, sc in each st across (168 sc).
Row 7 :
ch 1, turn, sc in each st across (168 sc).
— 8. Tote Bag - Handles :
Round 1 :
ch 121 using dark pink yarn.
Round 2 :
sc in the 2nd ch from hook and the next 118 ch. Work 3 sc in the final ch. Turn to work along the bottom of the ch: sc in the next 118 ch, then 3 sc in the last ch. sl st to close (243 sc).
Round 3 :
sc in 118 st. inc in next st, 3 sc in next st, inc in next st. sc in 119 st. inc in next st, 3 sc in next st, inc in next st. sl st to close (251 sc).
I really hope you have as much fun making this strawberry set as I did! There is just something about that pop of red against the pink and white that makes my heart skip a beat. Once you finish, don't forget to take your new tote out for a spin—it is the best conversation starter at the market. Whether you keep the set together or gift the pouch to a friend, I know these berries will bring a huge smile to anyone who sees them. Happy hooking, and may your days be as sweet as a fresh summer strawberry! 🧶🍓✨