About This Stripy Shell Stitches Crochet Hat Pattern
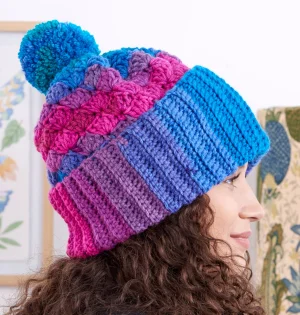
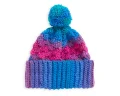
This beanie is a fantastic choice for gifting because the self-striping yarn does all the hard work for you, creating a high-end look with very little effort.
Ideal for those with basic crocheting experience, featuring slightly more advanced stitches and techniques to expand your skills.
Fits nicely into a free afternoon — 2 to 5 hours of focused, enjoyable crocheting.
A warm touch for your space that transforms ordinary corners into inviting nooks filled with handmade charm.
This beanie is a fantastic choice for gifting because the self-striping yarn does all the hard work for you, creating a high-end look with very little effort.
I honestly love how this pattern turns a simple ball of striped yarn into something that looks so intricate. The shell stitches create such a thick, squishy fabric that’s incredibly warm, and the way the ribbing folds up gives it that classic boutique feel. It’s my go-to when I want a project that’s relaxing but doesn't look boring!
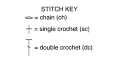
I still remember the first time I picked up a cake of self-striping yarn. I was so worried about how the transitions would look in a textured stitch, but this hat totally changed my mind. There’s something so meditative about working those five-double-crochet shells; once you get into the rhythm, the hat practically grows itself while you’re catching up on your favorite podcast. The way the colors shift through the shells creates this gorgeous, scalloped look that you just don't get with plain stripes.
One thing I’ve learned from making a few of these is that the ribbing is the secret to a perfect fit. Don't be afraid to pull it a little snug when you're measuring it against your head! You want that brim to stay put, especially once you add the weight of that fluffy pompom on top. Speaking of the pompom, I always go a little overboard and wrap it more than the pattern says—there is no such thing as a pompom that is too big or too fluffy in my book. It’s the perfect finishing touch for a project that feels much more complicated than it actually is. Happy hooking!
There is something so satisfying about watching a colorful cake of yarn transform into a beautifully textured accessory. This hat uses the classic shell stitch to create a scalloped, rhythmic design that looks much more intricate than it actually is. You'll love how the self-striping yarn does all the colorwork for you, leaving you free to enjoy the flow of the stitches. It is the perfect cozy project for a chilly evening when you want to create something stylish and warm.
Start by making a foundation ch of 21.
(RS). Work 1 sc into the 2nd ch from your hook and in every ch across to the end. Turn. (20 sc).
ch 1. Work 1 scbl into every st across the row. Turn.
Keep repeating Row 2 until your ribbed band measures about 19.5 inches when slightly stretched. Make sure you finish on a RS row and do not cut your yarn.
With the WS facing you, align the foundation ch with your last row. Work 1 sc through both layers for every st to join the ribbing into a circle. Do not fasten off.
Turn the ribbing sideways so you are working along the long edge. Work 72 sc evenly around the entire circumference. Join with a sl st to the first sc.
Keep in mind that your starting ch 3 will always count as a dc throughout the pattern.
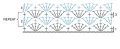
ch 1 and work 1 sc into the very first st. *Skip the next 2 sc, then place 5 dc into the following sc. Skip another 2 sc and work 1 sc into the next st. Keep repeating from * until you have 5 sc left. Skip 2 sc, work 5 dc into the next st, skip the last 2 sc, and sl st into your first sc to close.
ch 3 (counts as dc), then work 2 dc into the same spot. *Skip over 2 dc, place 1 sc in the next dc, skip 2 dc, and then work 5 dc into the next sc. Repeat that sequence from * until you reach the last 5 dc. Skip 2 dc, work 1 sc into the next dc, skip 2 dc, then put 2 dc into that very first sc where you started. sl st into the top of your ch 3 to finish the round.
ch 1 and work 1 sc into the same space as your join. *Skip the next 2 dc, work 5 dc into the following sc, skip 2 dc, and work 1 sc into the next dc. Keep going from * until you reach the final sc and 2 dc. Skip those 2 dc, work 5 dc into the next sc, skip the last 2 dc, and sl st into the first sc.
Continue repeating Round 2 and Round 3 for the shell pattern until the hat measures 6.5 inches from the first sc round. Ensure you finish on a Round 2 repeat before moving to the shaping.
ch 1 and sc into the same space. *Skip 2 dc, work 3 dc into the next sc, skip 2 dc, and sc into the next dc. Repeat from * until you reach the last sc and 2 dc. Skip 2 dc, work 3 dc into the next sc, skip 2 dc, and sl st into the first sc. (50 sts).
ch 3 and work 1 dc into the same spot as the join. *Skip 1 dc, place 1 sc in the next dc, skip 1 dc, then work 3 dc into the next sc. Repeat from * until you have 3 dc left. Skip 1 dc, work 1 sc in the next dc, skip 1 dc, and put 1 dc into the first sc. sl st into the top of the ch 3.
ch 1 and sc into the same space. *Skip the next dc, work 1 hdc into the next sc, skip the following dc, and work 1 sc into the next dc. Repeat from * until you reach the last sc and dc. Skip 1 dc, work 1 hdc into that next sc, skip the last dc, and sl st into the first sc. (28 sts).
ch 1 and work 1 sc into every st around the circle. Join with a sl st to the first sc. (28 sts).
Fasten off your yarn, leaving a long tail for closing. Use your yarn needle to weave the tail through the front loops of the remaining 28 stitches. Pull the yarn tight to cinch the top closed and secure it firmly on the inside.
Fold the ribbed brim upward toward the RS of the hat.
To make the pompom, wrap your yarn around three fingers about 100 times. Tie it very tightly around the center with a long strand, leaving enough yarn to attach it later. Snip the loops on both ends and give it a good trim until it is perfectly round and fluffy. Finally, sew it firmly to the top of your hat.
There is nothing quite like pulling a fresh, handmade hat over your ears on a chilly morning. This pattern is designed to give you that cozy, "I made this" feeling with every single stitch. I hope you enjoy the rhythmic flow of the shells and the way the colors play together as much as I do. Once you finish that final sc round and attach your big, fluffy pompom, you'll have a gorgeous accessory that’s ready for any adventure. Don't forget to show off your beautiful work—you've earned those compliments! 🧶✨
Absolutely! While the pattern is designed to showcase self-striping yarn, a solid color will highlight the beautiful scalloped texture of the shell stitches even more clearly.
The easiest way to adjust the size is to change your ribbing length. Just make sure the final number of sc you work into the edge is a multiple of 6 so the shell pattern fits perfectly.
No problem! This pattern includes instructions for making a pompom using just your fingers, which creates a lovely, rustic look that fits the style of the hat perfectly.
If your shells aren't holding their shape, your tension might be a little too loose. Try dropping down to a 4.5mm hook to create a firmer, more structured fabric.
