About This Sunflower Garden Gnome Amigurumi Pattern
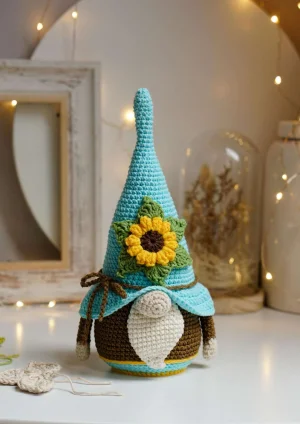
Whether he's acting as a cheerful doorstop or just brightening up a sunny windowsill, this gnome brings a touch of handmade warmth to any corner of your home.
Ideal for those with basic crocheting experience, featuring slightly more advanced stitches and techniques to expand your skills.
Takes 5-7 hours, making it an enjoyable project to finish over a couple of days.
Playful characters full of personality, designed to spark imagination and become cherished playtime favorites.
Whether he's acting as a cheerful doorstop or just brightening up a sunny windowsill, this gnome brings a touch of handmade warmth to any corner of your home.
I honestly couldn't stop smiling while making the hat brim—the way it ruffles out just right is so satisfying. Plus, using the 'X' stitch technique gives him such a clean, professional finish that makes the colors really pop.
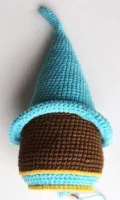
I’ve always felt that gnomes are the unsung heroes of the craft world. They have so much personality packed into such a simple shape! When I first saw this sunflower design, I knew it would be the perfect project for a lazy Sunday afternoon. The way the blue of the hat contrasts with the earthy brown of the body really reminds me of a clear sky over a summer garden.
One thing I discovered while making my own version is how much the 'X' stitch really changes the look. If you haven't tried yarning under yet, this is the perfect pattern to practice on. It makes the fabric so much firmer, which is great because gnomes can be a bit top-heavy with those tall hats! If you find yours leaning a bit, definitely try the 'lifehack' in the pattern and add some weight to the base. I used a small pouch of clean cat litter for mine, and he stands perfectly straight now. I also think he'd look darling in a deep forest green or even a soft lavender if you want to change up the seasonal vibe! It's those little personal touches that make handmade items so special, don't you think? Adding a bit of weight really gives him that premium, high-quality feel when you pick him up.
This cheerful little fellow is exactly what your bookshelf or tiered tray has been missing! Between his oversized floppy hat and that bright sunflower bloom, he's a total joy to stitch up. I've designed him with a sturdy base so he stands tall on his own, making him a perfect little guardian for your indoor plants or a sweet gift for a sun-loving friend. You'll love seeing his personality emerge with every round.
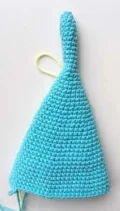
Work in continuous rounds using Blue yarn. Use a marker to track the start of each round.
Create a magic ring and work 6sc into it, then pull tight (6)
(1inc, 1sc) repeat 3 times (9)
1sc in every st around (9)
(1sc, 1inc, 1sc) repeat 3 times (12)
1sc in every st around (12)
(3sc, 1inc) repeat 3 times (15)
1sc in every st around (15)
(2sc, 1inc, 2sc) repeat 3 times (18)
1sc in every st around (18)
(5sc, 1inc) repeat 3 times (21)
1sc in every st around (21)
(3sc, 1inc, 3sc) repeat 3 times (24)
1sc in every st around (24)
(7sc, 1inc) repeat 3 times (27)
1sc in every st around (27)
(4sc, 1inc, 4sc) repeat 3 times (30)
1sc in every st around (30)
(9sc, 1inc) repeat 3 times (33)
1sc in every st around (33)
(5sc, 1inc, 5sc) repeat 3 times (36)
1sc in every st around (36)
(11sc, 1inc) repeat 3 times (39)
1sc in every st around (39)
(6sc, 1inc, 6sc) repeat 3 times (42)
1sc in every st around (42)
(13sc, 1inc) repeat 3 times (45)
1sc in every st around (45)
(7sc, 1inc, 7sc) repeat 3 times (48)
1sc in every st around (48)
(15sc, 1inc) repeat 3 times (51)
1sc in every st around (51)
(8sc, 1inc, 8sc) repeat 3 times (54)
(26sc, 1inc) repeat 2 times (56)
1sc in every st around (56)
Ch2. In FLO only: (6dc, 2dc in next st) x3, 1hdc, 5sc, 1inc, 5sc, 1hdc, (2dc in next st, 6dc) x3, 1dc. Sl st to 2nd ch (64)
Ch2. 25dc, 1hdc, 12sc, 1hdc, 24dc. Sl st to 2nd ch (64)
Ch2. (7dc, 2dc in next st) x3, 1hdc, 6sc, 1inc, 6sc, 1hdc, (2dc in next st, 7dc) x3, 1dc. Sl st to 2nd ch (72)
1sc in each of the 72 sts. Sl st to first st of round and fasten off blue (72)
Join Brown yarn. Work into the BLO of Round 46: 1sc in every st around (56)
11sc, 5sc in BLO (arm placement), 8sc, 8sc in BLO (beard placement), 8sc, 5sc in BLO (arm placement), 11sc (56)
1sc in every st around (56)
(13sc, 1inc) repeat 4 times (60)
1sc in every st around (60)
(7sc, 1inc, 7sc) repeat 4 times (64)
1sc in every st around. Change to Blue in the final st of Round 15 and cut Brown (64)
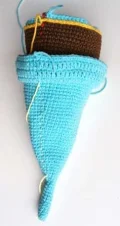
Using Blue: (3sc in BLO, 1sc2tog in BLO, 3sc in BLO) repeat 8 times (56)
1sc in every st around. Leave the blue loop on a holder for later (56)
Using Yellow yarn, work surface slip stitches into the stitches of Round 16. Fasten off yellow.
Pick up the blue loop: (5sc, 1sc2tog) repeat 8 times. Begin stuffing here (48)
1sc in every st around (48)
1sc in every BLO around (48)
(2sc, 1sc2tog, 2sc) repeat 8 times (40)
(3sc, 1sc2tog) repeat 8 times (32)
(1sc, 1sc2tog, 1sc) repeat 8 times (24)
(1sc, 1sc2tog) repeat 8 times. Finish stuffing firmly (16)
1sc2tog 8 times. Fasten off and sew the small hole closed (8)
Join Yellow to the FLO of Round 21 of the Body. Work 1sc in every st around. Fasten off (48)
Make two. Work in continuous rounds.
With Wheat: 5sc in a magic ring and pull tight (5)
1inc in every st around (10)
1sc in every st around. Change to Brown in the last st of Round 5 (10)
With Brown: 1sc in every st around (10)
1sc in every BLO around (10)
1sc in every st around. Fasten off with a long tail for sewing (10)
With Wheat: 6sc in a magic ring (6)
1inc in every st around (12)
(1sc, 1inc) repeat 6 times (18)
1sc in every st around (18)
(1sc, 1sc2tog) repeat 6 times. Fasten off with a long tail and stuff lightly (12)
Use Off-White yarn. Start with a ch2.
3sc in the 2nd ch from hook. Work in continuous rounds from here (3)
1inc in each of the 3 sts (6)
1inc in next 2 sts, 1sc, 1inc, 1sc (9)
1sc, 1inc in next 2 sts, 5sc, 1inc (12)
2sc, 1inc in next 2 sts, 5sc, 1inc, 2sc, 1sc (15)
3sc, 1inc in next 2 sts, 9sc, 1inc (18)
4sc, 1inc in next 2 sts, 8sc, 1inc, 3sc (21)
5sc, 1inc in next 2 sts, 14sc (23)
6sc, 1inc in next 2 sts, 14sc, 1inc (26)
1sc in every st around (26)
8sc, 1sc2tog, 11sc, 1sc2tog, 3sc (24)
7sc, 1sc2tog, 10sc, 1sc2tog, 3sc (22)
6sc, 1sc2tog, 9sc, 1sc2tog, 3sc (20)
1sc in every st around. Fasten off with a long tail (20)
With Brown: in a magic ring, ch2, 11dc. Sl st to the 2nd ch of the start and fasten off (12)
Join Yellow: (Ch3, 4dc in next st, drop loop, insert hook in 3rd ch and pull loop through to make a popcorn petal, ch2) repeat 12 times. Sl st to finish and fasten off.
Join Green: Ch1, *(in next ch-2 space: 1hdc, 2dc, 1tr, ch4, sl st in previous tr, 1tr, 2dc, 1hdc), 1sc in next ch-2 space* repeat 6 times to make 6 leaves. Fasten off.
I hope you had as much fun bringing this sunny little gnome to life as I did! There’s something so rewarding about seeing that tall hat finally take shape and adding the finishing touch of the sunflower. He’s sure to bring a bit of garden magic to wherever he ends up. Don't forget to give his beard a little fluff once he's all put together! Happy crafting, and I can't wait to see your finished gnomes gracing your homes. 🧶✨
Absolutely! Just keep in mind he'll turn out quite a bit larger, so you'll need to increase your hook size to about 3.5mm and use more stuffing.
A little bit of curl is fine, but if it's excessive, try blocking the brim with a bit of steam or check that your double crochet stitches aren't too tight.
The secret is keeping the tension even while twisting. If it kinks up too much, untwist a little before folding it in half to let it spiral naturally.
It’s a technique where you yarn under instead of over for the first part of your single crochet. It creates a denser fabric that's perfect for amigurumi.
