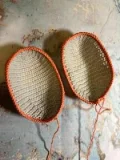
🧢 Beautiful ✨ Detailed πŸ’ Adorable

Surprise Carrot Bunny Amigurumi Pattern

Surprise Carrot Bunny Amigurumi Pattern
4.3β˜…Rating
5-7 HoursTime Needed
3.0KMade This
βœ‚οΈ

Intermediate Level

Ideal for those with basic crocheting experience, featuring slightly more advanced stitches and techniques to expand your skills.

⏱️

Weekend Treat

Takes 5-7 hours, making it an enjoyable project to finish over a couple of days.

🐰

Whimsical Buddy

Playful characters full of personality, designed to spark imagination and become cherished playtime favorites.

About This Surprise Carrot Bunny Amigurumi Pattern

Surprise Carrot Bunny Amigurumi Pattern crochet pattern - detailed view

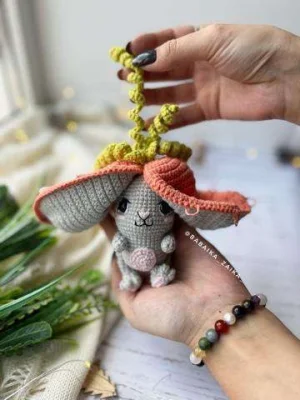
This clever peek-a-boo toy is the ultimate gift for little ones or a whimsical addition to your spring decor. It’s a fun conversation piece that showcases your skills in a truly unique way.

Why You'll Love This Surprise Carrot Bunny Amigurumi Pattern

I absolutely adore how this bunny surprises everyone! As a crafter, there is nothing more satisfying than finishing a piece that has a secret 'wow' factor. I loved working on the curly green tops and seeing the carrot shell snap together with the buttonsβ€”it feels so much more interactive than a standard stuffed animal.

Surprise Carrot Bunny Amigurumi Pattern step 1 Surprise Carrot Bunny Amigurumi Pattern step 2 Surprise Carrot Bunny Amigurumi Pattern step 3 Surprise Carrot Bunny Amigurumi Pattern step 4

Switch Things Up

There's something so special about toys that have a little secret, isn't there? When I first saw this design, I knew it was going to be one of those 'wow' projects that everyone wants to pick up and play with. It's not just a bunny; it’s a tiny piece of magic that tucks away into its own little carrot home. I spent a rainy Saturday afternoon working on the ears, and honestly, seeing the carrot take shape as I joined the orange and gray pieces was the highlight of my week.

One tip I really want to share from my own experience: take your time with the thread mounting for the arms and legs. It’s what gives this little guy his personality! If you pull the thread just right, he can sit up or wave, making him feel so much more alive than if the limbs were just sewn on statically. Also, don't be afraid to get creative with the embroidery. Those little black stripes on the carrot and the tiny pink nose are where the character really comes out. I hope you enjoy making this as much as I didβ€”it’s the perfect project for when you want to create something truly unique and heartwarming.

Common Mistakes & How to Fix Them

βœ— If the thread mounting for the arms and legs is too loose, the bunny won't be able to sit up properly or hold its pose.βœ— Misaligning the two layers of the ears during the joining round can cause the carrot shell to twist and not close evenly.βœ— Placing the safety eyes even one round too high or too low will drastically change the bunny's expression and make it look unbalanced.βœ— Overstuffing the very top of the legs and arms makes them stick out stiffly rather than hanging naturally against the body.

Surprise Carrot Bunny Amigurumi Pattern

Get ready to create something truly magical with this clever peek-a-boo design! You'll be crafting a sweet little bunny that fits perfectly inside a carrot shell made from its own ears. It is such a rewarding project because you get to see a simple vegetable transform into a cuddly friend right before your eyes. You will love how the textured stitches and bright colors come together to make a toy that is both a puzzle and a plushie.

Intermediate 5-7 Hours

Materials Needed for Surprise Carrot Bunny Amigurumi Pattern

β€” Main Fabric

  • 01
    Sport weight 4-ply yarn (YarnArt Jeans or similar)
  • 02
    Orange yarn for the carrot exterior
  • 03
    Light Green yarn for the leafy tops
  • 04
    Gray yarn for the bunny's body and inner ears
  • 05
    Black yarn for facial details and carrot stripes
  • 06
    White yarn for eye highlights
  • 07
    Pink yarn for the tummy, tail, and nose

β€” Tools Required

  • 01
    1.75 mm crochet hook
  • 02
    5 small buttons for the carrot closure
  • 03
    Sewing pins for positioning pieces
  • 04
    10 mm safety eyes
  • 05
    Polyester fiberfill stuffing
  • 06
    Darning needle for assembly and embroidery

Progress Tracker

0% Complete

β€” 1. Body & Head :

Round 1 :

Using Gray yarn, work 6 sc into a MR (6)

Round 2 :

6 x inc (12)

Round 3 :

(1 sc, inc) * 6 (18)

Round 4 :

(2 sc, inc) * 6 (24)

Round 5 :

(3 sc, inc) * 6 (30)

Round 6 :

(4 sc, inc) * 6 (36)

Round 7 :

(5 sc, inc) * 6 (42)

Round 8-10 :

42 sc (42)

Round 11 :

(2 sc, dec) * 6, then 18 sc (36)

Round 12-16 :

36 sc (36)

Info :

Begin stuffing the body firmly with fiberfill as you continue.

Round 17 :

(1 sc, inc) * 18 (54)

Round 18-21 :

54 sc (54)

Round 22 :

(7 sc, dec) * 6 (48)

Round 23 :

(6 sc, dec) * 6 (42)

Round 24-28 :

42 sc (42)

Info :

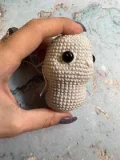
Position the 10mm safety eyes between Round 23 and Round 24, leaving a space of 10 to 12 sc between them.

Round 29 :

(5 sc, dec) * 6 (36)

Round 30 :

(4 sc, dec) * 6 (30)

Round 31 :

(3 sc, dec) * 6 (24)

Info :

Finish stuffing the head firmly.

Round 32 :

(2 sc, dec) * 6 (18)

Round 33 :

(1 sc, dec) * 6 (12)

Round 34 :

6 x dec (6)

Info :

Fasten off, cut the yarn, and weave in the remaining tail.

β€” 2. Tummy :

Round 1 :

Using Pink yarn, work 6 sc into a MR (6)

Round 2 :

6 x inc (12)

Round 3 :

(1 sc, inc) * 6 (18)

Info :

Fasten off, leaving a long tail for sewing onto the body.

β€” 3. Legs (Make 2) :

Round 1 :

Using Pink yarn, ch 6. Starting in the second ch from hook: inc, 3 sc, 3 sc in the last ch, then 4 sc along the other side (12)

Round 2 :

Switch to Gray yarn. 2 x inc, 3 sc, 3 x inc, 3 sc, inc (18)

Round 3 :

8 sc, (4-dc bobble, sc) * 3, 4 sc (18)

Info :

Stuff the foot area as you work.

Round 4 :

4 sc, 6 x dec, 2 sc (12)

Round 5 :

(2 sc, dec) * 3 (9)

Round 6 :

(1 sc, dec) * 3 (6)

Round 7-11 :

6 sc (6)

Info :

Fasten off and weave in the ends.

β€” 4. Arms (Make 2) :

Round 1 :

Using Gray yarn, work 6 sc into a MR (6)

Round 2 :

(1 sc, inc) * 3 (9)

Round 3 :

9 sc (9)

Info :

Add stuffing to the hand area.

Round 4 :

(1 sc, dec) * 3 (6)

Round 5-8 :

6 sc (6)

Info :

Fasten off and weave in the ends.

β€” 5. Tail :

Round 1 :

Using Pink yarn, work 6 sc into a MR (6)

Round 2 :

6 x inc (12)

Round 3 :

12 sc (12)

Round 4 :

6 x dec (6)

Info :

Stuff lightly and leave a long tail for attachment.

β€” 6. Ear Pieces (Make 2 Gray, 2 Orange) :

Row 1 :

Work 4 sc into a MR, turn (4)

Row 2 :

ch 1, 4 x inc, turn (8)

Row 3 :

ch 1, (1 sc, inc) * 4, turn (12)

Row 4 :

ch 1, (2 sc, inc) * 4, turn (16)

Row 5 :

ch 1, (3 sc, inc) * 4, turn (20)

Row 6 :

ch 1, 20 sc, turn (20)

Row 7 :

ch 1, (4 sc, inc) * 4, turn (24)

Row 8 :

ch 1, 24 sc, turn (24)

Row 9 :

ch 1, (5 sc, inc) * 4, turn (28)

Row 10-28 :

ch 1, 28 sc, turn (28)

Row 29 :

ch 1, (5 sc, dec) * 4, turn (24)

Row 30 :

ch 1, 24 sc, turn (24)

Row 31 :

ch 1, (4 sc, dec) * 4, turn (20)

Row 32 :

ch 1, 20 sc, turn (20)

Row 33 :

ch 1, (3 sc, dec) * 4, turn (16)

Row 34 :

ch 1, 16 sc, turn (16)

Row 35 :

ch 1, (2 sc, dec) * 4, turn (12)

Row 36 :

ch 1, 12 sc, turn (12)

Row 37 :

ch 1, (1 sc, dec) * 4, turn (8)

Row 38 :

ch 1, 4 x dec, turn (4)

Row 39 :

ch 1, 2 x dec (2)

Info :

Fasten off the Gray pieces. Keep the yarn attached to the Orange pieces.

β€” 7. Ear Assembly :

Round 1 :

Place one Gray piece on top of an Orange piece. Using Orange yarn, work through both thicknesses: sl st, ch 1, 84 sc around the edge (84)

Round 2 :

84 sc, finish with a sl st (84)

Info :

Fasten off and hide the yarn tails inside the ear.

β€” 8. Carrot Greens :

Part 1 :

Using Light Green yarn, ch 31. Starting in 2nd ch: 30 x inc (60)

Part 2 :

ch 41. Starting in 2nd ch: 40 x inc (80)

Part 3 :

ch 51. Starting in 2nd ch: 50 x inc (100)

Part 4 :

ch 41. Starting in 2nd ch: 40 x inc (80)

Part 5 :

ch 31. Starting in 2nd ch: 30 x inc (60)

Info :

Leave a long tail to sew all curls to the top of the carrot.

Assembly Instructions

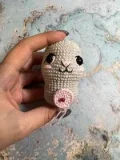
  • Embroider the facial features: use pink for the nose and cheeks, white for the eye whites, and black for the eyelids and mouth detail.
  • Pin the pink tummy circle to the center of the body and sew it securely in place.
  • Attach the arms and legs using a thread mount method through the body to allow them to be poseable.
  • Sew the small pink tail to the lower back of the bunny body.
  • Add decorative black horizontal stripes across the orange side of both ears to mimic carrot texture.
  • Sew the base of the ears to the top center of the head, ensuring they can fold down to cover the bunny.
  • Attach 5 buttons along one ear edge and create matching yarn loops on the other ear to close the carrot shell.

Important Notes

  • πŸ’‘When connecting the two ear layers, ensure your tension is consistent so the ears don't curl inward too much.
  • πŸ’‘Thread mounting requires a very long, strong needle to pass through the entire body from one limb to the other.
  • πŸ’‘The 4-dc bobble stitches on the legs should all face forward to represent the bunny's little toes.
  • πŸ’‘Use sewing pins to hold the ears in a 'closed' position before sewing them to the head to check the fit.
  • πŸ’‘The curly greens should be sewn right where the two ears meet at the top center of the head.

I can't wait to see your finished bunnies peeking out from their carrot homes! This project is such a wonderful blend of clever engineering and pure cuteness. Remember to take your time with the finishing touchesβ€”the embroidery and the button placement really make the 'carrot' function perfectly. Once you've finished, you'll have a handmade heirloom that is sure to be cherished. Happy hooking, and may your carrot bunny bring a huge smile to whoever receives it! 🧢✨

You ask,

we answer.

FAQs

How do I make the arms and legs move?

This pattern uses a 'thread mount' or jointing technique. Instead of sewing the limbs directly to the surface, you use a long needle to pass a single thread through the limb, through the body, and into the opposite limb, then back again. This creates a hinge effect.

Can I use safety eyes smaller than 10mm?

You can, but it will change the 'kawaii' look of the bunny. 10mm eyes give it that oversized, sweet expression that fits the large carrot ears perfectly.

My carrot shell doesn't close all the way, what happened?

Check your ear placement on the head. If the ears are sewn too far apart, they won't meet in the middle. They should be attached very close together at the top center of the head.

What is the best way to embroider the carrot stripes?

Use a single strand of black yarn and make simple horizontal straight stitches of varying lengths. Don't pull them too tight, or they will pucker the ear fabric.