About This Sweet Grandma Amigurumi Pattern
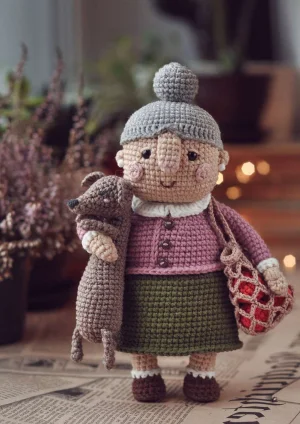
Whether you're making a nostalgic gift for a loved one or adding a touch of vintage charm to your shelf, this set is sure to be a conversation starter.
Designed for experienced crocheters, these patterns involve intricate designs and complex techniques to challenge and inspire.
A 10-12 hour project—great for savoring the process over several sessions.
Playful characters full of personality, designed to spark imagination and become cherished playtime favorites.
Whether you're making a nostalgic gift for a loved one or adding a touch of vintage charm to your shelf, this set is sure to be a conversation starter.
I absolutely adore how much character is packed into this design! The way the nose and cheeks are shaped gives her such a kind expression, and making the tiny tangerines for her market bag was oddly satisfying. It’s one of those projects where you really feel like you’re creating a little person with a story.
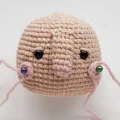
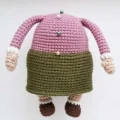
There is something so nostalgic about making a doll like this. As I was stitching her little grey bun and adding those tiny pink cheeks, I couldn't help but think of my own grandmother’s kitchen. This isn't just a quick afternoon project; it’s a slow-making experience that rewards you for every bit of patience you put in.\n\nOne thing I really want to mention is the wire armature. If you’ve never used wire in your amigurumi before, don't be intimidated! It gives her arms such a realistic pose, which is exactly how she’s able to hold her little dachshund so securely. Just make sure you’re using a good quality adhesive tape to wrap those ends—it makes a world of difference for safety and durability.\n\nI also had a blast with the market bag. It’s made with a finer thread, which provides a lovely contrast to the sturdiness of the doll. If you want to change things up, you could easily swap the tangerines for tiny crochet flowers or even little balls of yarn to make her a 'knitting grandma' instead. This pattern is really a canvas for your own memories, and I hope you have as much fun personalizing her as I did!
This darling project captures all the warmth of a favorite grandmother, complete with her tiny dachshund sidekick and a bag of fresh tangerines. You'll love seeing her personality come to life as you add the little details like her pearl earrings and knitted-look cardigan. It's a truly heart-warming make that feels like a hug in crochet form.
Start with ch12, then beginning in the 2nd ch from your hook, work 10 sc, place 3 sc into the final ch, then rotate to work back along the other side with 9 sc and an inc (24)
inc, 9 sc, 3 inc, 9 sc, 2 inc (30)
1 sc, inc, 9 sc, (1 sc, inc) repeat 3 times, 9 sc, (1 sc, inc) repeat 2 times (36)
(5 sc, inc) repeat 6 times (42)
(6 sc, inc) repeat 6 times (48)
sc in each stitch around (48)
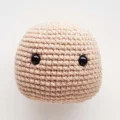
Place the safety eyes between Rounds 12 and 13, leaving a gap of 9 stitches between them.
(6 sc, dec) repeat 6 times (42)
(5 sc, dec) repeat 6 times (36)
(4 sc, dec) repeat 6 times (30)
(3 sc, dec) repeat 6 times (24)
(2 sc, dec) repeat 6 times (18)
(1 sc, dec) repeat 6 times (12)
6 dec (6)
Fasten off and use a needle to thread through the flo, pulling tight to close. Hide the yarn end inside.
Using grey melange, 6 sc in MR (6)
6 inc (12)
(1 sc, inc) repeat 6 times (18)
(2 sc, inc) repeat 6 times (24)
(3 sc, inc) repeat 6 times (30)
(4 sc, inc) repeat 6 times (36)
(5 sc, inc) repeat 6 times (42)
(6 sc, inc) repeat 6 times (48)
(7 sc, inc) repeat 6 times (54)
sc in each stitch around (54)
ch1, 14 dc, 1 hdc, 1 sc, 1 hdc, 10 dc, 1 hdc, 2 sl st, 1 hdc, 10 dc, 1 hdc, 1 sc, 1 hdc, 10 dc, sl st (54)
Using grey melange, 6 sc in MR (6)
6 inc (12)
(1 sc, inc) repeat 6 times (18)
(2 sc, inc) repeat 6 times (24)
sc in each stitch around (24)
(2 sc, dec) repeat 6 times (18)
(1 sc, dec) repeat 6 times (12)
Fasten off and leave a long tail. Stuff the bun firmly before sewing.
Using beige, make 4 sc in MR. Close the ring but leave a tail for sewing. Make 2.
Using powder, 6 sc in MR, sl st to join. Fasten off with a sewing tail. Make 2.
In powder color, 8 sc in MR (8)
sc in each stitch around (8)
Switch to beige and sc in each stitch around (8)
Do not stuff. Flatten the piece and work 4 sc through both layers to close. Leave a long tail.
In beige, 6 sc in MR (6)
(1 sc, inc) repeat 3 times (9)
sc in each stitch around (9)
4 sc, 1 puff, 4 sc (9)
sc in each stitch around (9)
Switch to blueberry, work blo 9 sc (9)
sc in each stitch around (9)
Join white yarn to the flo of Round 6. Work 9 dc around, fasten off and hide ends.
In brown, ch6. Starting in 2nd ch: 4 sc, 3 sc in one ch, rotate to other side: 3 sc, inc (12)
inc, 3 sc, 3 inc, 3 sc, 2 inc (18)
blo 18 sc (18)
sc in each stitch around (18)
Insert your cardboard insoles now to keep the feet flat.
3 sc, 6 dec, 3 sc (12)
Switch to beige, blo 12 sc (12)
sc in each stitch around (12)
Switch to white, (3 sc, inc) repeat 3 times (15)
Work 13 sc. Stop here and leave 2 stitches unworked so the toes point forward. Fasten off leg 1. On leg 2, work an extra 6 sc after Round 17 and do not cut yarn.
Join white yarn to the flo of Round 7 on the leg. Work 12 sc around and fasten off.
From the second leg, ch9 and join to the first leg. Work 15 sc around leg 1, 9 sc along the chain, 15 sc around leg 2, and 9 sc back along the chain (48)
(7 sc, inc) repeat 6 times (54)
sc in each stitch around (54)
(8 sc, inc) repeat 6 times (60)
sc in each stitch around (60)
Switch to green, sc in each stitch around (60)
Switch to blueberry, blo 60 sc (60)
sc in each stitch around (60)
(8 sc, dec) repeat 6 times (54)
sc in each stitch around (54)
(7 sc, dec) repeat 6 times (48)
sc in each stitch around (48)
(6 sc, dec) repeat 6 times (42)
6 sc, 4 sc through both body and arm, 16 sc, 4 sc through both body and second arm, 12 sc (42)
6 sc, work across outer arm: 2 sc, dec, 1 sc; continue on body: 16 sc, work across outer second arm: 1 sc, dec, 2 sc; continue on body: 12 sc (42)
Prepare your wire frame now. Insert the taped ends into the arms and twist the center together inside the body.
(5 sc, dec) repeat 6 times (36)
(4 sc, dec) repeat 6 times (30)
(3 sc, dec) repeat 6 times (24)
(2 sc, dec) repeat 6 times (18)
(1 sc, dec) repeat 6 times (12)
6 dec (6)
Hold the doll upside down. Join green yarn to the flo of Round 12 on the body. (9 sc, inc) repeat 6 times (66)
sc in each stitch around (66)
Hold doll upside down. Join blueberry yarn to the first round of the cardigan. Work 60 hdc around the bottom edge and fasten off.
Starting from the bottom edge, work a vertical chain of sl st up to the neck to mimic a cardigan opening.
In white, ch34
Starting in 3rd ch: (1 dc, dc inc) repeat 7 times, dc inc, ch2, 2 sl st, ch2, dc inc, (dc inc, 1 dc) repeat 7 times. Fasten off.
In brown melange: R1: 6 sc in MR. R2: 6 sc (6)
R3: (1 sc, inc)x3 (9). R4: 9 sc. R5: (2 sc, inc)x3 (12). R6: 12 sc.
R7: (1 sc, inc)x6 (18). R8: 18 sc. R9: (2 sc, inc)x6 (24).
R10-12: 24 sc. R13: (2 sc, dec)x6 (18). R14: (1 sc, dec)x6 (12). R15: 6 dec (6).
ch6, starting in 2nd ch: 4 sc, 3 sc in one ch, 3 sc, inc, sl st to start. Make 2.
R1: 6 sc in MR. R2: 6 inc (12). R3: (1 sc, inc)x6 (18). R4: (2 sc, inc)x6 (24).
sc in each stitch around (24)
Decrease by 1 stitch every other round until you reach 14 stitches.
R27: 11 sc, 3 sl st. R28: 3 sl st, 8 sc. Fasten off.
Forelegs: 8 rounds of 4 sc. Hind legs: 6 rounds of 4 sc. Tail: ch7, 6 hdc.
In fine thread: R1: 6 sc in MR. R2: 6 inc (12).
blo (ch3, sc) repeat 11 times, skip last stitch.
(ch5, sc into 2nd ch of previous arc) repeat 11 times.
(ch7, sc into 3rd ch of previous arc) repeat 11 times.
(ch7, sc into 4th ch of previous arc) repeat 11 times.
R10: (ch3, sc into 4th ch)x11. R11: 46 sc, sl st. Add ch23 handles.
R1: 6 sc in MR. R2: 12 sc. R3: 18 sc. R4-5: 18 sc. R6: 12 sc. R7: 6 dec. Make 5.
I really hope you enjoy bringing this sweet lady to life as much as I did. There’s something so special about creating a piece with this much detail—from her tiny pearl earrings to the little dog that fits just right under her arm. She makes the perfect gift for a grandmother or a lovely addition to any amigurumi collection. Don't forget to share your finished photos with the community; I can't wait to see your versions of her! Happy crafting! 🧶✨
A flexible craft wire or copper wire works best. Make sure it is strong enough to hold a pose but thin enough to be easily bent and covered by the stuffing.
The pattern recommends embroidery for the dog's eyes to give him a softer look, but you could use 3mm or 4mm safety eyes if you prefer.
The vertical slip stitch chain and the hdc edging at the bottom create the visual illusion of a separate garment, even though the body is crocheted in one piece.
The cardboard insoles provide a flat base, helping the doll stand more securely and preventing the bottom of the shoes from bulging once stuffed.
