About This Sweet Holiday Nutcracker Amigurumi Pattern
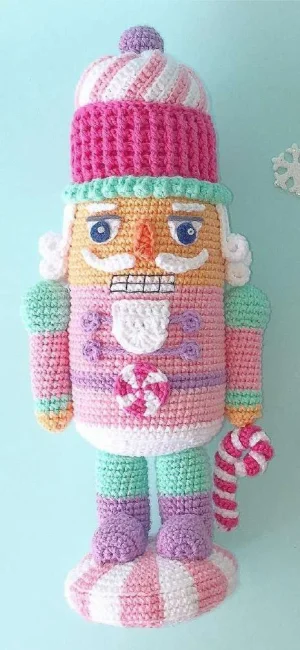
Perfect for adding a touch of handmade warmth to your holiday decor, or as a show-stopping gift for collectors who appreciate unique amigurumi designs.
Ideal for those with basic crocheting experience, featuring slightly more advanced stitches and techniques to expand your skills.
Takes 5-7 hours, making it an enjoyable project to finish over a couple of days.
A delightful, gift-ready creation perfect for birthdays and special occasions that will be treasured for years.
Perfect for adding a touch of handmade warmth to your holiday decor, or as a show-stopping gift for collectors who appreciate unique amigurumi designs.
I fell in love with this design because of how it plays with textures—alternating post stitches for the cupcake base and working tapestry crochet for the candy-swirl base is incredibly satisfying and keeps the project exciting from start to finish!
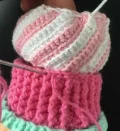
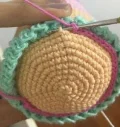
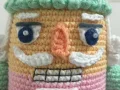
I've always loved the traditional holiday nutcrackers, but there's something so magical about giving classic designs a whimsical, sweet-themed makeover! When I first saw this candy-inspired soldier, I knew he'd be the perfect addition to a pastel Christmas theme. \n\nIf you want to customize your nutcracker, try swapping out the pastel pink and lilac for classic cherry red, forest green, and gold metallic yarn for a traditional toy soldier look. Or, go full gingerbread style with warm browns, cream, and red accents! \n\nMy absolute favorite part of this project is the cupcake hat. The combination of post stitches and the wavy white-and-pink frosting creates such a realistic, delicious texture. Don't worry if the post stitches feel a bit slow at first; once you get into the rhythm, they flow beautifully. Take your time with the face embroidery too—adding those tiny teeth and felt eyes is where his sweet, quirky personality truly comes to life!
Bring some festive magic to your crochet hook with this adorable, candy-themed Nutcracker! He's the perfect blend of classic holiday charm and sweet, whimsical details. You will absolutely love watching his colorful uniform and cupcake-style hat come to life stitch by stitch. He makes a stunning centerpiece for your mantel or a truly unforgettable handmade gift for someone special this season.
Begin working from the top of the head using the nude/skin tone yarn.
Work 6 sc into a magic ring (6)
Work 2 sc in each stitch around (12)
Work [1 sc, 1 inc] 6 times (18)
Work [2 sc, 1 inc] 6 times (24)
Work [3 sc, 1 inc] 6 times (30)
Work [4 sc, 1 inc] 6 times (36)
Work [5 sc, 1 inc] 6 times (42)
Work [6 sc, 1 inc] 6 times (48)
Work [7 sc, 1 inc] 6 times (54)
Work [8 sc, 1 inc] 6 times (60)
Working in BLO, sc in each stitch around (60)
Sc in each stitch around (60)
Sc in each stitch around (60)
Sc in each stitch around (60)
Sc in each stitch around (60)
Sc in each stitch around (60)
Sc in each stitch around (60)
Sc in each stitch around (60)
Sc in each stitch around (60)
Sc in each stitch around (60)
Sc in each stitch around (60)
Work 26 sc in nude, change to white and work 8 sc, change back to nude and work 26 sc (60). Change to pink yarn at the end of the round.
Work 26 sc in pink, change to white and work 8 sc, change back to pink and work 26 sc (60)
Using pink yarn, sc in each stitch around (60)
Sc in each stitch around (60)
Sc in each stitch around (60)
Sc in each stitch around (60)
Sc in each stitch around (60)
Sc in each stitch around (60)
Sc in each stitch around (60)
Sc in each stitch around (60)
Sc in each stitch around (60)
Sc in each stitch around (60)
Sc in each stitch around (60). Change to lilac yarn at the end of the round.
Using lilac yarn, sc in each stitch around (60)
Sc in each stitch around (60). Change to pink yarn at the end of the round.
Using pink yarn, sc in each stitch around (60)
Sc in each stitch around (60)
Sc in each stitch around (60)
Sc in each stitch around (60)
Sc in each stitch around (60). Change to white yarn at the end of the round.
Using white yarn, sc in each stitch around (60)
Sc in each stitch around (60)
Working in BLO, work [8 sc, 1 dec] 6 times (54)
Work [7 sc, 1 dec] 6 times (48)
Work [6 sc, 1 dec] 6 times (42)
Work [5 sc, 1 dec] 6 times (36)
Work [4 sc, 1 dec] 6 times (30)
Work [3 sc, 1 dec] 6 times (24)
Work [2 sc, 1 dec] 6 times (18)
Work [1 sc, 1 dec] 6 times (12). Fasten off, leaving a long yarn tail for sewing, and close the opening.
Start crocheting with the green yarn.
Work 6 sc into a magic ring (6)
Work 2 sc in each stitch around (12)
Work [1 sc, 1 inc] 6 times (18)
Working in BLO, sc in each stitch around (18)
Sc in each stitch around (18)
Sc in each stitch around (18)
Sc in each stitch around (18)
Sc in each stitch around (18)
Sc in each stitch around (18). Change to lilac yarn at the end of the round.
Using lilac yarn, sc in each stitch around (18)
Sc in each stitch around (18)
Sc in each stitch around (18)
Sc in each stitch around (18)
Sc in each stitch around (18)
Sc in each stitch around (18)
Sc in each stitch around (18). Fasten off, leaving a long tail for sewing.
Start crocheting with the nude/skin tone yarn.
Work 6 sc into a magic ring (6)
Work 2 sc in each stitch around (12)
Work [1 sc, 1 inc] 6 times (18)
Work [2 sc, 1 inc] 6 times (24)
Sc in each stitch around (24)
Sc in each stitch around (24)
Work [2 sc, 1 dec] 6 times (18)
Work [1 sc, 1 dec] 6 times (12). Change to pink yarn at the end of the round.
Using pink yarn, sc in each stitch around (12)
Sc in each stitch around (12)
Sc in each stitch around (12)
Sc in each stitch around (12)
Sc in each stitch around (12)
Sc in each stitch around (12)
Sc in each stitch around (12)
Sc in each stitch around (12)
Sc in each stitch around (12). Change to green yarn at the end of the round.
Using green yarn, sc in each stitch around (12)
Sc in each stitch around (12). Change to nude/skin tone yarn at the end of the round.
Using nude/skin tone yarn, sc in each stitch around (12)
Work 6 dec around (6). Fasten off, weave the tail through the remaining stitches with a needle, pull tight to close, and hide the yarn end.
The pattern source lists duplicate round numbers for the green and nude sections of the arms. We have corrected the sequence here so that Rounds 18-19 are in green, Round 20 is in nude, and Round 21 is the decrease round.
Attach green yarn to the remaining front loops of Round 11 on the head. Work [1 popcorn stitch using hdc, 1 hdc] repeatedly around.
Work 6 sc into a magic ring, then ch 13. Turn your work, make 1 ch to go up, and work 6 sc back along the chain. Finish with a sl st and fasten off, leaving a tail to attach to the body.
Insert your hook into the remaining front loops of the round just before the BLO round on the head, and sc all the way around.
Dc in each stitch around.
Work all rounds alternating 1 FPDC and 1 BPDC. Fasten off, leaving a long tail for assembly.
Using white yarn, ch 15.
Ch 1 to go up, work 1 dec, 13 sc, and 1 inc in the final chain stitch (15)
Ch 1 to go up, turn. Working in BLO: 1 inc, 13 sc, 1 dec (15). Change to pink yarn.
Ch 1 to go up, turn. Working in FLO: 1 dec, 13 sc, 1 inc (15)
Ch 1 to go up, turn. Working in BLO: 1 inc, 13 sc, 1 dec (15). Change to white yarn.
Repeat Rows 2-5 until you have completed 10 white and 10 pink stripes. Fasten off, leaving a long yarn tail.
Sew the final row to the first row to form a ring. Leave a long tail to close the top.
Sew the frosting piece to the ribbed cupcake base.
Using a yarn needle, weave the remaining yarn tail through all the colored sections at the top opening.
Pull the yarn tightly to gather the top closed, secure, and weave in the ends.
Using red yarn, work 6 sc into a magic ring (6)
Work 2 sc in each stitch around (12)
Work [1 sc, 1 inc] 6 times (18)
Sc in each stitch around (18)
Sc in each stitch around (18)
Work [1 sc, 1 dec] 6 times (12)
Stuff the cherry firmly, fasten off, and sew or glue it to the top of the cupcake frosting.
Using purple yarn, work 6 sc into a magic ring (6)
Do not join. Ch 1, turn, and work 2 sc in each stitch across (12)
Ch 1, turn, and work 12 sc across (12). Fasten off, leaving a tail to attach to the boots.
Into a magic ring, work 8 sc, alternating 1 pink and 1 white stitch.
Work 2 sc in each stitch, matching pink stitches in pink and white in white (16)
Using white yarn: work 1 sc, then 1 sc. Using pink yarn: work 2 sc in the next stitch, then 1 sc. Fasten off and weave in ends.
Ch 7, then work 1 dc in each chain stitch across (7)
Work 7 dc across (7)
In the fourth stitch, work 7 dc, then sl st into the seventh stitch. Fasten off.
Using white yarn, ch 25, then work 3 sc in each chain across. The piece will curl naturally as you work.
Using pink yarn, ch 25, then work 3 sc in each chain across.
Braid or twist the pink and white spirals together to form the candy cane shape. Secure the ends with glue or stitches.
Ch 15, hdc in each chain across. Do not cut the yarn.
Ch 20, hdc in each chain across. Repeat this step 15 times to create a total of 15 curls.
For the final curl, ch 15 and hdc in each chain across. Fasten off and glue the wig to the back of the head.
Ch 5. Starting in the second chain from your hook, work 2 ch, then work 1 hdc in each of the remaining 4 chains. Fasten off and hide the yarn tail.
For the white part: Ch 3. In the third chain from hook, ch 4, then work 1 trc in the second and first chains. Fasten off and hide the ends, then glue to the face.
Cut two small circles of blue or black felt for the pupils and glue them to the white pieces. Add two mini white beads to the blue felt for highlights.
Cut two small crescent shapes from grey felt and glue them above the pupils to serve as eyelids.
Ch 4, fasten off, and glue above the eyes.
Ch 8.
Starting in the second chain from your hook, work 1 sc in each of the first 3 stitches, then sl st in each of the remaining stitches. Fasten off.
Using white yarn, work 7 sc into a magic ring (7)
Work [1 pink sc, 1 white sc] in each stitch around (14)
Work [2 pink sc in the pink stitches, 1 white sc in the white stitch] around (21)
Work [1 pink sc, 1 pink sc, 2 white sc in the white stitch] around (28)
Work [1 pink inc, 1 pink sc, 1 white sc, 1 white sc] around
Work [1 pink sc, 1 pink sc, 1 pink sc, 1 white sc, 1 white inc] around
Work [1 pink sc, 1 pink sc, 1 pink inc, 1 white sc, 1 white sc, 1 white inc] around
Work [1 pink sc, 1 pink inc, 1 pink sc, 1 pink sc, 1 white sc in each of the next 4 stitches] around
Work [1 pink sc in each of the next 5 stitches, 1 white sc, 1 white inc, 1 white sc, 1 white sc] around
Work [1 pink sc in each of the next 3 stitches, 1 pink inc, 1 pink sc, 1 white sc in each of the next 3 stitches, 1 white inc, 1 white sc] around
Work [1 pink sc in each of the next 4 stitches, 1 pink inc, 1 pink sc, 1 white sc in each of the next 6 stitches] around
Working in BLO: work [1 pink sc in each of the next 7 stitches, 1 white sc in each of the next 6 stitches] around
Work [1 pink sc in each of the next 7 stitches, 1 white sc in each of the next 6 stitches] around
Working in BLO: work [1 pink sc in each of the next 5 stitches, 1 pink dec, 1 white sc in each of the next 6 stitches] around
Work [1 pink sc in each of the next 3 stitches, 1 pink dec, 1 pink sc, 1 white sc in each of the next 3 stitches, 1 white dec, 1 white sc] around
Work [1 pink sc in each of the next 5 stitches, 1 white sc in each of the next 2 stitches, 1 white dec, 1 white sc] around
Work [1 pink sc in each of the next 2 stitches, 1 pink dec, 1 pink sc, 1 white sc in each of the next 4 stitches] around
Work [1 pink sc in each of the next 2 stitches, 1 pink dec, 1 white sc in each of the next 2 stitches, 1 white dec] around
Work [1 pink sc in each of the next 3 stitches, 1 white sc, 1 white dec] around
Work [1 pink dec, 1 pink sc, 1 white sc, 1 white sc] around
Work [1 pink sc in each of the next 2 stitches, 1 white dec] around
Work [1 pink dec, 1 white sc] around. Fasten off and weave in ends.
I hope you enjoy creating your very own sweet Nutcracker companion! This project is such a joy to make, and seeing all those pastel colors and sweet textures come together is pure magic. Keep this little guy on your holiday table or gift him to someone who needs a little extra cheer this season. Happy crocheting, my friends! 🧶✨🎄
Yes, you can! However, 100% cotton yarn is highly recommended for this pattern because it gives excellent stitch definition, which is crucial for the post stitches on the cupcake hat and the tapestry details on the candy base.
To get perfectly clean color changes, always pull through the new color on the very last loop of the stitch before the change. This keeps the tops of your stitches looking neat and seamless.
This usually happens if your tension is too tight or if you are pulling the floated yarn too snugly across the back. Try to keep your floats relaxed, or use a slightly larger hook for the base.
Not at all! If you prefer a completely sewn toy (especially if it's for a young child), you can easily sew all the face details, buttons, and hair curls down with matching yarn or sewing thread instead of gluing them.
