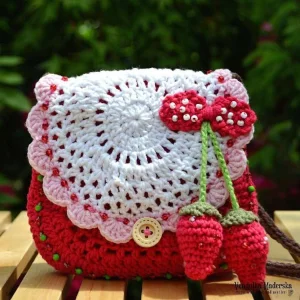
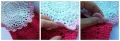
Get ready to crochet the sweetest little accessory ever! This delightful strawberry bag is perfect for little ones who love a touch of whimsical, berry-inspired style. With its gorgeous scalloped flap, dangling strawberry charms, and lovely textured details, it is a joy to stitch up. I will guide you through every step so you can easily create a treasured handmade keepsake.
Progress Tracker
0% Complete
— 1. Main Purse Panels (Make 2) :
Beginning :
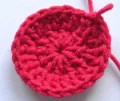
Using your red yarn and the 3.0 mm hook, ch 4 and join with a sl st to the first chain to make a ring.
Round 1 :
ch 3 (this counts as your first dc), work 11 dc directly into the ring, then join to the top of the ch-3 with a sl st (12 dc in total).
Round 2 :
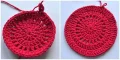
ch 3 (counts as your first dc), work 1 dc in the very first stitch, then work an inc of dc in each of the remaining 11 stitches, join with a sl st to the first dc (24 dc in total).
Round 3 :
ch 3 (counts as your first dc), [ch 1, 1 dc in the next stitch] repeat this pattern all the way around to the end of the round, then join with a sl st to the first dc (24 dc and 24 ch-spaces in total).
Round 4 :
ch 3 (counts as your first dc), work 1 dc in the very first ch-space from the previous round, then work 2 dc in every remaining ch-space around, join with a sl st to the first dc (48 dc in total).
Round 5 :
ch 3 (counts as your first dc), work 1 dc in the very first stitch, then repeat [1 dc in the next stitch, inc of dc in the following stitch] 23 times, work 1 dc in the last stitch, join with a sl st to the first dc, and fasten off (72 dc in total).
Round 6 :
ch 3 (counts as your first dc) + ch 1, [skip the next stitch, work 1 dc in the next stitch, then ch 1] repeat this pattern all the way around, then join with a sl st to the first dc (36 dc and 36 ch-spaces in total).
Round 7 :
ch 3 (counts as your first dc), work 1 dc in the first ch-space, work 2 dc in each of the next two ch-spaces, work 3 dc in the next ch-space, then repeat [2 dc in each of the next three ch-spaces, 3 dc in the next ch-space] 8 times, then join with a sl st to the first stitch (81 stitches in total).
Round 8 :
ch 1 (this is a turning chain and does not count as a stitch), work 1 sc in each of the next 12 stitches, 1 hdc in the next stitch, 1 dc in each of the next 4 stitches, work [inc of dc] 6 times, work 1 dc in each of the next 13 stitches, work [inc of dc] 6 times, work 1 dc in each of the next 4 stitches, 1 hdc in the next stitch, and 1 sc in each of the next 12 stitches (71 stitches in total). Leave the remaining 22 stitches unworked, ch 1 to turn, and turn your work.
Round 9 :
work 1 sc in each of the next 12 stitches, 1 hdc in the next stitch, 1 dc in each of the next 45 stitches, 1 hdc in the next stitch, and 1 sc in each of the next 12 stitches (71 stitches in total), ch 1 to turn, and turn your work.
Round 10 :
work 1 sc in every stitch across (71 sc in total), then fasten off and weave in your ends. Repeat this entire section to make a second matching panel.
— 2. Joining the Panels :
Info :
Place your two completed red panels together with their right sides facing each other. We will crochet them together from the wrong side.
Step 1 :
Using red yarn, work one row of 71 sc through both thicknesses to join the panels together. Do not cut your yarn when finished; you will continue directly into the upper brim. Turn the purse right side out.
— 3. Upper Brim :
Round 1 :
ch 1 (does not count as a stitch), work 1 sc in each of the next 3 stitches on the side, 1 sc in each of the 22 stitches across the middle of the first panel, 1 sc in each of the next 3 stitches on the side of the first panel, 1 sc in the center joining stitch between both panels, 1 sc in each of the next 3 stitches on the side of the second panel, 1 sc in each of the 22 stitches across the middle of the second panel, and 1 sc in each of the next 3 stitches on the side, then join with a sl st to the first sc (58 sc in total).
Round 2 :
ch 1 (does not count as a stitch), work 1 sc in every stitch around, then join with a sl st to the first sc (58 sc in total).
Round 3 :
work 1 sl st in every stitch around (58 sl st in total), then fasten off and weave in all loose yarn ends neatly.
— 4. The Flap :
Beginning :
Using white yarn and your 3.0 mm hook, ch 4 and join with a sl st to the first chain to make a ring.
Round 1 :
ch 3 (counts as your first dc), work 11 dc into the center of the ring, then join with a sl st to the first dc (12 dc in total).
Round 2 :
ch 3 (counts as your first dc), work 1 dc in the very first stitch, then work an inc of dc in each of the remaining 11 stitches, join with a sl st to the first dc (24 dc in total).
Round 3 :
ch 3 (counts as your first dc), [ch 1, 1 dc in the next stitch] repeat this pattern all the way around, then join with a sl st to the first dc (24 dc and 24 ch-spaces in total).
Round 4 :
ch 3 (counts as your first dc) + ch 1, work 1 dc in the first ch-space from the previous round, then work [1 dc, ch 1, 1 dc] in each remaining ch-space around, join with a sl st to the first dc (24 groups of [1 dc, ch 1, 1 dc] in total).
Round 5 :
ch 3 (counts as your first dc) + ch 1, work 1 dc in the first ch-space, then work [1 dc, ch 1, 1 dc] in every ch-space around, join with a sl st to the first dc (24 groups of [1 dc, ch 1, 1 dc] in total).
Round 6 :
ch 3 (counts as your first dc) + ch 2, work 1 dc in the first ch-space, then work [1 dc, ch 2, 1 dc] in every ch-space around, join with a sl st to the first dc (24 groups of [1 dc, ch 2, 1 dc] in total).
Round 7 :
ch 1 (does not count as a stitch), work [3 sc in each ch-space] all the way around, join with a sl st to the first sc, and fasten off (72 sc in total).
Round 8 :
Attach light pink yarn and work 1 sc in every stitch around, then join with a sl st to the first sc (72 sc in total).
Round 9 :
Continuing with light pink yarn, ch 1, repeat [skip the next stitch, work 5 dc in the next stitch, skip the next stitch, work 1 sl st in the next stitch] 8 times, then ch 5 and skip the next 3 stitches to create the buttonhole, work 1 sl st in the next stitch, then repeat [skip the next stitch, work 5 dc in the next stitch, skip the next stitch, work 1 sl st in the next stitch] 9 times, join with a sl st to the first stitch, and fasten off.
— 5. The Handle :
Step 1 :
Using two strands of brown yarn held together and your 3.5 mm hook, ch 134 (or adjust this chain length to fit your child).
Step 2 :
Rotate your chain slightly to find the side loops of the chain. Work 1 sl st into the side loop of each chain stitch all the way across, then fasten off, leaving a tail for sewing.
— 6. Strawberries (Make 2) :
Info :
These cute strawberry charms are worked in continuous spiral rounds. Do not join or turn at the end of each round.
Round 1 :
Using red yarn and your 3.0 mm hook, ch 2, then work 7 sc in the second chain from your hook (7 sc).
Round 2-3 :
Work 1 sc in every stitch around (7 sc).
Round 4 :
Work [inc, 1 sc in the next stitch] 2 times, then work 1 sc in each of the remaining 3 stitches (9 sc).
Round 5 :
Work [inc, 1 sc in each of the next 2 stitches] 2 times, then work 1 sc in each of the remaining 3 stitches (11 sc).
Round 6 :
Work [inc, 1 sc in each of the next 3 stitches] 2 times, then work 1 sc in each of the remaining 3 stitches (13 sc). Start stuffing the strawberry with polyester toy filling now and continue to stuff as you go.
Round 7 :
Work [inc, 1 sc in each of the next 3 stitches] 3 times, then work 1 sc in the last stitch (16 sc).
Round 8-10 :
Work 1 sc in every stitch around (16 sc).
Round 11 :
Work [dec, 1 sc in the next stitch] 5 times, then work 1 sc in the last stitch (11 sc).
Round 12 :
Work [dec] 5 times, then work 1 sl st in the next stitch (6 stitches remaining). Fasten off, weave the tail through the remaining stitches, pull tight to close, and sew securely.
— 7. Leaves (Make 2) :
Beginning :
Using dark green yarn and your 3.0 mm hook, ch 4 and join with a sl st to the first chain to make a ring.
Round 1 :
Work 9 sc into the center of the ring, then join with a sl st to the first sc (9 sc).
Round 2 :
Work [ch 2, 1 sl st in the next stitch] 9 times, then fasten off.
— 8. Stems :
Step 1 :
Using hot green yarn, insert your hook into the top center of one strawberry and crochet a chain of 16. Fasten off. Pull this chain stem through the center of one leaf, then sew the leaf securely to the top of the strawberry.
Step 2 :
Repeat the process for the second strawberry, but crochet a chain of 18 instead to make the stem slightly longer. Pull through the second leaf and sew in place.
— 9. Bow :
Beginning :
Using red yarn and your 3.0 mm hook, ch 13.
Row 1 :
Insert your hook into the fourth chain from the hook and work 1 dc, work 1 dc in each of the next 3 chains, 1 sc in each of the next 2 chains, 1 dc in each of the next 3 chains, and work [1 dc + 1 sl st] in the last chain. Fasten off and weave in your ends.
Step 1 :
Cut a 20 cm length of red yarn. Wrap this yarn tightly around the center of the bow several times to cinch it, then tie a secure knot on the back. Weave in the tails.
Step 2 :
To add the scalloped edging, insert your hook into the first stitch next to the wrapped center of the bow. Work [ch 2, 1 sl st in the next stitch] 8 times, then fasten off. Repeat this exact process on the second side of the bow to match.
I hope you have the absolute best time making this darling strawberry purse! Whether you're gifting it to a sweet little one in your life or keeping it as a delightful spring accessory, it's sure to bring big smiles. Don't forget to take your time sewing on those tiny seed beads—they really make the whole design pop! Happy crocheting, my friends, and may your days be filled with beautiful stitches! 🧶🍓✨