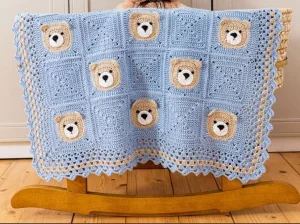
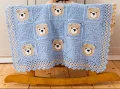
There is something so timeless about a teddy bear themed nursery. This blanket brings together the classic granny square with a cute, modern twist. You'll love seeing those little bear faces come to life as you work through the squares. It's the kind of project that feels like a warm hug, making it the perfect gift for a new arrival or a special little one in your life.
Progress Tracker
0% Complete
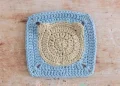
— 1. Teddy Bear Square (Make 13) :
Round 1 :
Start with a magic ring. ch2 (counts as dc), 11dc into the ring. sl st to top of ch2 to join. (12)
Round 2 :
ch2, 1dc in the same st. 2dc in each of the next 11 sts. sl st to top of ch2 to join. (24)
Round 3 :
ch2, 1dc in the same st. 2dc in each of the next 23 sts. sl st to top of ch2 to join. (48)
Round 4 :
ch1, 1sc in the same st. 1sc in next 16 sts. In FLO of the next st, work 6dc to form the first ear. 1sc in next 11 sts. In FLO of the next st, work 6dc to form the second ear. 1sc in next 18 sts. Join with a sl st to the first sc. (58)
Info :
Cut your beige yarn and weave in the ends securely.
Colour Change :
Switch to Color B (Baby Blue).
Info :
Join the blue yarn to the BLO of the very first st from Round 4. This is crucial for keeping the corners aligned behind the ears.
Round 5 :
ch3 (counts as dc), 1dc in BLO of next 2 sts, 1EXdc in BLO of next 2 sts, (2tr, ch2, 2tr) in BLO of next st. *1EXdc in BLO of next 2 sts, 1dc in BLO of next 7 sts, 1EXdc in BLO of next 2 sts, (2tr, ch2, 2tr) in BLO of next st*. Repeat from * to * two more times. 1EXdc in BLO of next 2 sts, 1dc in next 4 sts. sl st to top of ch3 to join. (15 sts per side)
Round 6 :
ch3, 1dc in next 6 sts. *(2dc, ch2, 2dc) in the corner ch2 sp, 1dc in next 15 sts*. Repeat from * to * 3 times. (2dc, ch2, 2dc) in the last corner sp, 1dc in next 8 sts. sl st to top of ch3 to join. (19 sts per side)
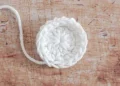
— 2. Snout (Make 13) :
Round 1 :
Using Color C, start with a magic ring. ch2, 11dc into the ring. sl st to top of ch2 to join. (12)
Round 2 :
ch1, 1hdc in the same st, 2hdc in the next st. *1hdc in next st, 2hdc in next st*. Repeat from * to * 5 times. sl st to first hdc to join. (18)
Info :
Fasten off, leaving a long tail for sewing the snout to the face.
— 3. Solid Granny Square (Make 12) :
Round 1 :
Using Color B, start with a magic ring. ch5 (counts as 1dc and ch2). (3dc, ch2) into the ring 3 times. 2dc into the ring. sl st to 3rd ch of beg ch5 to join. (3 sts per side)
Round 2 :
ch3, *(2dc, ch2, 2dc) in the corner sp, 1dc in next 3 sts*. Repeat from * to * 3 times. (2dc, ch2, 2dc) in the last corner, 1dc in next 2 sts. sl st to top of ch3 to join. (7 sts per side)
Round 3 :
ch3, 1dc in next 2 sts. *(2dc, ch2, 2dc) in the corner sp, 1dc in next 7 sts*. Repeat from * to * 3 times. (2dc, ch2, 2dc) in the last corner, 1dc in next 4 sts. sl st to top of ch3 to join. (11 sts per side)
Round 4 :
ch3, 1EXdc in next 4 sts. *(2EXdc, ch2, 2EXdc) in the corner sp, 1EXdc in next 11 sts*. Repeat from * to * 3 times. (2EXdc, ch2, 2EXdc) in the last corner, 1EXdc in next 6 sts. sl st to top of ch3 to join. (15 sts per side)
Round 5 :
ch3, 1EXdc in next 6 sts. *(2EXdc, ch2, 2EXdc) in the corner sp, 1EXdc in next 15 sts*. Repeat from * to * 3 times. (2EXdc, ch2, 2EXdc) in the last corner, 1EXdc in next 8 sts. sl st to top of ch3 to join. (19 sts per side)
— 4. Blanket Border :
Info :
Arrange your 25 squares in a 5x5 grid and join them using a flat slip stitch seam. Attach Color B to any corner ch2 space of the assembled blanket.
Round 1 :
*(3dc, ch2, 3dc) in the corner sp, 1dc in every st across to the next corner, working 1dc2tog over the ch2 spaces where the squares meet*. Repeat from * to * 4 times. sl st to join.
Round 2 :
sl st 3 times to reach the corner sp. *(3dc, ch2, 3dc) in the corner, **sk 2 sts, V-st in next st**. Repeat from ** to ** until 3 sts remain before the next corner, sk 3 sts*. Repeat from * to * 4 times. sl st to join.
Round 3 :
sl st 3 times to reach the corner sp. *(3dc, ch2, 3dc) in the corner, ch1, **3dc in the next V-st, ch1**. Repeat from ** to ** until the next corner*. Repeat from * to * 4 times. sl st to join.
Round 4 :
sl st 3 times to reach the corner sp. *(3dc, ch2, 3dc) in the corner, ch1, **3dc in the next ch1 sp, ch1**. Repeat from ** to ** until the next corner*. Repeat from * to * 4 times. sl st to join.
Colour Change :
Fasten off blue and attach Color A (Beige) to any corner.
Round 5 :
Repeat the instructions for Round 4 using the beige yarn. Fasten off.
Colour Change :
Attach Color B (Baby Blue) back to any corner.
Round 6 :
Repeat the instructions for Round 4 using the blue yarn.
Round 7 :
sl st 3 times to reach the corner sp. *(ch3, 1dc in the next ch1 sp, 5dc worked around the post of the dc just made, 1sc in the next ch1 sp) 19 times to the next corner, ch4, 1sc in the corner ch2 sp*. Repeat from * to * 4 times. sl st to join.
I hope you enjoy every stitch of this bear blanket! There's something so special about creating a nursery heirloom that will be cherished for years to come. Whether you're making this for your own little one or as a heartfelt baby shower gift, the effort you put into those 25 squares really shows in the finished piece. Happy crocheting, and I can't wait to see your finished blankets! 🧶✨