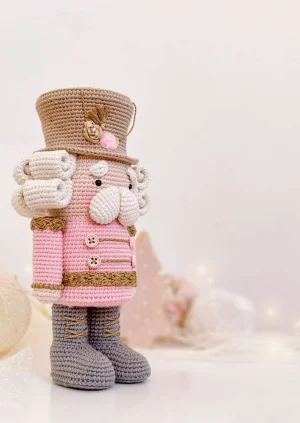
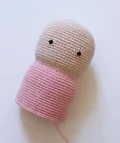
Get ready to bring a touch of classic holiday magic to your home! Theo is such a dapper fellow, and crafting him is a truly rewarding experience. You will love seeing his personality come to life through the tiny details, from those iconic curly white locks to his shimmering golden epaulettes. He is the perfect project for a cozy weekend of festive making.
Progress Tracker
0% Complete
— 1. Head and Body :
Round 1 :
Using nude yarn, place 7 sc into a mr and pull it tight (7).
Round 2 :
Work 7 inc around the ring (14).
Round 3 :
Repeat [1 sc, 1 inc] 7 times (21).
Round 4 :
Repeat [2 sc, 1 inc] 7 times (28).
Round 5 :
Repeat [3 sc, 1 inc] 7 times (35).
Round 6 :
2 sc, 1 inc, then repeat [4 sc, 1 inc] 6 times, finishing with 2 sc (42).
Round 7 :
Repeat [5 sc, 1 inc] 7 times (49).
Round 8 :
3 sc, 1 inc, then repeat [6 sc, 1 inc] 6 times, finishing with 3 sc (56).
Round 9 :
Repeat [7 sc, 1 inc] 7 times (63).
Round 10-25 :
Work 63 sc in each round (63).
Round 26 :
Repeat [7 sc, 1 dec] 7 times (56).
Round 27 :
3 sc, 1 dec, then repeat [6 sc, 1 dec] 6 times, finishing with 3 sc (49).
Info :
Insert the 5mm safety eyes between rounds 18 and 19, leaving a space of 10 sts between them.
Round 28 :
Switch to pink yarn and work a round of sl st in the blo (49).
Round 29 :
Work 49 sc into the blo (49).
Round 30 :
Repeat [6 sc, 1 inc] 7 times (56).
Round 31 :
Repeat [7 sc, 1 inc] 7 times (63).
Round 32-47 :
Work 63 sc in each round (63).
Info :
Fasten off and use a needle to close. Fill the piece firmly with stuffing.
— 2. Body Base :
Round 1 :
With pink yarn, work 7 sc into a mr (7).
Round 2 :
Work 7 inc (14).
Round 3 :
Repeat [1 sc, 1 inc] 7 times (21).
Round 4 :
Repeat [2 sc, 1 inc] 7 times (28).
Round 5 :
Repeat [3 sc, 1 inc] 7 times (35).
Round 6 :
2 sc, 1 inc, then repeat [4 sc, 1 inc] 6 times, finishing with 2 sc (42).
Round 7 :
Repeat [5 sc, 1 inc] 7 times (49).
Round 8 :
3 sc, 1 inc, then repeat [6 sc, 1 inc] 6 times, finishing with 3 sc (56).
Round 9 :
Repeat [7 sc, 1 inc] 7 times (63).
Info :
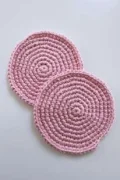
Cut the yarn and close the piece neatly. Make two of these bases.
— 3. Joining the Bases :
Info :
Trace one base onto cardboard and cut it out to provide structure.
Info :
Hold both bases with right sides facing out. Attach pink yarn through both loops of the front base and only the flo of the back base.
Info :
Work 63 sl st around to join them, inserting the cardboard before you finish. Close invisibly.
Info :
Sew this double-layered base to the bottom of the body by taking the flo of the base and the flo of the body opening.
— 4. Arms :
Round 1 :
With nude yarn, work 7 sc in a mr (7).
Round 2 :
Work 7 inc (14).
Round 3 :
Repeat [1 sc, 1 inc] 7 times (21).
Round 4-5 :
Work 21 sc in each round (21).
Round 6 :
Switch to pink yarn and work 21 sl st (18).
Round 7 :
Work 21 sc in the blo (21).
Round 8-20 :
Work 21 sc in each round (21).
Info :
Leave a long tail for sewing and stuff the arm fully.
— 5. Arm Closure Caps :
Round 1 :
With pink yarn, work 7 sc in a mr (7).
Round 2 :
Work 7 inc (14).
Round 3 :
Repeat [1 sc, 1 inc] 7 times (21).
Info :
Cut a small cardboard circle to fit inside. Join the cap to the arm by sewing through the flo of both pieces.
Info :
Using gold thread, work a round of crab stitch edging in the remaining pink flo.
— 6. Shoulder Epaulettes :
Round 1 :
Using gold thread, ch 2 in a mr, work 9 hdc, then close the ring.
Round 2 :
ch 2, work 9 hdc inc, then 1 hdc at the base of the starting chain. sl st to the 2nd ch to close.
Round 3 :
Work sl st in the blo all the way around.
Round 4 :
Working in the blo, repeat [ch 3, 2-hdc pineapple stitch, skip 2 sts, sl st in the next st] 6 times, then finish with 2 sl st.
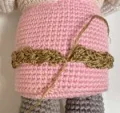
— 7. Belt :
Row 1 :
In a mr, work [ch 3, 1 dc, ch 1, 2 dc], then pull the ring tight and turn.
Row 2 :
sl st in the blo and into the ch space, then [ch 3, 1 dc, ch 1, 2 dc] and turn.
Info :
Repeat Row 2 until the belt is long enough to wrap around Theo's waist. Sew the ends together.
— 8. Soles :
Round 1 :
With lead yarn, ch 10. Starting in 2nd ch from hook: 8 sc, 3 sc in the next st, 8 sc on the other side, and 3 sc in the final st (22).
Round 2 :
8 sc, 3 inc, 8 sc, 3 inc (28).
Round 3 :
7 sc, [1 sc, 1 inc] twice, [1 inc, 1 sc] twice, 6 sc, [1 sc, 1 inc] twice, 1 inc, 1 sc, 1 inc (36).
Round 4 :
9 sc, [1 sc, 1 inc] twice, [1 inc, 1 sc] twice, 10 sc, [1 sc, 1 inc] twice, [1 inc, 1 sc] twice, 1 sc (44).
Info :
Make 4 soles total. Close each with a needle.
— 9. Sole Assembly :
Info :
Trace the sole onto cardboard and cut two pieces. Stack two soles together with right sides out.
Info :
sl st them together using the blo of the outer sole and both loops of the inner sole, inserting the cardboard before finishing.
— 10. Boot Feet :
Round 1 :
With lead yarn, ch 24. sl st to the first ch to form a loop, then ch 5 (29).
Round 2 :
sc in 2nd ch from hook, 3 sc in next chains, 24 sc, 4 sc in the chains, and 3 sc in the last ch (35).
Round 3 :
32 sc, 3 inc (38).
Round 4 :
32 sc, 6 inc (44).
Round 5-8 :
Work 44 sc in each round (44).
— 11. Boot Legs :
Round 1-9 :
Attach lead yarn to the back of the boot with a sl st and work 9 rounds of 24 sc each.
— 12. Boot & Sole Join :
Info :
Position the sole like a lid on the bottom of the boot, aligning point 39 of the sole with the center of the boot.
Info :
Using a needle and lead yarn, sew the flo of the sole to the boot around the entire edge.
— 13. Hat Base :
Round 1 :
With beige yarn, work 7 sc in a mr (7).
Round 2 :
Work 7 inc (14).
Round 3 :
Repeat [1 sc, 1 inc] 7 times (21).
Round 4 :
Repeat [2 sc, 1 inc] 7 times (28).
Round 5 :
Repeat [3 sc, 1 inc] 7 times (35).
Round 6 :
2 sc, 1 inc, then repeat [4 sc, 1 inc] 6 times, finishing with 2 sc (42).
Round 7 :
Repeat [5 sc, 1 inc] 7 times (49).
Round 8 :
3 sc, 1 inc, then repeat [6 sc, 1 inc] 6 times, finishing with 3 sc (56).
Round 9 :
Repeat [7 sc, 1 inc] 7 times (63).
Round 10 :
4 sc, 1 inc, then repeat [8 sc, 1 inc] 6 times, finishing with 4 sc (70).
Round 11 :
Repeat [9 sc, 1 inc] 7 times (77).
Round 12 :
Stack two bases with cardboard between them and sc 77 through the blo of both pieces to join.
— 14. Hat Top and Brim :
Round 13 :
Work 77 sc around (77).
Round 14 :
Repeat [9 sc, 1 dec] 7 times (70).
Round 15-17 :
Work 70 sc in each round (70).
Round 18 :
4 sc, 1 dec, then repeat [8 sc, 1 dec] 6 times, finishing with 4 sc (63).
Round 19-26 :
Work 63 sc in each round (63).
Round 27 :
Working in the flo: 4 sc, 1 inc, then repeat [8 sc, 1 inc] 6 times, finishing with 4 sc (70).
Round 28 :
Repeat [9 sc, 1 inc] 7 times (77).
Round 29 :
5 sc, 1 inc, then repeat [10 sc, 1 inc] 6 times, finishing with 5 sc, then sl st in the next st (84).
Round 30 :
Turn to work from the purl side and work a round of sl st in the blo. Fasten off invisibly.
— 15. Hair Curlers :
Round 1 :
With winter white, work 6 sc in a mr (6).
Round 2 :
Work 6 inc (12).
Round 3 :
Repeat [1 sc, 1 inc] 6 times (18).
Round 4-26 :
Work 18 sc in each round (18).
Info :
Leave a long tail and make 12 curlers in total.
— 16. Eyebrows :
Round 1 :
Using winter white, ch 3 in a mr. Work a pineapple stitch of 3 dtr, then close the stitch and the mr with a sl st. Make two.
— 17. Mustache :
Round 1 :
With winter white, work 6 sc in a mr (6).
Round 2 :
Work 6 inc (12).
Round 3 :
Repeat [1 sc, 1 inc] 6 times (18).
Round 4-8 :
Work 18 sc in each round (18).
Round 9 :
Repeat [1 sc, 1 dec] 6 times (12).
Round 10 :
Work 12 sc (12).
Round 11 :
Work 6 dec (6).
Info :
Close with a needle and leave a long tail. Make two.
Theo is finally ready to stand guard! I hope you enjoyed every single stitch of this festive project. There is something so rewarding about seeing a pile of crocheted pieces transform into such a characterful little soldier. Whether he is a special gift or a new addition to your own holiday decor, he is sure to be a conversation starter. Don't forget to share your finished Theo—I would love to see the colors you chose! Happy crafting, and may your holidays be filled with handmade joy! 🧶✨