About This Tweety Bird Amigurumi Pattern
This little bird is the ultimate gift for anyone who loves classic animation. He looks absolutely precious sitting on a desk or tucked into a gift basket for a new baby.
Ideal for those with basic crocheting experience, featuring slightly more advanced stitches and techniques to expand your skills.
Fits nicely into a free afternoon — 2 to 5 hours of focused, enjoyable crocheting.
Playful characters full of personality, designed to spark imagination and become cherished playtime favorites.
This little bird is the ultimate gift for anyone who loves classic animation. He looks absolutely precious sitting on a desk or tucked into a gift basket for a new baby.
I honestly had the best time making those big orange feet! The way the toes are shaped with just a bit of clever needle sculpting is so satisfying to see. Plus, using felt for the eyes gives him that crisp, professional look that really makes the character pop. It's one of those projects where you'll find yourself smiling at every new piece you finish.
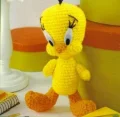
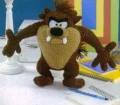
I honestly think Tweety might be one of the most requested characters whenever I show off my amigurumi collection. There is just something about that giant head and those tiny wings that everyone connects with instantly. When I was working through this pattern, I really wanted to make sure the transition between the head and the body felt secure, as amigurumi with larger heads can sometimes get a bit 'floppy' if you aren't careful.
One little trick I've found is to use a slightly smaller hook than you might usually use for worsted weight yarn. This keeps the stitches nice and tight so the stuffing doesn't peek through, especially around the increases on the cheeks. If you want to make him even more special, try using a slightly fuzzy yarn for the hair tuft at the top—it adds such a cute, tactile detail!
I also spent a lot of time getting the felt eyes just right. Don't be afraid to move them around and pin them in place before you commit to the glue. A millimeter or two can completely change his expression from 'innocent' to 'about to outsmart a cat.' I hope you enjoy making him as much as I did!
If you grew up watching Saturday morning cartoons, this project is going to be a total nostalgia trip for you. There is something so satisfying about seeing Tweety's iconic silhouette come to life stitch by stitch, from those oversized orange feet to that sweet, slightly mischievous face. I’ve made sure the instructions are clear so you can focus on the fun part—bringing this classic character into your home. He makes a wonderful gift for fellow animation fans or a charming addition to a nursery shelf. You'll love how the simple shaping creates such a recognizable and lovable little bird.
Using yellow yarn, ch 2. Work 8 sc into the second ch from your hook. Do not join rounds; use a marker to track progress (8 sc).
Work 2 sc into every st around (16 sc).
Work a pattern of [1 sc in the first st, 2 sc in the next st] all the way around (24 sc).
Work [1 sc in each of the next 11 sts, 2 sc in the next st] twice (26 sc).
Work 1 sc into every st around (26 sc).
Work 1 sc into every st around (26 sc).
Work 1 sc into every st around (26 sc).
Work 1 sc into every st around (26 sc).
Work 1 sc into every st around (26 sc).
Work a pattern of [decrease, 1 sc in each of the next 11 sts] twice (24 sc).
Work 1 sc in the next 5 sts, then decrease. Work 1 sc in the next 10 sts, then decrease. Work 1 sc in the final 5 sts (22 sc).
Work [decrease, 1 sc in each of the next 9 sts] twice (20 sc).
Work 1 sc in the next 3 sts, decrease, 1 sc in next 8 sts, decrease, 1 sc in the final 5 sts (18 sc).
Work [1 sc in each of the next 7 sts, decrease] twice (16 sc).
Work 1 sc in the next 4 sts, decrease, 1 sc in next 6 sts, decrease, 1 sc in the final 2 sts (14 sc).
Work [decrease, 1 sc in each of the next 5 sts] twice. Finish with a sl st in the next st and fasten off (12 sts).
Using yellow yarn, ch 5. In the second ch from hook, work 1 sc. Work 1 sc in each of the next 2 chs. In the last ch, work 3 sc. Turn to work in the unused loops of the foundation ch: 1 sc in each of the next 2 loops, then 2 sc in the last loop. Do not join (10 sc).
Work 2 sc in the next st, 1 sc in each of the next 2 sts, 2 sc in each of the next 3 sts, 1 sc in each of the next 2 sts, 2 sc in each of the final 2 sts (16 sc).
Work 2 sc in the next st, 1 sc in each of the next 4 sts, 2 sc in each of the next 4 sts, 1 sc in each of the next 4 sts, 2 sc in each of the final 3 sts (24 sc).
Work 1 sc in the next st, 2 sc in the next st, 1 sc in next 4 sts, [2 sc in next st, 1 sc in next st] 3 times, 1 sc in next 4 sts, [2 sc in next st, 1 sc in next st] 3 times (32 sc).
Work 1 sc in next 6 sts. Mark the last sc with a scrap of yarn. Work 1 sc in next 4 sts, [2 sc in next st, 1 sc in next 2 sts] twice, [2 sc in next st, 1 sc in next 3 sts] 3 times, 2 sc in next st, 1 sc in next 2 sts, 2 sc in next st (39 sc).
Work 1 sc in next 12 sts, [2 sc in next st, 1 sc in next 2 sts] around until finished (48 sc).
Work 1 sc in every st around (48 sc).
Work 1 sc in every st around (48 sc).
Work 1 sc in every st around (48 sc).
Work [decrease, 1 sc in each of the next 14 sts] around (45 sc).
Work 1 sc in next 5 sts, decrease, [1 sc in next 13 sts, decrease] twice, 1 sc in final 8 sts (42 sc).
Work [1 sc in next 12 sts, decrease] around (39 sc).
Work 1 sc in next 6 sts, decrease, [1 sc in next 11 sts, decrease] twice, 1 sc in final 5 sts (36 sc).
Work [1 sc in next 10 sts, decrease] around (33 sc).
Work 1 sc in next 2 sts, decrease, [1 sc in next 9 sts, decrease] twice, 1 sc in final 7 sts (30 sc).
Work [decrease, 1 sc in next 8 sts] around (27 sc).
Work 1 sc in next 4 sts, decrease, [1 sc in next 7 sts, decrease] twice, 1 sc in final 3 sts (24 sc).
Work 1 sc in every st around (24 sc).
Work 1 sc in every st around (24 sc).
Work 1 sc in every st around (24 sc).
Work 1 sc in every st around (24 sc).
Work decrease all the way around. Sl st in next st and fasten off, leaving a long tail for sewing (12 sts).
Using yellow, ch 2. Work 8 sc into the second ch from hook. Do not join (8 sc).
Work 2 sc in every st around (16 sc).
Work [2 sc in next st, 1 sc in next 3 sts] around. Finish with a sl st and leave a long tail for assembly (20 sts).
Using orange, ch 5. Sc in second ch from hook and next 2 chs. Work 5 sc in the last ch. Turn to work in free loops: sc in next 2 chs, 3 sc in last loop. Sl st to join and fasten off (13 sts).
Using orange, ch 3. Sc in second ch from hook and the next ch. Turn (2 sc).
Ch 1, turn. Sc in each st across (2 sc).
Ch 1, turn. Sc in each st across (2 sc).
Ch 1, turn. Work 2 sc in each st across (4 sc).
Ch 1, turn. Sc in each st across (4 sc).
Ch 1, turn. Sc in each st across (4 sc).
Ch 1, turn. Work 2 sc in first st, sc in next 2 sts, 2 sc in last st (6 sc).
Ch 1, turn. Sc in each st across (6 sc).
Ch 1, turn. Decrease 3 times across (3 sc).
Ch 1, do not turn. Sc in the first st, 2 sc in next st, sc in last st. Work 8 sc evenly down the side of the rows. Work into the foundation ch loops: sc in next 2 chs. Work 8 sc evenly up the other side. Join with sl st (22 sc).
Ch 1, do not turn. hdc in first st, 2 hdc in each of next 2 sts, hdc in next 3 sts, 2 hdc in next st, hdc in next 12 sts, 2 hdc in last 3 sts. Join with sl st (24 sts).
Ch 1, hdc in first 9 sts, sc in next 12 sts, hdc in final 3 sts. Join with sl st and fasten off.
Ch 1, hdc in first st, [yarn over, insert hook into next st, pull up loop] twice, yarn over and pull through all 5 loops. Repeat this decrease once more. hdc in next st, sl st in next 2 sts. Leave remaining sts unworked (6 sts).
Ch 1, turn. Skip the sl sts, sc in next 4 sts, sl st in next 2 sts on the Sides (6 sts).
Ch 1, turn. Skip the sl sts, sc in next 4 sts, sl st in next 2 sts on the Sides (6 sts).
Ch 1, turn. Skip the sl sts, sc in next 4 sts, sl st in next 2 sts on the Sides (6 sts).
Ch 1, turn. Skip the sl sts, sc in next 4 sts, sl st in next 2 sts on the Sides (6 sts).
Ch 1, turn. Skip the sl sts, decrease twice, sl st in next 2 sts on Sides. Fasten off (4 sts).
Ch 1, turn. Skip the sl sts, sc in next 2 sts, hdc in same st as the next sl st, sc in next 6 sts around the Sides. Do not join; mark the round (9 sts).
sc in every st around (9 sts).
sc in every st around (9 sts).
sc in every st around. Finish with a sl st in the next st and fasten off, leaving a long tail for sewing (9 sts).
Using yellow, ch 8 and join with a sl st to form a ring. Ch 1, sc in each ch around. Do not join (8 sc).
sc in every st around (8 sc).
sc in every st around (8 sc).
sc in every st around (8 sc).
Work 5 dc in the first st, then sc in the remaining 7 sts (12 sts).
Pull up a loop in each of the next 5 dc, yarn over and pull through all 6 loops on hook. sc in the next 7 sts (8 sts).
Decrease 4 times. Fasten off leaving a tail for sewing (4 sts).
Using yellow, ch 6 and join to form a ring. Ch 1, sc in each ch around (6 sc).
sc in every st around (6 sc).
sc in every st around (6 sc).
Work [decrease, 1 sc in next st] twice. Sl st in next st and fasten off (4 sts).
I can’t wait to see your finished Tweety birds! There is nothing quite like the feeling of finishing that last stitch and seeing a beloved character looking back at you. Remember to take your time with the felt details, as that is where his personality really shines through. If you run into any tricky spots, just take a breath and count your stitches—you’ve got this. Happy crafting, and may your yarn always be tangle-free! 🧶 ✨
You certainly can, though it will change the look of the character slightly. If using safety eyes, I recommend 12mm or 15mm eyes placed before stuffing the head.
Use a clear-drying fabric glue and apply it sparingly to the back of the felt. Pin the felt in place while it dries to ensure it doesn't shift.
This is usually due to under-stuffing the neck. Try adding a small piece of foam or extra-firm stuffing specifically at the join between the head and body.
Yes, but keep in mind the finished toy will be much larger. You may also need to adjust the felt eye sizes to match the larger scale.
