About This Jumping Spider Amigurumi Pattern
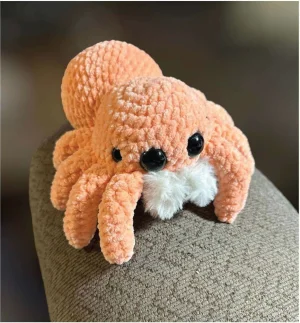
This little guy makes a fantastic desk companion or a unique gift for nature lovers. Since it uses bulky yarn, it works up surprisingly fast and feels incredibly soft to the touch.
Ideal for those with basic crocheting experience, featuring slightly more advanced stitches and techniques to expand your skills.
Fits nicely into a free afternoon — 2 to 5 hours of focused, enjoyable crocheting.
Playful characters full of personality, designed to spark imagination and become cherished playtime favorites.
This little guy makes a fantastic desk companion or a unique gift for nature lovers. Since it uses bulky yarn, it works up surprisingly fast and feels incredibly soft to the touch.
I'm a huge fan of low-sew designs because they save so much time at the end! Crocheting the legs into the head is such a satisfying technique. Plus, seeing those big safety eyes come together with the fuzzy yarn fangs just makes me smile every time I finish one.
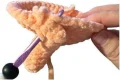
I’ve always had a bit of a soft spot for jumping spiders—they’re basically the kittens of the insect world with those huge, curious eyes! When I first sat down to design this, I knew I wanted to minimize the sewing because, let’s be honest, attaching eight legs individually is nobody’s favorite task. That’s why the leg-attachment round in the head is such a game-changer. It feels like magic when you flip the piece over and see all those little legs perfectly in place.
My favorite part of the whole process is definitely the fangs. Using fuzzy yarn really elevates the look and gives it that professional, high-end toy feel. If you’re feeling adventurous, try making one in a bright, neon color or even a variegated yarn for a galaxy spider vibe. I usually keep one of these on my desk while I work; there’s something oddly calming about their big, silent stare. I can’t wait to see the different personalities you all give your spiders through your eye placement choices!
If you're looking for a project that's more "cute" than "creepy crawly," this little spider is exactly what you need. It's designed to be low-sew, which means you'll be crocheting the legs directly into the head as you go. You'll love how the plush yarn makes it extra squishy and how the fuzzy fangs add that perfect touch of character. It's the kind of project that brings a smile to your face as each little leg is added.
Make 8 legs. Stuff them lightly as you work through the rounds.
Work 4 sc into a mc (4)
Work 1 sc, then work 3 inc in a row (7)
Work 1 sc into every stitch around (7)
Work 1 sc into every stitch around (7)
Work 1 sc into every stitch around (7)
Work 1 sc into every stitch around (7)
Work 1 sc into every stitch around (7)
Begin stuffing the leg more firmly now and continue as you go.
Work 2 sc, 1 inc, 2 sc, then 1 dec (7)
Work 2 sc, 1 inc, 2 sc, then 1 dec (7)
Work 2 sc, 1 inc, 2 sc, then 1 dec (7)
Work 1 sc into every stitch around (7)
Work 2 sc, then leave the remaining 5 sts unworked (2)
Finish with a sl st and fasten off. If you prefer floppy, poseable legs, you can choose to close the top with 3 sc instead of leaving it open.
Make 2 using your fuzzy accent yarn. Ensure you leave long yarn tails at both ends for tying.
ch 5, then work 4 sc starting from the second ch from the hook (4)
The head is worked in continuous rounds starting from the top and moving downward.
Work 9 sc into a mc (9)
Work 9 inc around (18)
Repeat (2 sc, 1 inc) 6 times (24)
Repeat (3 sc, 1 inc) 6 times (30)
Repeat (4 sc, 1 inc) 6 times (36)
Repeat (5 sc, 1 inc) 6 times (42)
Work 1 sc into every stitch around (42)
Work 1 sc into every stitch around (42)
Join the first four legs by crocheting through both the leg and the head for 3 sc each, work 7 sc across the front, then join the remaining four legs for 3 sc each, finishing with 11 sc (42)
Work 1 sc into every stitch around (42)
Pause here to secure the leg tails with knots and install the safety eyes. See the assembly section for specific placement details.
Repeat (5 sc, 1 dec) 6 times (36)
Attach the fuzzy fangs onto Round 8 now. Refer to the assembly instructions for the correct positioning.
Repeat (4 sc, 1 dec) 6 times (30)
Repeat (3 sc, 1 dec) 6 times (24)
Repeat (2 sc, 1 dec) 6 times (18)
Stuff the head firmly with polyfil.
Work 9 dec around (9)
sl st, fasten off, and sew the remaining hole closed.
Work 6 sc into a mc (6)
Work 6 inc around (12)
Work 1 sc into every stitch around (12)
Repeat (1 sc, 1 inc) 6 times (18)
Repeat (2 sc, 1 inc) 6 times (24)
Work 1 sc into every stitch around (24)
Repeat (3 sc, 1 inc) 6 times (30)
Repeat (4 sc, 1 inc) 6 times (36)
Repeat (5 sc, 1 inc) 6 times (42)
Work 1 sc into every stitch around (42)
Work 1 sc into every stitch around (42)
Work 1 sc into every stitch around (42)
Work 1 sc into every stitch around (42)
Repeat (5 sc, 1 dec) 6 times (36)
Work 1 sc into every stitch around (36)
Repeat (4 sc, 1 dec) 6 times (30)
Work 1 sc into every stitch around (30)
Repeat (3 sc, 1 dec) 6 times (24)
sl st and fasten off, making sure to leave a long tail for sewing. Stuff the body firmly.
You've done it! Your very own plush jumping spider is ready to find a new home on your shelf or with a friend. I hope you enjoyed the low-sew process and that those fuzzy fangs turned out exactly as you hoped. There's something so rewarding about seeing a pile of yarn turn into such a charismatic little creature. Don't forget to give him a little pat on the head—he's earned it! Happy crafting! 🧶🕷️✨
Instead of leaving the leg tops open, you can crochet them closed with 3 sc before joining them to the head; this makes them floppier and easier to position for photos.
No worries! You can use a scrap of white or cream velvet yarn, or even brush out some regular acrylic yarn with a pet brush to get that fuzzy, hairy look.
Make sure you sew the body high enough on the back of the head. It should sit right up against the legs to provide better balance and prevent the head from tipping.
Absolutely, but try to keep the ratio similar—one large pair and one smaller pair—to maintain that signature jumping spider appearance that everyone loves.
