🧶 Beautiful ✨ Detailed 💝 Adorable

Twinkling Snowflakes Amigurumi Pattern

Twinkling Snowflakes Amigurumi Pattern
4.2★Rating
3-5 HoursTime Needed
1.1KMade This
✂️

Intermediate Level

Ideal for those with basic crocheting experience, featuring slightly more advanced stitches and techniques to expand your skills.

⏱️

Quick Craft

Fits nicely into a free afternoon — 2 to 5 hours of focused, enjoyable crocheting.

🎄

Holiday Cheer

Festive fun for the season, bringing handmade magic to celebrations and creating new family traditions.

About This Twinkling Snowflakes Amigurumi Pattern

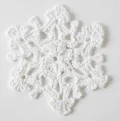
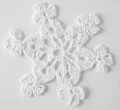
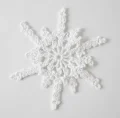
Twinkling Snowflakes Amigurumi Pattern crochet pattern - detailed view

These delicate designs make the perfect heirloom-quality gift toppers or window decorations that you'll look forward to bringing out year after year as part of your festive tradition.

Why You'll Love This Twinkling Snowflakes Amigurumi Pattern

I honestly love how meditative these are once you get the rhythm of the clusters down. There’s something so satisfying about working with that tiny bit of sparkle in the yarn—it really makes the lace pop! Plus, finishing a whole set gives you such a sense of accomplishment for your holiday decorating.

Twinkling Snowflakes Amigurumi Pattern step 1 Twinkling Snowflakes Amigurumi Pattern step 2 Twinkling Snowflakes Amigurumi Pattern step 3 Twinkling Snowflakes Amigurumi Pattern step 4

Switch Things Up

I’ve always felt that snowflakes are the ultimate test of a crocheter’s patience and precision, but the payoff is so incredibly worth it. There’s a specific kind of joy that comes from seeing a crumpled, lacey mess transform into a crisp, geometric masterpiece after a bit of starch and steam. I remember one year I stayed up late making a dozen of these while a real blizzard swirled outside—it felt like I was bringing the magic indoors without the cold!

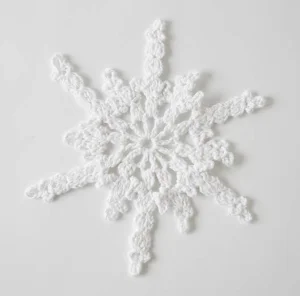
For these specific patterns, my biggest piece of advice is to not fear the starch. I know some folks prefer a natural look, but for these intricate points to really sing, they need that extra support. If you're using the sparkle yarn suggested, the way the light catches the metallic thread through the stiffened lace is just breathtaking. Try hanging them at different heights in a window to catch the morning sun. You can even add a tiny bead to the center of Snowflake 3 for an extra bit of festive flair. Happy hooking, friends!

Common Mistakes & How to Fix Them

✗ It's very easy to miss the turn instruction in Snowflake 2 Round 3, which will result in your top clusters facing the wrong direction.✗ In Snowflake 1 Round 4, ensure you skip exactly 9 single crochet stitches as instructed, or the side points will end up bunched together.✗ When working the down steps in Snowflake 3, failing to slip stitch into the actual base of the cluster can leave gaps in your lace work.✗ Using too large of a hook can make the sparkle yarn look sloppy; stick to the 3.75mm size to keep the intricate stitches crisp and defined.

Twinkling Snowflakes Amigurumi Pattern

Bring the quiet beauty of a winter snowfall into your home with these three distinct snowflake designs. Each one offers a different level of detail, from bold and graphic to delicate and lacy, so you can create a varied collection that looks stunning on a tree or strung into a festive garland. You'll love working with the shimmering yarn to bring these icy treasures to life, and the rhythmic stitches make for a truly relaxing afternoon of crafting. Get your hook ready and let's make some winter magic together!

Intermediate 3-5 Hours

Materials Needed for Twinkling Snowflakes Amigurumi Pattern

— Main Fabric

  • 01
    1 ball of Bernat Handicrafter Holidays in White Sparkle (approx 80g / 138yds)
  • 02
    One ball is enough to create approximately four snowflakes in total

— Tools Required

  • 01
    Size U.S. F/5 (3.75 mm) crochet hook
  • 02
    Sturdy rust-proof pins for blocking
  • 03
    Spray starch to help the points hold their shape
  • 04
    Steam iron for professional finishing
  • 05
    Yarn needle for weaving in ends
  • 06
    Sharp scissors

Progress Tracker

0% Complete

— 1. Snowflake 1 :

Ring :

Create a foundation by making 6 ch, then sl st into the first ch to form your center ring.

Round 1 :

*ch 4. [yoh twice and pull up a loop in the ring. (yoh and pull through 2 loops) twice] repeat the bracketed steps twice. yoh and pull through all remaining loops on your hook to finish the tr-cluster. ch 4. sl st into the ring. repeat from * 5 more times. Fasten off.

Round 2 :

ch 3. Join your yarn with a sl st to the top of that first tr-cluster. (ch 9. sl st into the same spot as your last sl st. ch 3. sl st into the top of the next tr-cluster) repeat this 5 times. ch 9. sl st in the same spot. Finish by making a sl st into the first ch.

Round 3 :

ch 1. *Work 1 sc into each of the next 3 ch. In the following ch-9 loop, work [3 sc, ch 3, 3 sc, ch 3, 3 sc, ch 3, 3 sc]. repeat from * 5 more times. sl st into the first sc to join and fasten off.

Round 4 :

Join your yarn with a sl st into the first ch-3 sp. ch 1. Work 2 sc in that same sp. *Work 1 sc into each of the next 3 sc. In the next ch-3 sp, work (1 sc, ch 3, 1 dc, ch 3, sl st, ch 4, 2 tr, ch 4, sl st, ch 3, 1 dc, ch 3, 1 sc). Work 1 sc into each of the next 3 sc. Work 2 sc into the next ch-3 sp. ch 4. In the 2nd ch from your hook, work (1 hdc, ch 2, sl st). ch 2. Skip the next 9 sc. Work 2 sc into the next ch-3 sp. repeat from * 5 more times. Fasten off.

— 2. Snowflake 2 :

Ring :

Start with 7 ch and sl st into the first ch to close the ring.

Round 1 :

ch 1. (Work 3 sc, then ch 9) repeat this 6 times inside the ring. sl st into the first sc to join and fasten off.

Round 2 :

Join your yarn with a sl st in any ch-9 loop. ch 3. In that same loop, work (2 dc, ch 3, 3 dc). [ch 1. In the next ch-9 loop, work (3 dc, ch 3, 3 dc)] repeat this 5 times. ch 1. sl st into the top of your starting ch-3.

Round 3 :

sl st back into the previous ch-1 sp. ch 1. Work 1 sc in that same sp. *ch 1. Work 6 dc in the next ch-3 sp. ch 6. sl st into the first ch of that ch-6. Turn your work. (ch 4, 2 tr, ch 4, sl st) repeat 3 times into the ch-6 loop you just made to create the top cluster. Turn your work back to the front. Work 6 dc into the same ch-3 sp where you made the first 6 dc. ch 1. Work 1 sc in the next ch-1 sp. repeat from * 5 more times. Fasten off.

— 3. Snowflake 3 :

Ring :

Make 6 ch and sl st into the first ch to form the ring.

Round 1 :

ch 6 (this counts as your first dc and a ch-3 sp). (Work 1 dc, then ch 3) repeat 11 times into the ring. sl st into the 3rd ch of your starting ch-6. You should have 12 spaces.

Round 2 :

sl st into the first ch-3 sp. ch 3. (yoh, pull up a loop, yoh and pull through 2 loops) twice in that same sp. yoh and pull through all 3 loops to make your beg cluster. [ch 5. In the next ch-3 sp, work a 3-dc cluster] repeat 11 times. ch 5. sl st into the top of the beg cluster.

Info :

Round 3 alternates between a long decorative point and a shorter one. Keep a close eye on the working down steps to ensure your points stay symmetrical.

Round 3 :

(sl st, ch 1, 1 sc, ch 5, 1 sc) into the first ch-5 sp. * (sl st, ch 3, cluster) into the next cluster. (ch 3, then make a cluster in the top of the one you just finished) repeat twice. (ch 3, sl st, ch 6, sl st, ch 3, sl st) all into the top of the last cluster. Working back down: (ch 3, sl st into the base of the cluster) 3 times. Work (1 sc, ch 5, 1 sc) in the next ch-5 sp. (sl st, ch 3, cluster) in the next cluster. (ch 3, sl st, ch 6, sl st, ch 3, sl st) into the top of that cluster. Work ch 3, then sl st into the base of the cluster. (1 sc, ch 5, 1 sc) into the next ch-5 sp. repeat from * 4 more times, then repeat the steps from * once more. sl st into the first sc and fasten off.

— 4. Finishing :

Info :

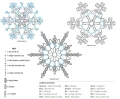
Securely weave in all your yarn tails on the back of each snowflake. Pin each snowflake to the measurements provided (7, 8.5, or 10 inches) on a blocking mat. Apply spray starch generously if you want a stiff finish, then lightly steam iron to set the shape.

Assembly Instructions

  • Carefully weave in all loose yarn ends using your tapestry needle on the wrong side of the work.
  • Place your snowflakes on a blocking mat or a clean, flat surface that can take pins.
  • Pin each point of the snowflake out to the recommended diameter, ensuring the shape is symmetrical.
  • Spray the pinned snowflakes with starch until they are damp to ensure they hold their crisp shape when dry.
  • Gently press each snowflake with a steam iron on a low setting, being careful not to melt any metallic sparkle threads.
  • Allow the snowflakes to dry completely before removing the pins and adding hanging loops.

Important Notes

  • 💡Gauge isn't strictly necessary for these flakes, but keeping your tension consistent will ensure your set looks uniform.
  • 💡The sparkle yarn can be a bit slippery, so take your time with the cluster stitches to ensure all loops are caught.
  • 💡Blocking is the most important step; without it, the snowflakes will look like crumpled lace rather than crisp stars.
  • 💡If you don't have spray starch, a mixture of white glue and water can also be used to stiffen the lace.
  • 💡Make sure to use rust-proof pins during the blocking process to avoid staining your white yarn.

Whether you're decorating a towering tree or looking for that perfect handmade touch for your holiday cards, these snowflakes bring a bit of winter wonder to every corner of your home. I hope you enjoy the rhythm of the clusters and the satisfaction of seeing each point take shape. Don't forget to take your time with the blocking—it’s where the real magic happens! I can't wait to see your shimmering creations hanging in your windows this season. Happy crocheting and stay cozy! 🧶✨❄️
You ask,

we answer.

FAQs

Can I use a different yarn weight for these snowflakes?

You certainly can! Using a thinner crochet thread will result in tiny, delicate flakes, while a thicker worsted weight yarn will make them much larger—perfect for a wall hanging or a table centerpiece.

What if I don't have a steam iron for blocking?

No worries! You can simply spray them heavily with starch or a glue-water mixture and let them air dry completely while pinned. It just takes a bit longer than steaming.

The sparkle yarn is hurting my fingers, what should I do?

Metallic threads can sometimes be a bit scratchy. Try loosening your tension slightly or using a small dab of hand lotion to help the yarn glide more smoothly over your skin.

My snowflake looks wonky after I finished the last round, is it ruined?

Not at all! Crochet lace often looks a bit messy right off the hook. Blocking is like magic for snowflakes—it will pull all those stitches into their perfect geometric positions.