🧶 Beautiful ✨ Detailed 💝 Adorable

Velvet Loaf Bunny Amigurumi Pattern

Velvet Loaf Bunny Amigurumi Pattern
4.7★Rating
3-5 HoursTime Needed
1.8KMade This
✂️

Intermediate Level

Ideal for those with basic crocheting experience, featuring slightly more advanced stitches and techniques to expand your skills.

⏱️

Quick Craft

Fits nicely into a free afternoon — 2 to 5 hours of focused, enjoyable crocheting.

🐰

Whimsical Buddy

Playful characters full of personality, designed to spark imagination and become cherished playtime favorites.

About This Velvet Loaf Bunny Amigurumi Pattern

Velvet Loaf Bunny Amigurumi Pattern crochet pattern - detailed view

A wonderful choice for a nursery decoration or a soft companion for a little one, this bunny's plush finish makes it impossible not to squeeze and it makes a fantastic last-minute gift.

Why You'll Love This Velvet Loaf Bunny Amigurumi Pattern

I personally adore how the face sculpting at the end really brings this little guy to life. It’s like magic watching a simple shape turn into a character with just a few tugs of yarn! Plus, using velvet yarn means it's incredibly soft and works up in no time.

Velvet Loaf Bunny Amigurumi Pattern step 1 Velvet Loaf Bunny Amigurumi Pattern step 2 Velvet Loaf Bunny Amigurumi Pattern step 3 Velvet Loaf Bunny Amigurumi Pattern step 4

Switch Things Up

I have a real soft spot for "loaf" animals. There’s just something about that rounded, chubby shape that makes any creature ten times cuter. When I first sat down to make this bunny, I was worried that working with velvet yarn might be a headache, but it actually works up so fast! The trick I’ve found is to feel for the stitches with your fingers rather than just relying on your eyes.

If you want to give your bunny a bit more personality, try using a slightly different shade for the inside of the ears or even adding a tiny ribbon around the neck. I once made a trio of these in soft greys and creams for a friend’s nursery, and they looked absolutely darling nestled together. Don’t be intimidated by the face sculpting at the end—it’s the "secret sauce" that turns a simple crochet ball into a face with real expression. Just take it slow, pull evenly, and you’ll be amazed at the transformation! It really makes the eyes pop and gives the bunny that soulful look we all love in handmade toys.

Common Mistakes & How to Fix Them

✗ When working with chenille yarn, it's very easy to lose your stitch count because the fuzz hides the stitch definition—always use a marker for the first stitch of every round.✗ The face sculpting step requires a bit of tension; if you pull too hard, you might snap the yarn, so use a slow, steady tug until the cheeks look just right.✗ If you sew the paws too close together in the center, the bunny might wobble—spread them out toward the sides to create a stable base for the body.✗ Don't overstuff the ears before sewing the bottom edge; they are meant to be relatively flat so they can flop naturally against the head.

Velvet Loaf Bunny Amigurumi Pattern

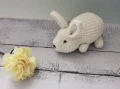
There is something so satisfying about working with chunky velvet yarn, and this little bunny is the perfect way to use it. You'll love how quickly this "loaf" style rabbit comes together! It's designed to be a sturdy, huggable friend that sits perfectly on a shelf or tucked into a gift basket. I've made sure the steps are easy to follow so you can focus on that lovely soft texture without any stress.

Intermediate 3-5 Hours

Materials Needed for Velvet Loaf Bunny Amigurumi Pattern

— Main Fabric

  • 01
    Approximately half a skein of super bulky chenille yarn (like Himalaya Dolphin Baby) in an off-white or cream shade
  • 02
    A small scrap of black yarn or embroidery thread if you prefer to stitch the nose instead of using plastic

— Tools Required

  • 01
    4mm crochet hook
  • 02
    6mm safety eyes
  • 03
    Small safety nose (optional alternative to embroidery)
  • 04
    Stitch marker to track your rounds
  • 05
    Large-eye tapestry needle for assembly
  • 06
    Fiberfill stuffing
  • 07
    Lighter to carefully singe the ends of the velvet yarn to prevent fraying

Progress Tracker

0% Complete

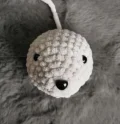
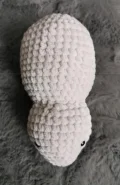
— 1. Head and Body :

Round 1 :

Create a mr and work 6 sc into it (6)

Round 2 :

Work 2 sc into every st around (12)

Round 3 :

Repeat the sequence of 3 sc followed by an inc 3 times (15)

Round 4 :

Repeat the sequence of 4 sc followed by an inc 3 times (18)

Round 5 :

Repeat the sequence of 2 sc followed by an inc 6 times (24)

Round 6 :

Repeat the sequence of 3 sc followed by an inc 6 times (30)

Round 7 :

Work 1 sc into every st around (30)

Round 8 :

Work 1 sc into every st around (30)

Round 9 :

Work 1 sc into every st around (30)

Round 10 :

Work 1 sc into every st around (30)

Round 11 :

Repeat the sequence of 3 sc followed by a dec 6 times (24)

Round 12 :

Repeat the sequence of 2 sc followed by a dec 6 times (18)

Info :

Insert the safety eyes between Round 6 and Round 7, leaving a space of 9 sc between them.

Round 13 :

Repeat the sequence of 2 sc followed by an inc 6 times, beginning to add stuffing as you go (24)

Round 14 :

Repeat the sequence of 3 sc followed by an inc 6 times (30)

Round 15 :

Repeat the sequence of 4 sc followed by an inc 6 times (36)

Round 16 :

Work 1 sc into every st around (36)

Round 17 :

Work 1 sc into every st around (36)

Round 18 :

Work 1 sc into every st around (36)

Round 19 :

Work 1 sc into every st around (36)

Round 20 :

Work 1 sc into every st around (36)

Round 21 :

Work 1 sc into every st around (36)

Round 22 :

Work 1 sc into every st around (36)

Round 23 :

Work 1 sc into every st around (36)

Round 24 :

Work 1 sc into every st around (36)

Round 25 :

Work 1 sc into every st around (36)

Round 26 :

Repeat the sequence of 4 sc followed by a dec 6 times (30)

Round 27 :

Repeat the sequence of 3 sc followed by a dec 6 times (24)

Round 28 :

Repeat the sequence of 2 sc followed by a dec 6 times (18)

Round 29 :

Repeat the sequence of 1 sc followed by a dec 6 times (12)

Round 30 :

Work 6 dec (6)

Info :

Fasten off leaving a 30cm tail. Use a needle to weave the tail through the front loops of the final 6 stitches and pull tight to close.

— 2. Ears (Make 2) :

Row 1 :

Create a foundation ch of 10

Row 2 :

Starting in the 2nd ch from the hook, work 8 hdc, then 3 hdc into the final ch. Turn to work along the opposite side of the ch and work 8 hdc (19)

Row 3 :

ch 1 to turn, then work 1 sc into each of the 19 st (19)

Info :

Sew the shorter bottom edges together and leave a long tail for attaching to the head.

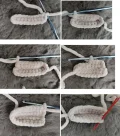
— 3. Paws (Make 4) :

Round 1 :

Create a mr and work 6 sc into it (6)

Round 2 :

Repeat the sequence of 2 sc followed by an inc twice (8)

Round 3 :

Work 1 sc into every st around (8)

Round 4 :

Work 1 sc into every st around (8)

Round 5 :

Work 1 sc into every st around (8)

Round 6 :

Work 1 sc into every st around (8)

Info :

Stuff the paw lightly, fold the top opening flat, and work 3 sc through both layers to close. Leave a tail for sewing.

— 4. Tail :

Round 1 :

Create a mr and work 6 sc into it (6)

Round 2 :

Repeat the sequence of 1 sc followed by an inc 3 times (9)

Round 3 :

Work 1 sc into every st around (9)

Round 4 :

Repeat the sequence of 1 sc followed by a dec 3 times, then add a small amount of stuffing (6)

— 5. Nose Piece (Optional) :

Round 1 :

Create a mr and work 2 sc into it, then fasten off leaving a tail for sewing (2)

Assembly Instructions

  • Secure the ears to the top of the head about 2 rounds above the level of the eyes, ensuring they are centered.
  • Attach the nose piece (or safety nose) right at the center point where the head joins the body to create a cute muzzle.
  • Sew the tail to the center of the back end of the torso.
  • Position the four paws on the bottom of the body, placing two at the front and two at the back to provide a stable base for the bunny to sit.
  • Perform face sculpting by threading body-colored yarn under the eyes and pulling gently to create indented eye sockets.
  • Tie off any sculpting threads securely and hide the ends deep inside the stuffing of the head.
  • Check all attachments for sturdiness and give your bunny a final squish to distribute the stuffing evenly.

Important Notes

  • 💡Using a lighter to very briefly singe the cut ends of chenille yarn prevents the fluff from sliding off the thread core.
  • 💡Stitch counts are provided in parentheses at the end of each step to help you stay on track.
  • 💡When stuffing the head and body, ensure you fill the neck area firmly so the head doesn't wobble or droop.
  • 💡For the face sculpting, use a long needle to go all the way through the head from one eye to the other for the best results.
  • 💡If making this for a very small child, consider embroidering the eyes and nose rather than using plastic safety parts.

I hope you enjoy every stitch of this cuddly bunny! There is nothing quite like the feeling of finishing a plushie and realizing you've created a brand new friend from just a hook and a ball of yarn. Whether this little one is staying with you or heading off to a new home, I know it will bring plenty of smiles. Don't forget to give it a good squeeze once you're done—that velvet texture is just the best! Happy crocheting, and I can't wait to see your finished bunnies. 🧶 ✨

You ask,

we answer.

FAQs

Can I use standard worsted weight yarn for this bunny?

You certainly can, but it will turn out much smaller and less 'squishy' than the velvet version. If you switch to worsted, I recommend using a 3.25mm or 3.5mm hook.

What exactly is 'face sculpting' and is it necessary?

It's a technique where you pull a thread through the head to pull the eyes inward. It isn't strictly necessary, but it gives the bunny a much more professional, expressive look by creating cheek definition.

My chenille yarn is shedding while I sew the pieces together. How do I stop it?

Chenille is notorious for this! Try to avoid pulling the yarn through the same spot multiple times, and singe the very tip of your yarn tail with a lighter to lock the fibers to the core thread.

The bunny keeps tipping over. How can I fix the balance?

This usually happens if the paws are too close to the center line. Try unpicking them and sewing them slightly further apart toward the sides of the belly to create a wider 'tripod' for support.