About This Victor Fox & Anna Bunny Autumn Amigurumi Pattern
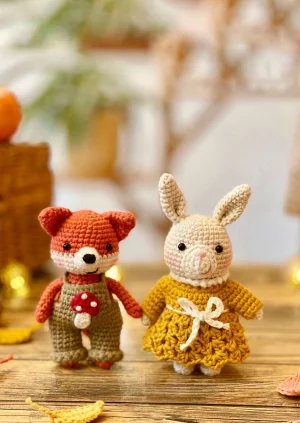
These little woodland creatures make the most precious gifts for nature lovers or a magical addition to a seasonal display shelf during the harvest months.
Ideal for those with basic crocheting experience, featuring slightly more advanced stitches and techniques to expand your skills.
Requires 8-10 hours, ideal for a full day of immersive crocheting.
An adorable friend to cherish, handcrafted with love to bring comfort and joy for years to come.
These little woodland creatures make the most precious gifts for nature lovers or a magical addition to a seasonal display shelf during the harvest months.
I honestly can't get over how much personality these two have! What I love most is the mix-and-match aspect of the outfits—it feels like playing with dolls again, but with yarn. Plus, the little mushrooms and pumpkins are just the cutest things to have scattered around your craft room.
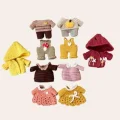
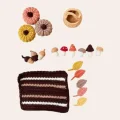
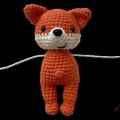
There is something so incredibly nostalgic about autumn, isn't there? The crisp air and the changing leaves always make me want to retreat to my favorite chair with a basket of yarn. When I first saw Victor and Anna, I knew they needed a whole world of their own. I spent hours picking out just the right shades of mustard and terracotta to capture that perfect forest floor feeling.
My biggest tip while you're working through this collection is to take your time with the embroidery. It's those tiny little hearts on the overalls and the delicate smiles that really give these characters their soul. I remember struggling with the mushroom caps at first, but once I realized I could use up all my tiny scrap ends for the different colors, it became my favorite part of the project!
One thing that really surprised me while designing these was the difference the X stitch makes. I used to be a strictly V stitch girl, but seeing how much cleaner the color changes look on Victor's snout when you yarn under... well, let's just say I'm a convert! It gives the fabric this gorgeous, dense texture that holds the stuffing perfectly without any gaps. But when it came to the clothes, I went back to the classic V stitch because those tiny sweaters need a bit of stretch to get over the bunny ears. It's those little technical shifts that keep our craft so interesting, don't you think? It’s like learning a secret language with your hook. I can't wait to see how your little forest family turns out!
Get ready to cozy up with the sweetest little forest friends you've ever seen! Victor and Anna are all dressed up for fall, and I've put together every detail you need to make their entire autumn world. From tiny raincoats to a basket full of mushrooms, this project is like a warm hug for your crochet hook. You'll love how these two come to life in your hands as you stitch up their tiny wardrobes.
Using fox orange yarn, 6 x sc into a magic ring (6)
6 x inc (12)
(1 x sc, inc) x 6 (18)
(2 x sc, inc) x 6 (24)
(3 x sc, inc) x 6 (30)
sc in each stitch around (30)
sc in each stitch around (30)
(4 x sc, inc) x 6 (36)
sc in each stitch around (36)
sc in each stitch around (36)
sc in each stitch around (36)
From here, we will alternate colors for the snout. Use the yarn under technique for the final step of each color change.
In orange: (17 x sc, inc). In cream: (17 x sc, inc) (38)
In orange: 19 x sc. In cream: 19 x sc (38)
In orange: 19 x sc. In cream: 19 x sc (38)
In orange: 19 x sc. In cream: 19 x sc (38)
In orange: (2 x sc, dec) x 4, 3 x sc. In cream: (2 x sc, dec) x 4, 3 x sc (30)
Place safety eyes between Rounds 10 and 11, spaced 7 stitches apart. Stuff the head firmly.
In orange: (1 x sc, dec) x 5. In cream: (1 x sc, dec) x 5 (20)
In orange: 5 x dec. In cream: 5 x dec (10)
Fasten off with a long tail. Use a needle and cream yarn to close the remaining 10 stitches through the FLO.
Muzzle: Using cream, 6 x sc into a magic ring (6)
(2 x sc, inc) x 2 (8)
(3 x sc, inc) x 2 (10)
2 x sc, inc, 4 x sc, inc, 2 x sc (12)
Ears (Make 2): Using orange, 6 x sc into a magic ring (6)
(1 x sc, inc) x 3 (9)
sc in each stitch around (9)
(2 x sc, inc) x 3 (12)
(3 x sc, inc) x 3 (15)
sc in each stitch around (15)
Legs (Make 2): In orange, 5 x sc into a magic ring (5)
5 x inc (10)
BLO sc in each stitch around (10)
1 x sc, 4 x dec, 1 x sc (6)
FLO: 1 x sc, 4 x inc, 1 x sc (10)
sc in each stitch around (10)
sc in each stitch around (10)
sc in each stitch around (10)
sc in each stitch around (10)
Body Join: ch 2, join to first leg, 4 x sc, inc, 5 x sc, 2 x inc along ch, 5 x sc, inc, 4 x sc on second leg (28)
sc in each stitch around (28)
sc in each stitch around (28)
sc in each stitch around (28)
sc in each stitch around (28)
15 x sc, 3dc-bobble stitch, 12 x sc (28)
sc in each stitch around (28)
sc in each stitch around (28)
(5 x sc, dec) x 4 (24)
sc in each stitch around (24)
(4 x sc, dec) x 4 (20)
sc in each stitch around (20)
(3 x sc, dec) x 4 (16)
Arms (Make 2): In orange, 6 x sc into a magic ring (6)
sc in each stitch for 9 rounds (6)
Tail: Using cream, 4 x sc into a magic ring (4)
3 x sc, inc (5)
2 x sc, inc, 1 x sc, inc (7)
3 x sc, inc, 3 x sc (8)
sc in each stitch around (8)
Switch to orange: (3 x sc, inc) x 2 (10)
sc in each stitch for 5 rounds (10)
1 x sc, dec, 2 x sc, 1 x sc, dec, 2 x sc (6)
Head: In mastic yarn, 6 x sc into magic ring (6)
6 x inc (12)
(1 x sc, inc) x 6 (18)
(2 x sc, inc) x 6 (24)
(3 x sc, inc) x 6 (30)
sc in each stitch for 2 rounds (30)
(4 x sc, inc) x 6 (36)
sc in each stitch for 3 rounds (36)
(17 x sc, inc) x 2 (38)
sc in each stitch for 3 rounds (38)
(2 x sc, dec) x 4, (3 x sc, dec) x 4, 2 x sc (30)
(1 x sc, dec) x 10 (20)
10 x dec (10)
Tail: In mastic, 6 x sc in magic ring (6)
sc in each stitch around (6)
In sand yarn, 7 x sc in magic ring (7)
7 x inc (14)
(1 x sc, inc) x 7 (21)
(2 x sc, inc) x 7 (28)
(3 x sc, inc) x 7 (35)
BLO: (4 x sc, inc) x 7 (42)
(1 x sc, 1 x spike stitch) x 21 (42)
(1 x spike stitch, 1 x sc) x 21 (42)
Repeat rounds 7 & 8 alternating (42)
(1 x sc, 1 x spike stitch) x 21 (42)
(5 x sc, dec) x 6 (36)
FLO: sl st in each stitch around (36)
ch 20, skip 17, sl st in back loop of R19, sl st in next, turn
25 x sc around the ch, sl st to finish handle
I hope you have as much fun bringing Victor and Anna to life as I did! There's something so satisfying about finishing those tiny accessories and seeing the whole autumn scene come together. Whether they're sitting on your desk or being gifted to a little one, these two are sure to spread some seasonal joy. Don't forget to share your photos—I'd love to see the color combinations you choose for their wardrobes! Happy stitching and enjoy your forest adventure! 🧶🧵✨
You might be using the yarn under method for the clothes too. Try switching to a standard yarn over single crochet for the outfits to make the fabric more relaxed and slightly larger.
Absolutely! Just keep in mind they will be much larger, and you'll need to use significantly bigger safety eyes and a larger hook to match the yarn weight.
You can insert a small piece of wire or a pipe cleaner through the body at the shoulder level before sewing the arms on, then slide the arms over the wire.
Look just behind the top V of your stitch—there's a horizontal bar there. Inserting your hook there pushes the V forward, creating that knit-look ribbing.
